
Setting up single sign-on (SSO)
Let your team sign in to Marloo with your existing identity provider: Google Workspace, Microsoft Entra ID or any SAML 2.0 provider.
Availability: SSO is available on enterprise agreements. If you don't see the Single sign-on section in Settings > Company settings, contact us at support@gomarloo.com.
Single sign-on lets your team sign in to Marloo with your existing identity provider (IdP), with no separate Marloo passwords. Marloo supports any identity provider that speaks SAML 2.0, including Google Workspace and Microsoft Entra ID.
Setting up SSO has three parts:
- Create a SAML app in your identity provider (you'll need admin access to it).
- Submit the connection in Marloo: the SAML metadata plus the email domains your team signs in with.
- Verify your domains with a DNS record. Marloo shows a TXT record for each domain. Add it to your DNS, and Marloo turns the connection on as soon as it finds the record, so it's worth having whoever manages your DNS on hand. Nothing changes for your team until this happens.
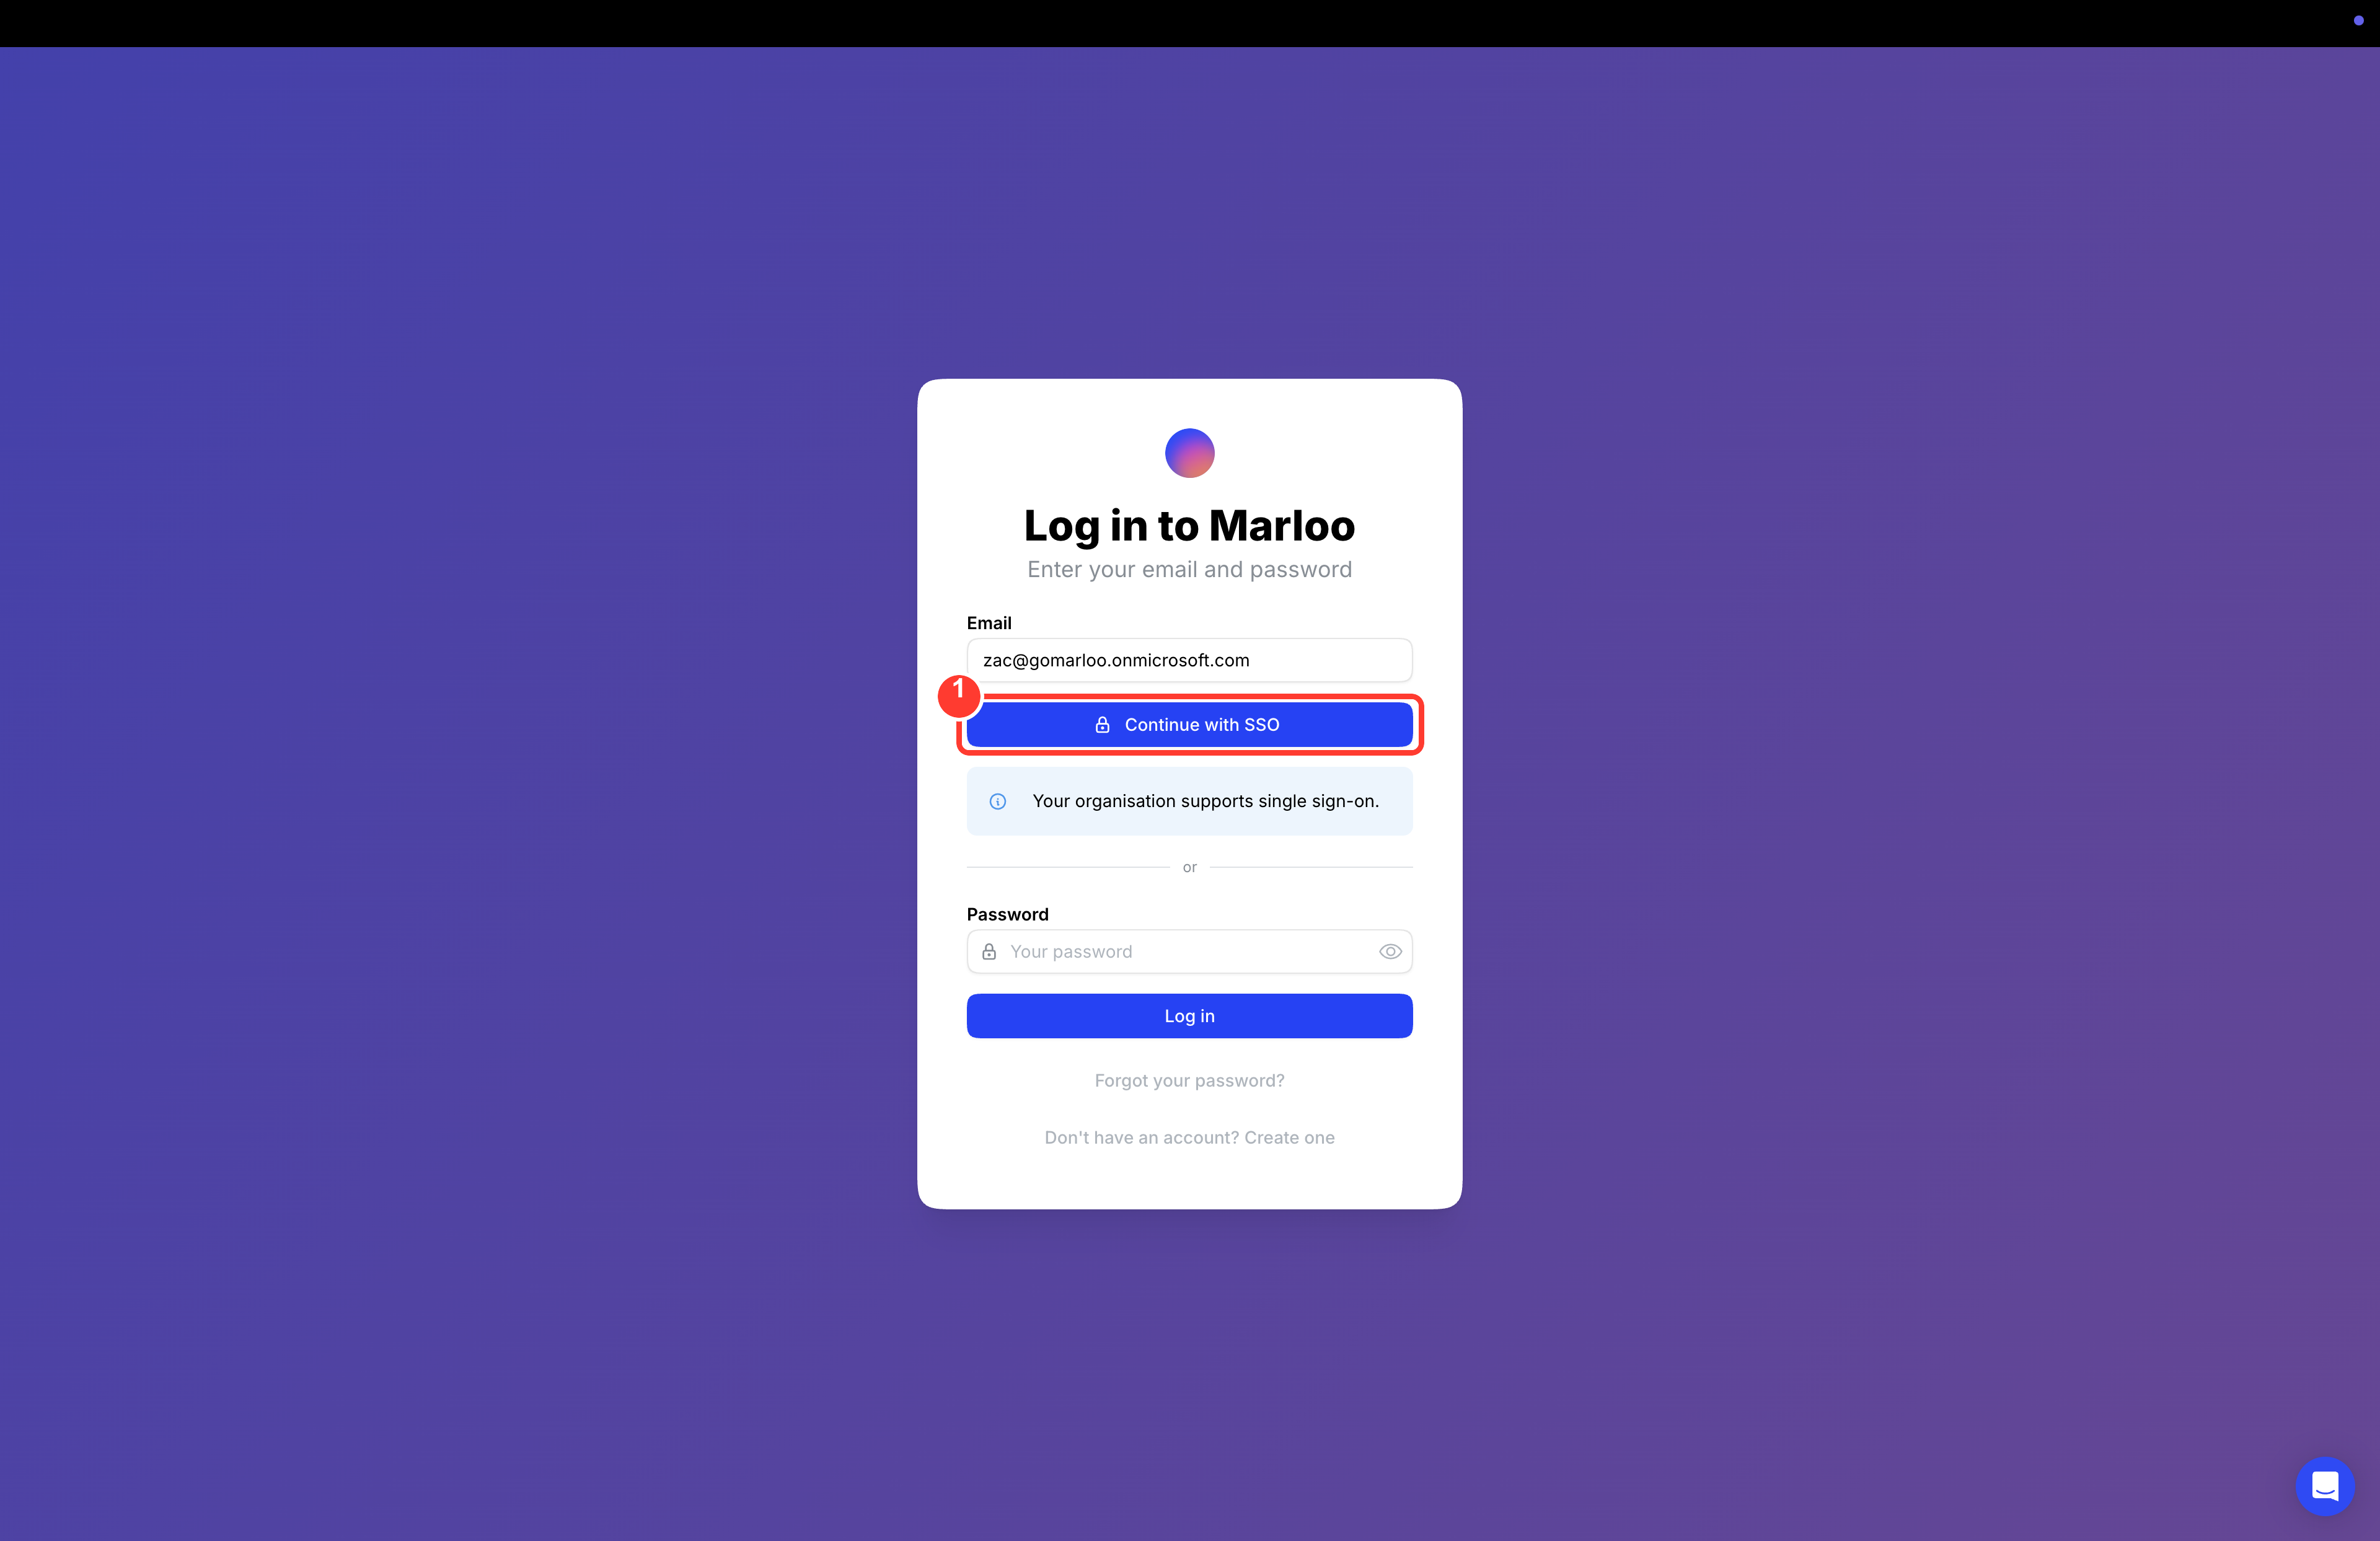
Once active, anyone signing in with an email on your domains sees a Continue with SSO button on the Marloo login page. Existing Marloo accounts are linked automatically: signing in with SSO takes each person to their existing account and data, not a new one. Password sign-in keeps working alongside SSO until you ask us to enforce SSO-only sign-in.
Part 1: create the SAML app in your identity provider
Follow the section for your provider.
Google Workspace
You'll need a Google Workspace super admin account.
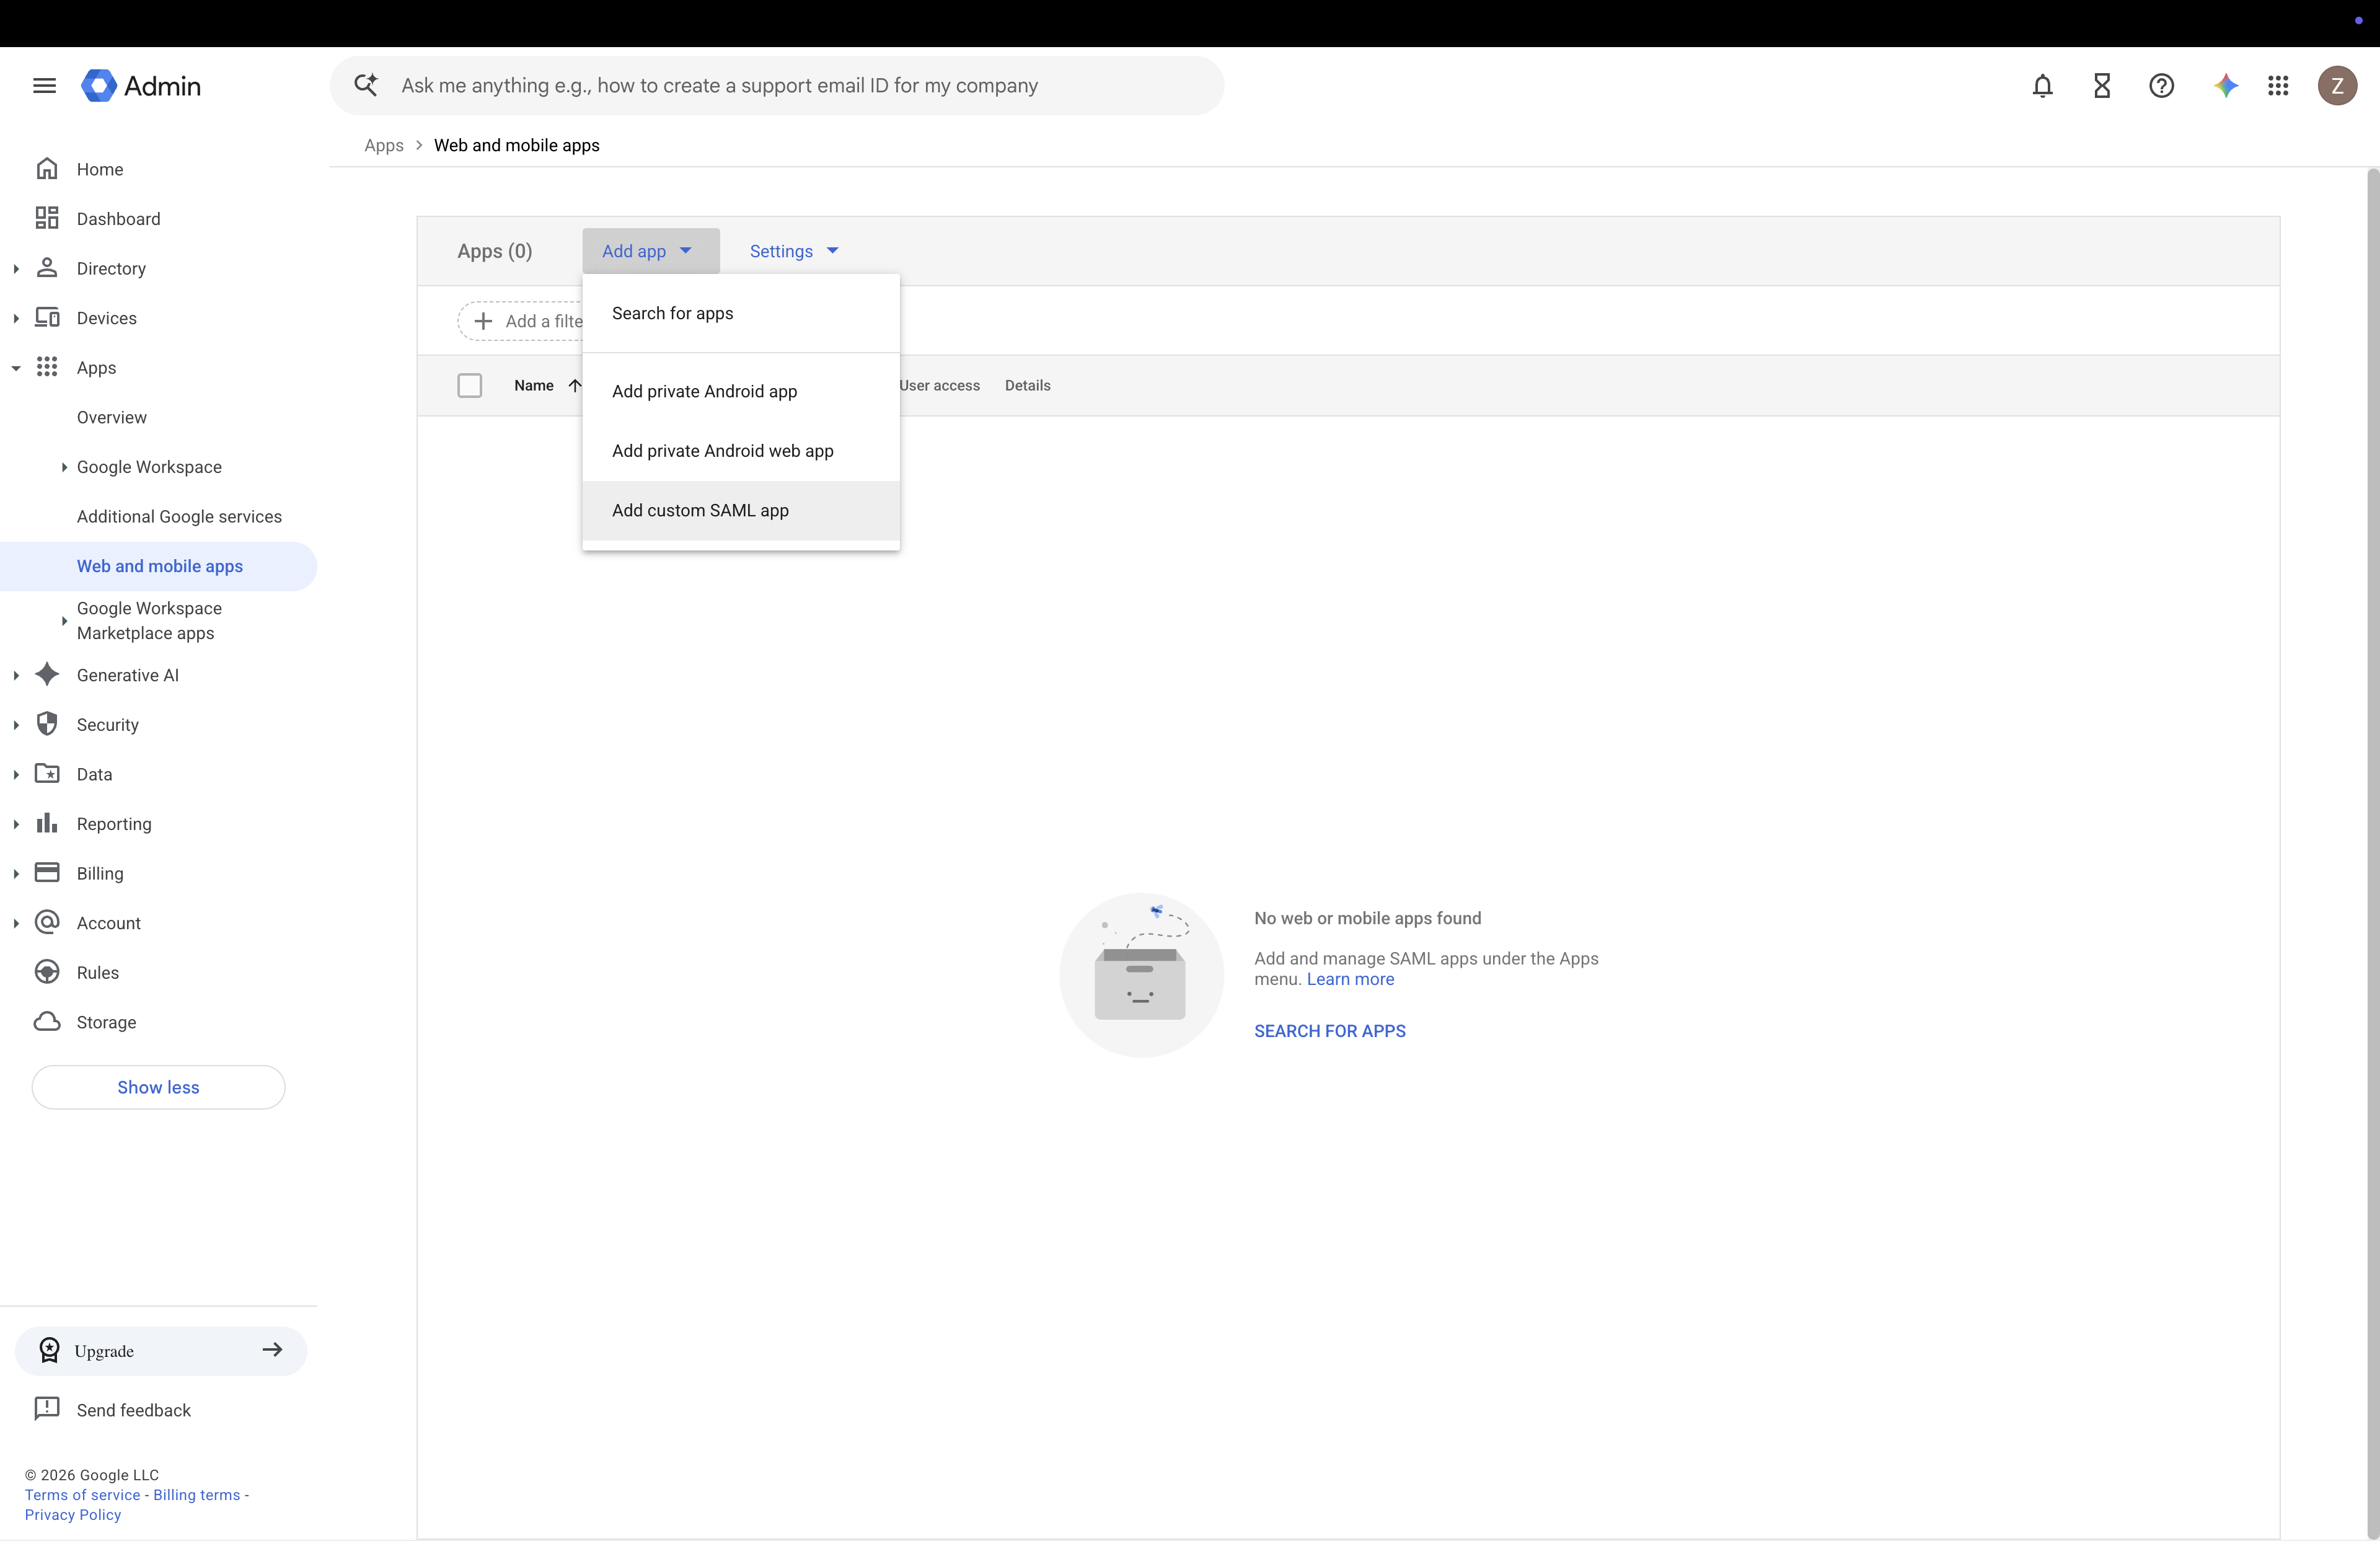
1. Create a custom SAML app. In admin.google.com, go to Apps > Web and mobile apps, then choose Add app > Add custom SAML app.
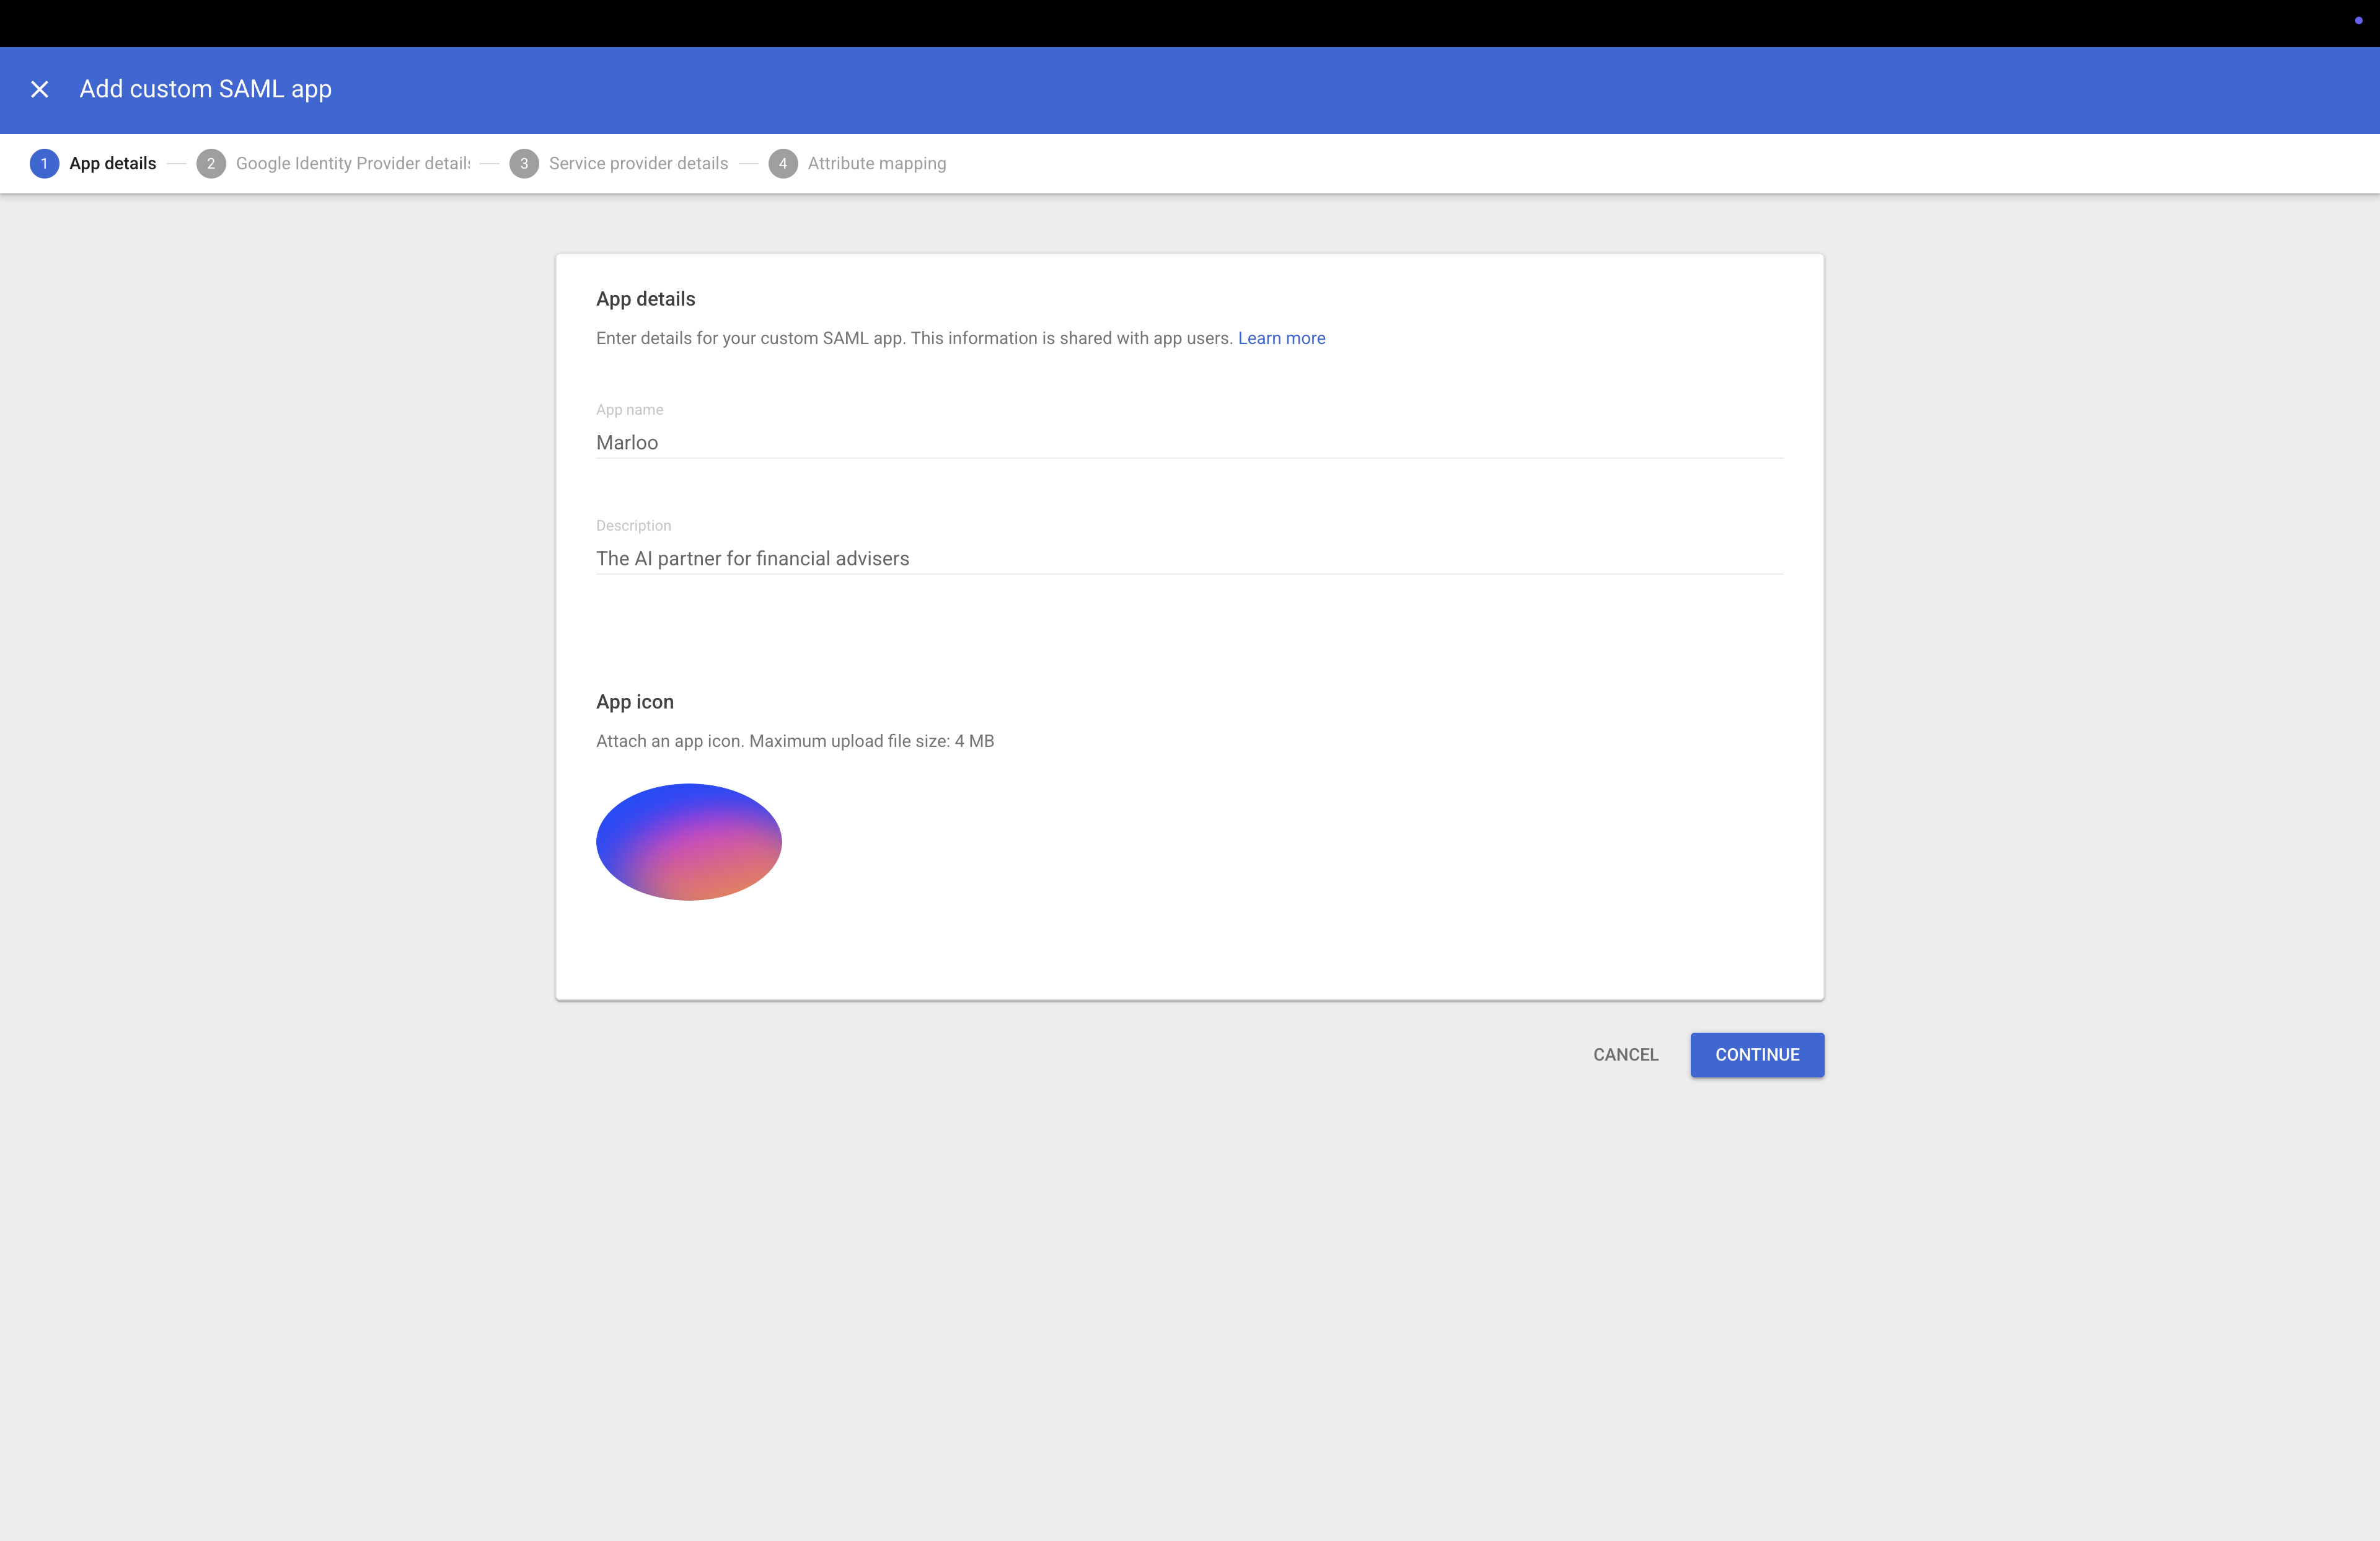
2. Name the app. Call it something your team will recognize, such as "Marloo". Optionally add the Marloo logo as the app icon. Click Continue.
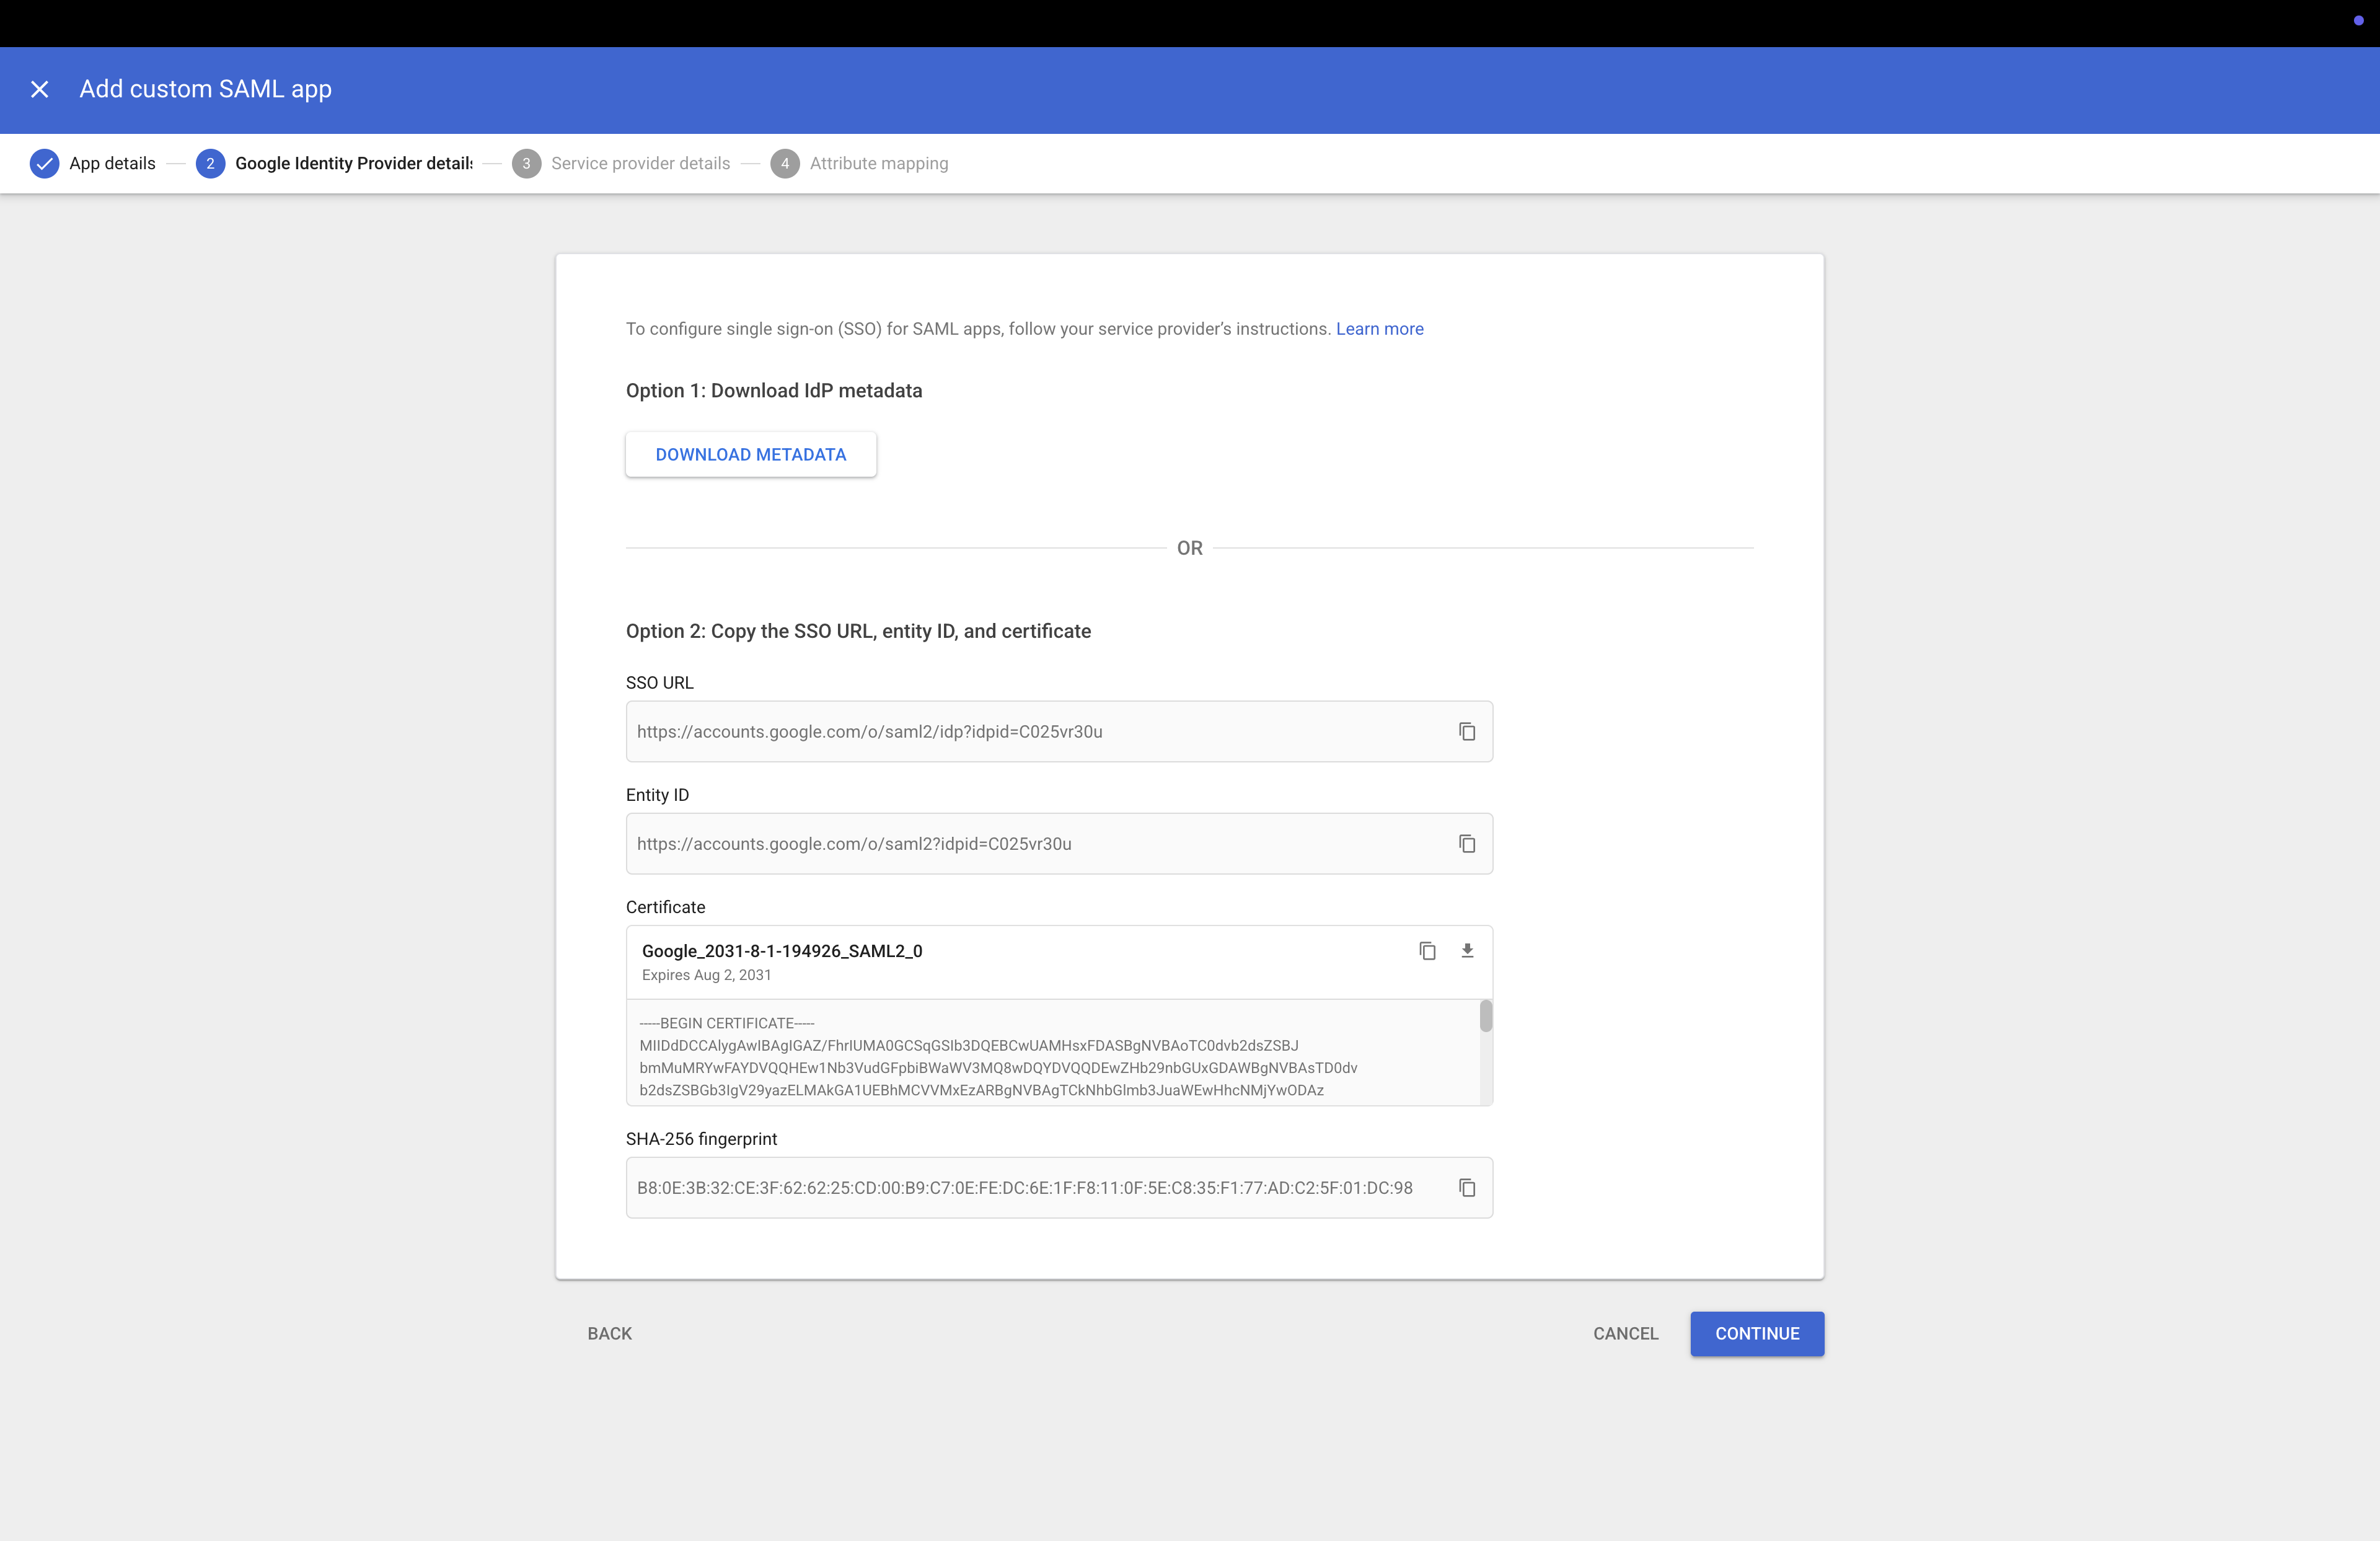
3. Download the metadata. On the Google Identity Provider details step, click Download metadata and keep the GoogleIDPMetadata.xml file. You'll upload it to Marloo in Part 2. Click Continue.
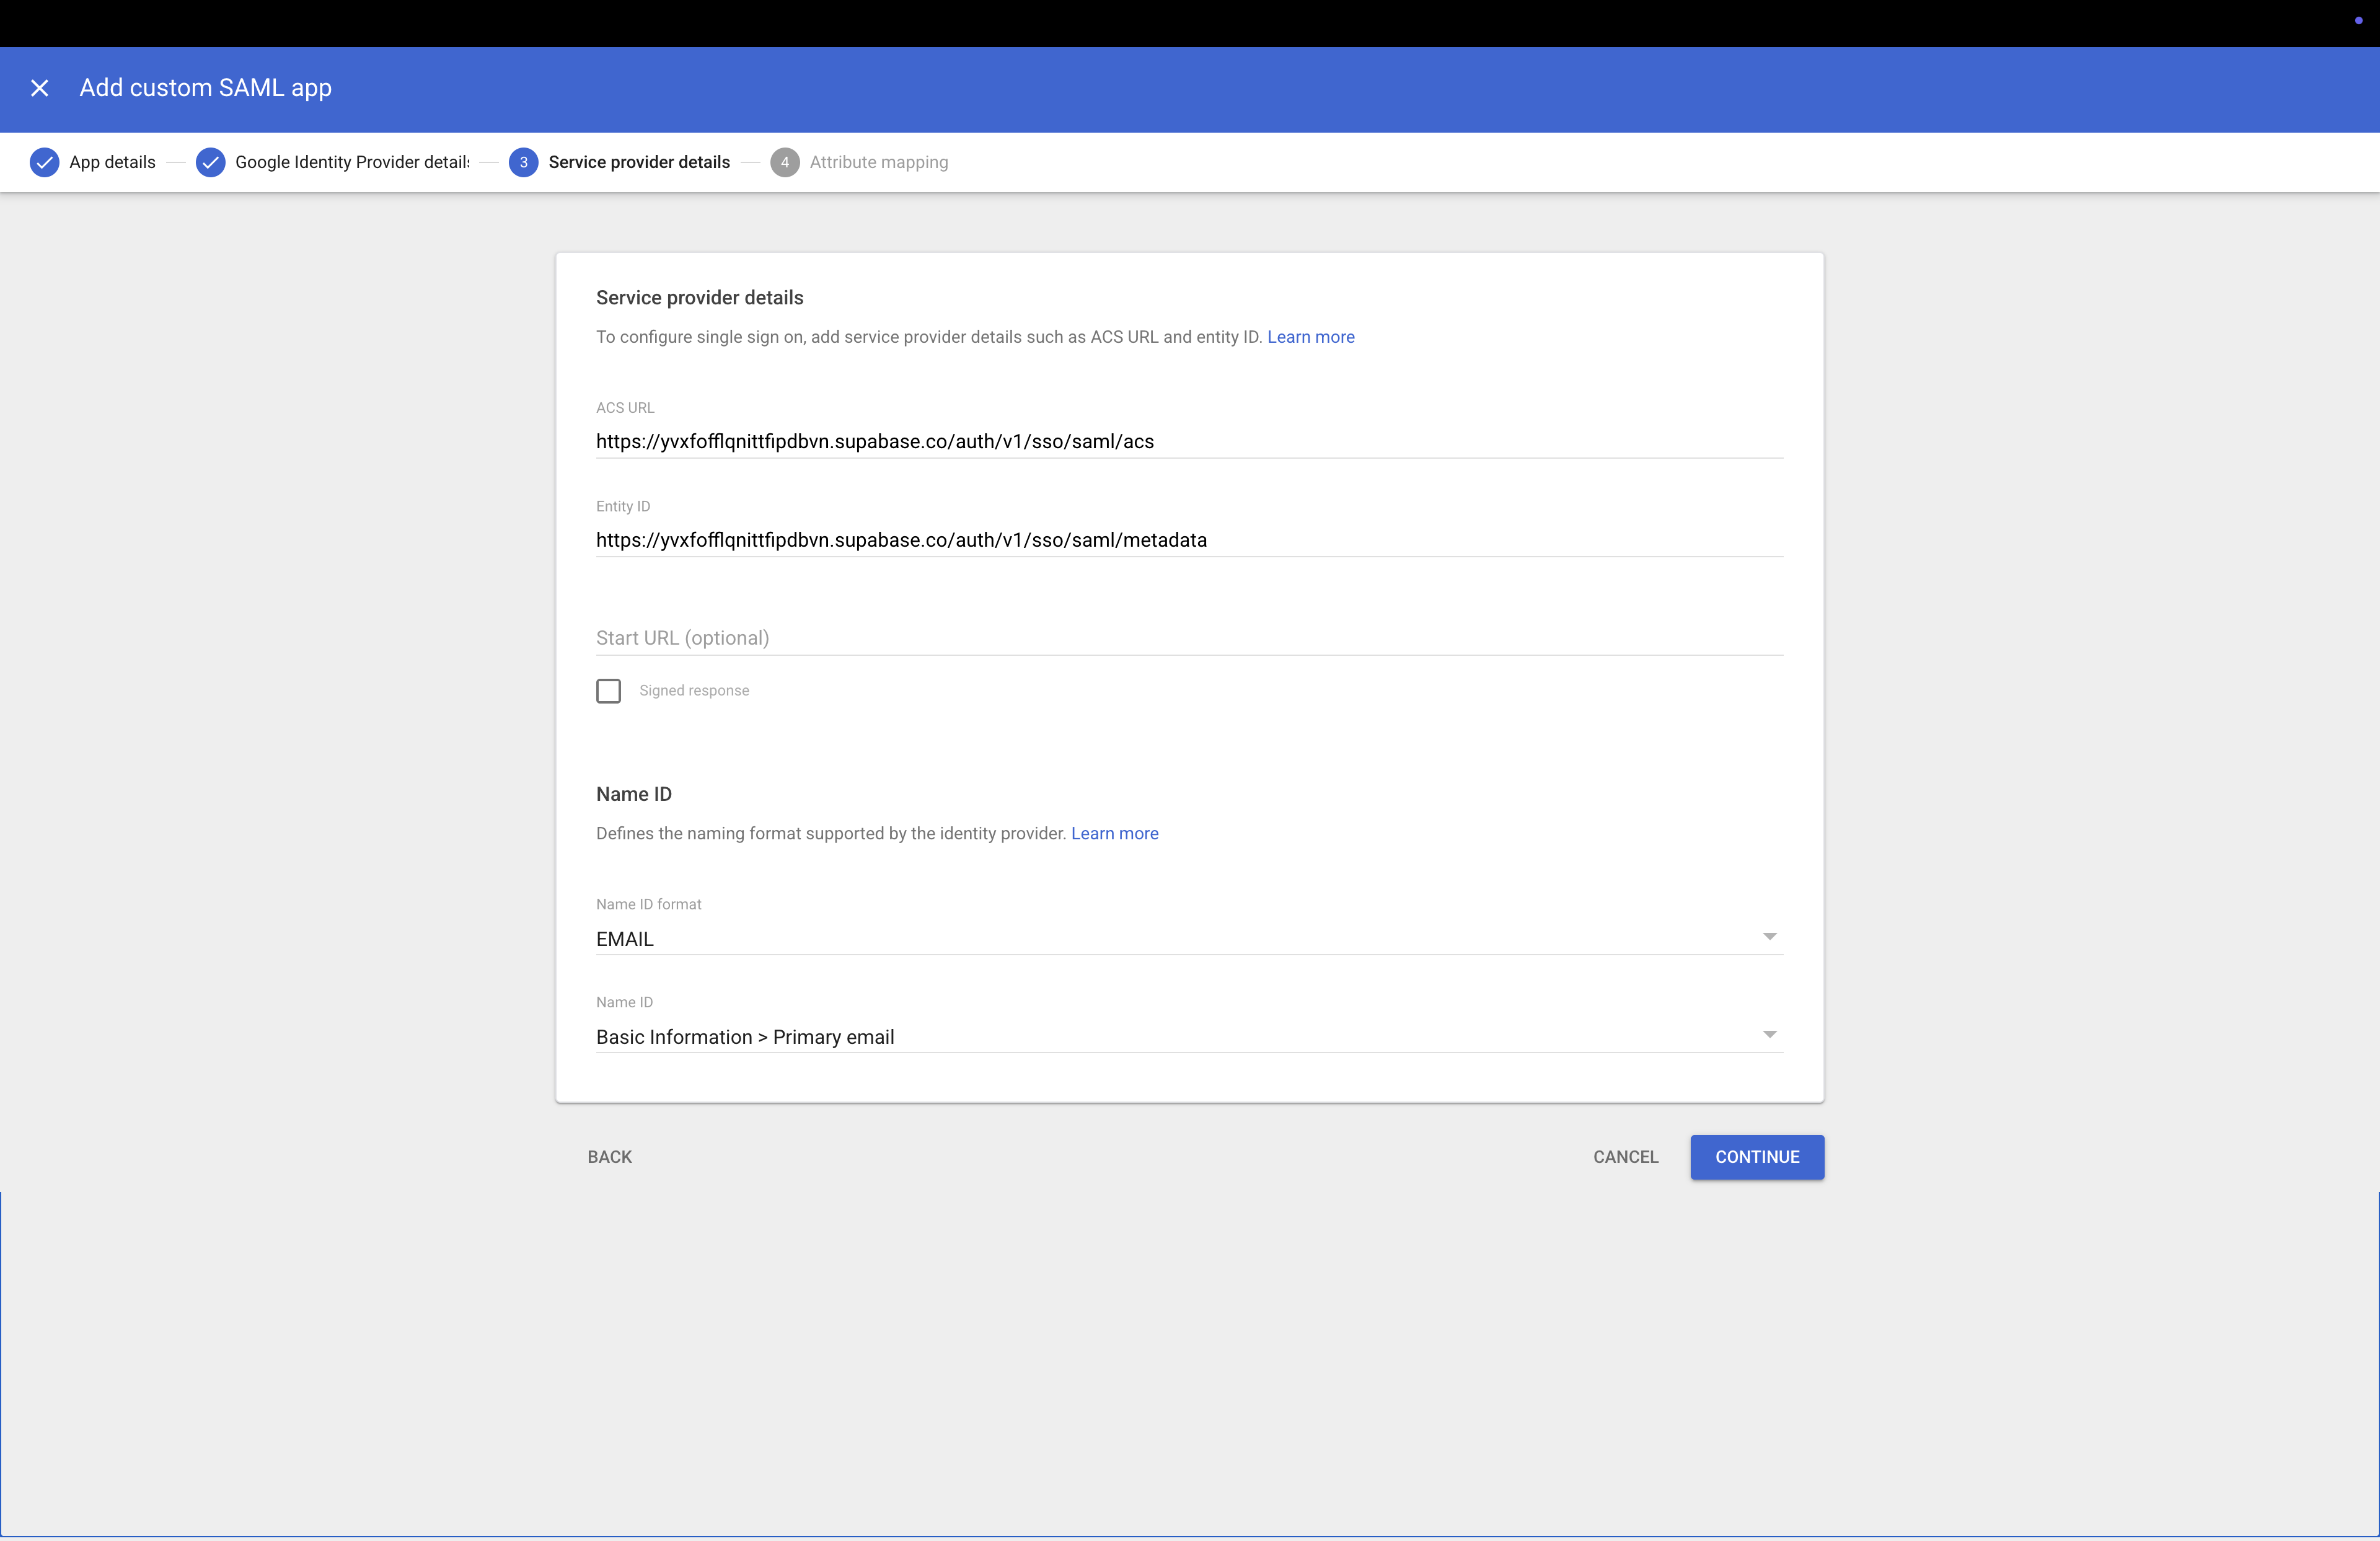
4. Enter Marloo's service provider details.
| Setting | Value |
|---|---|
| ACS URL | https://yvxfofflqnittfipdbvn.supabase.co/auth/v1/sso/saml/acs |
| Entity ID | https://yvxfofflqnittfipdbvn.supabase.co/auth/v1/sso/saml/metadata |
| Signed response | Leave unchecked |
| Name ID format | |
| Name ID | Basic Information > Primary email |
Click Continue.
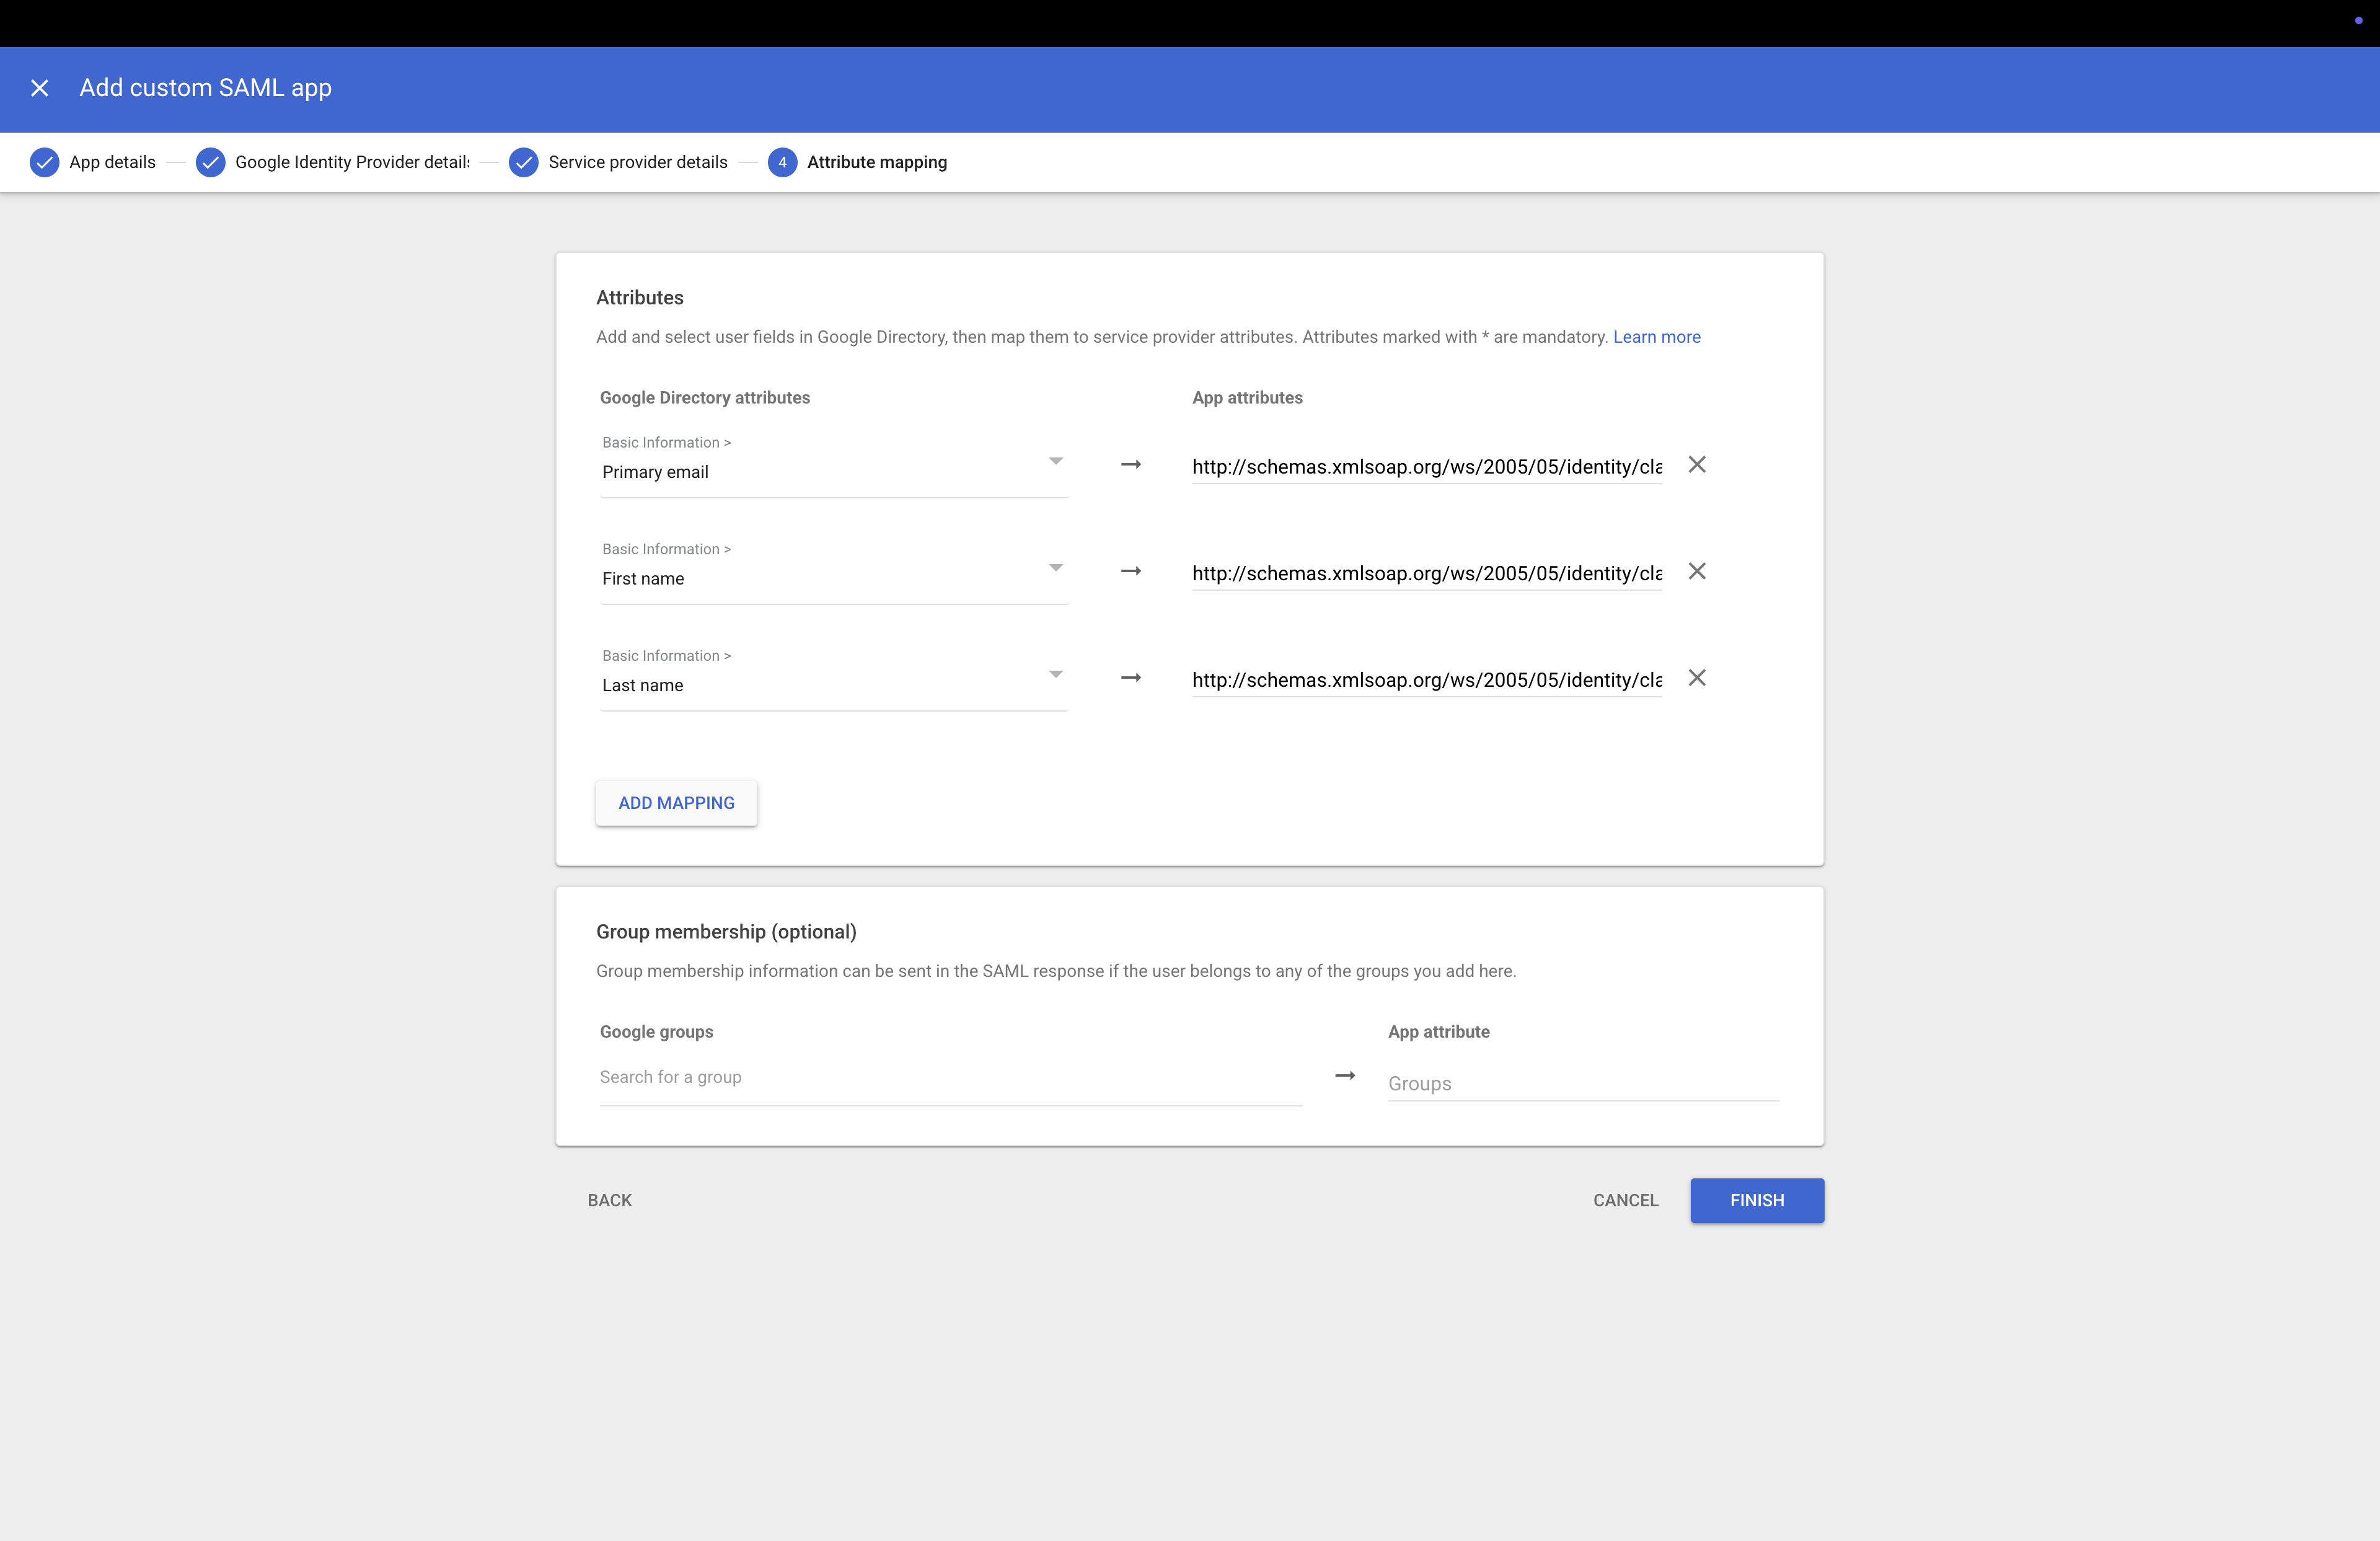
5. Map the attributes. On the Attribute mapping step (or later via Configure SAML attribute mapping on the app's page), add these three mappings. The email one is required for sign-in to work; the name ones let Marloo greet new team members by name:
| Google Directory attribute | App attribute (paste exactly) |
|---|---|
| Basic Information > Primary email | http://schemas.xmlsoap.org/ws/2005/05/identity/claims/emailaddress |
| Basic Information > First name | http://schemas.xmlsoap.org/ws/2005/05/identity/claims/givenname |
| Basic Information > Last name | http://schemas.xmlsoap.org/ws/2005/05/identity/claims/surname |
Click Finish or Save.
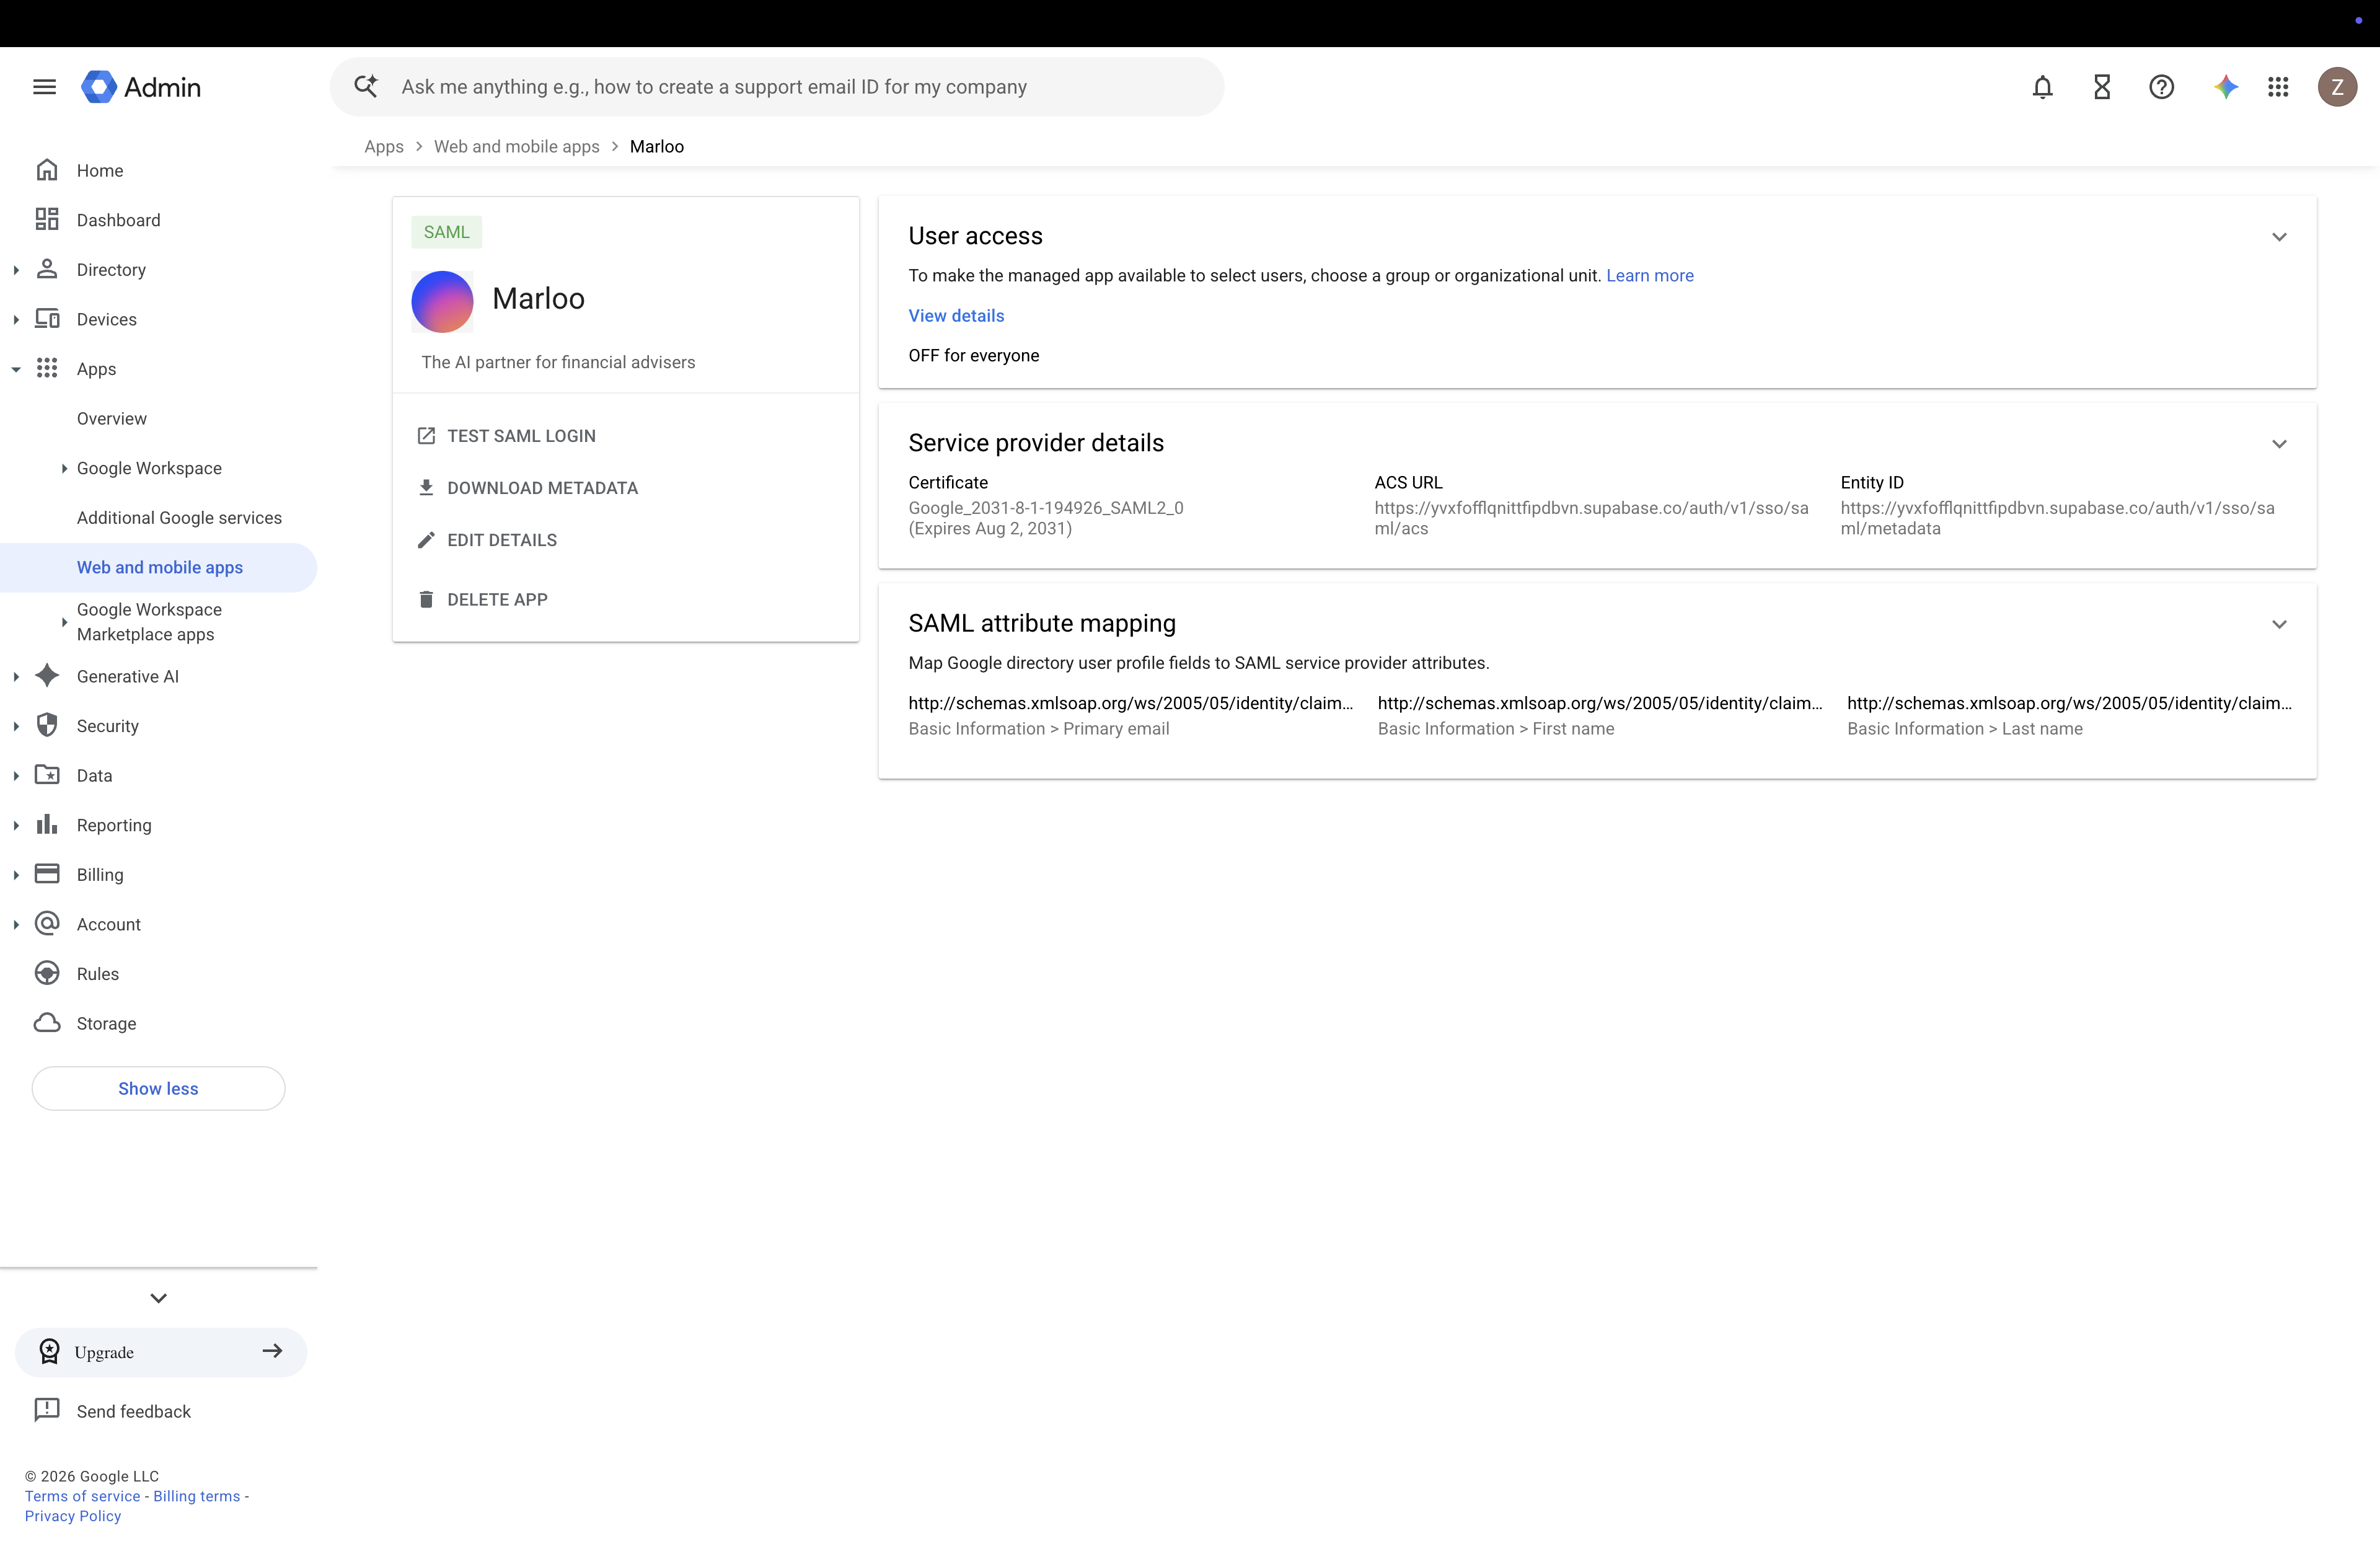
6. Turn the app on for your users. On the app's page, open User access and set the service to ON for everyone (or the organizational units or groups that use Marloo). Google can take a few minutes to apply new app settings.
Microsoft Entra ID (Azure AD)
You'll need an account with the Cloud Application Administrator or Application Administrator role.
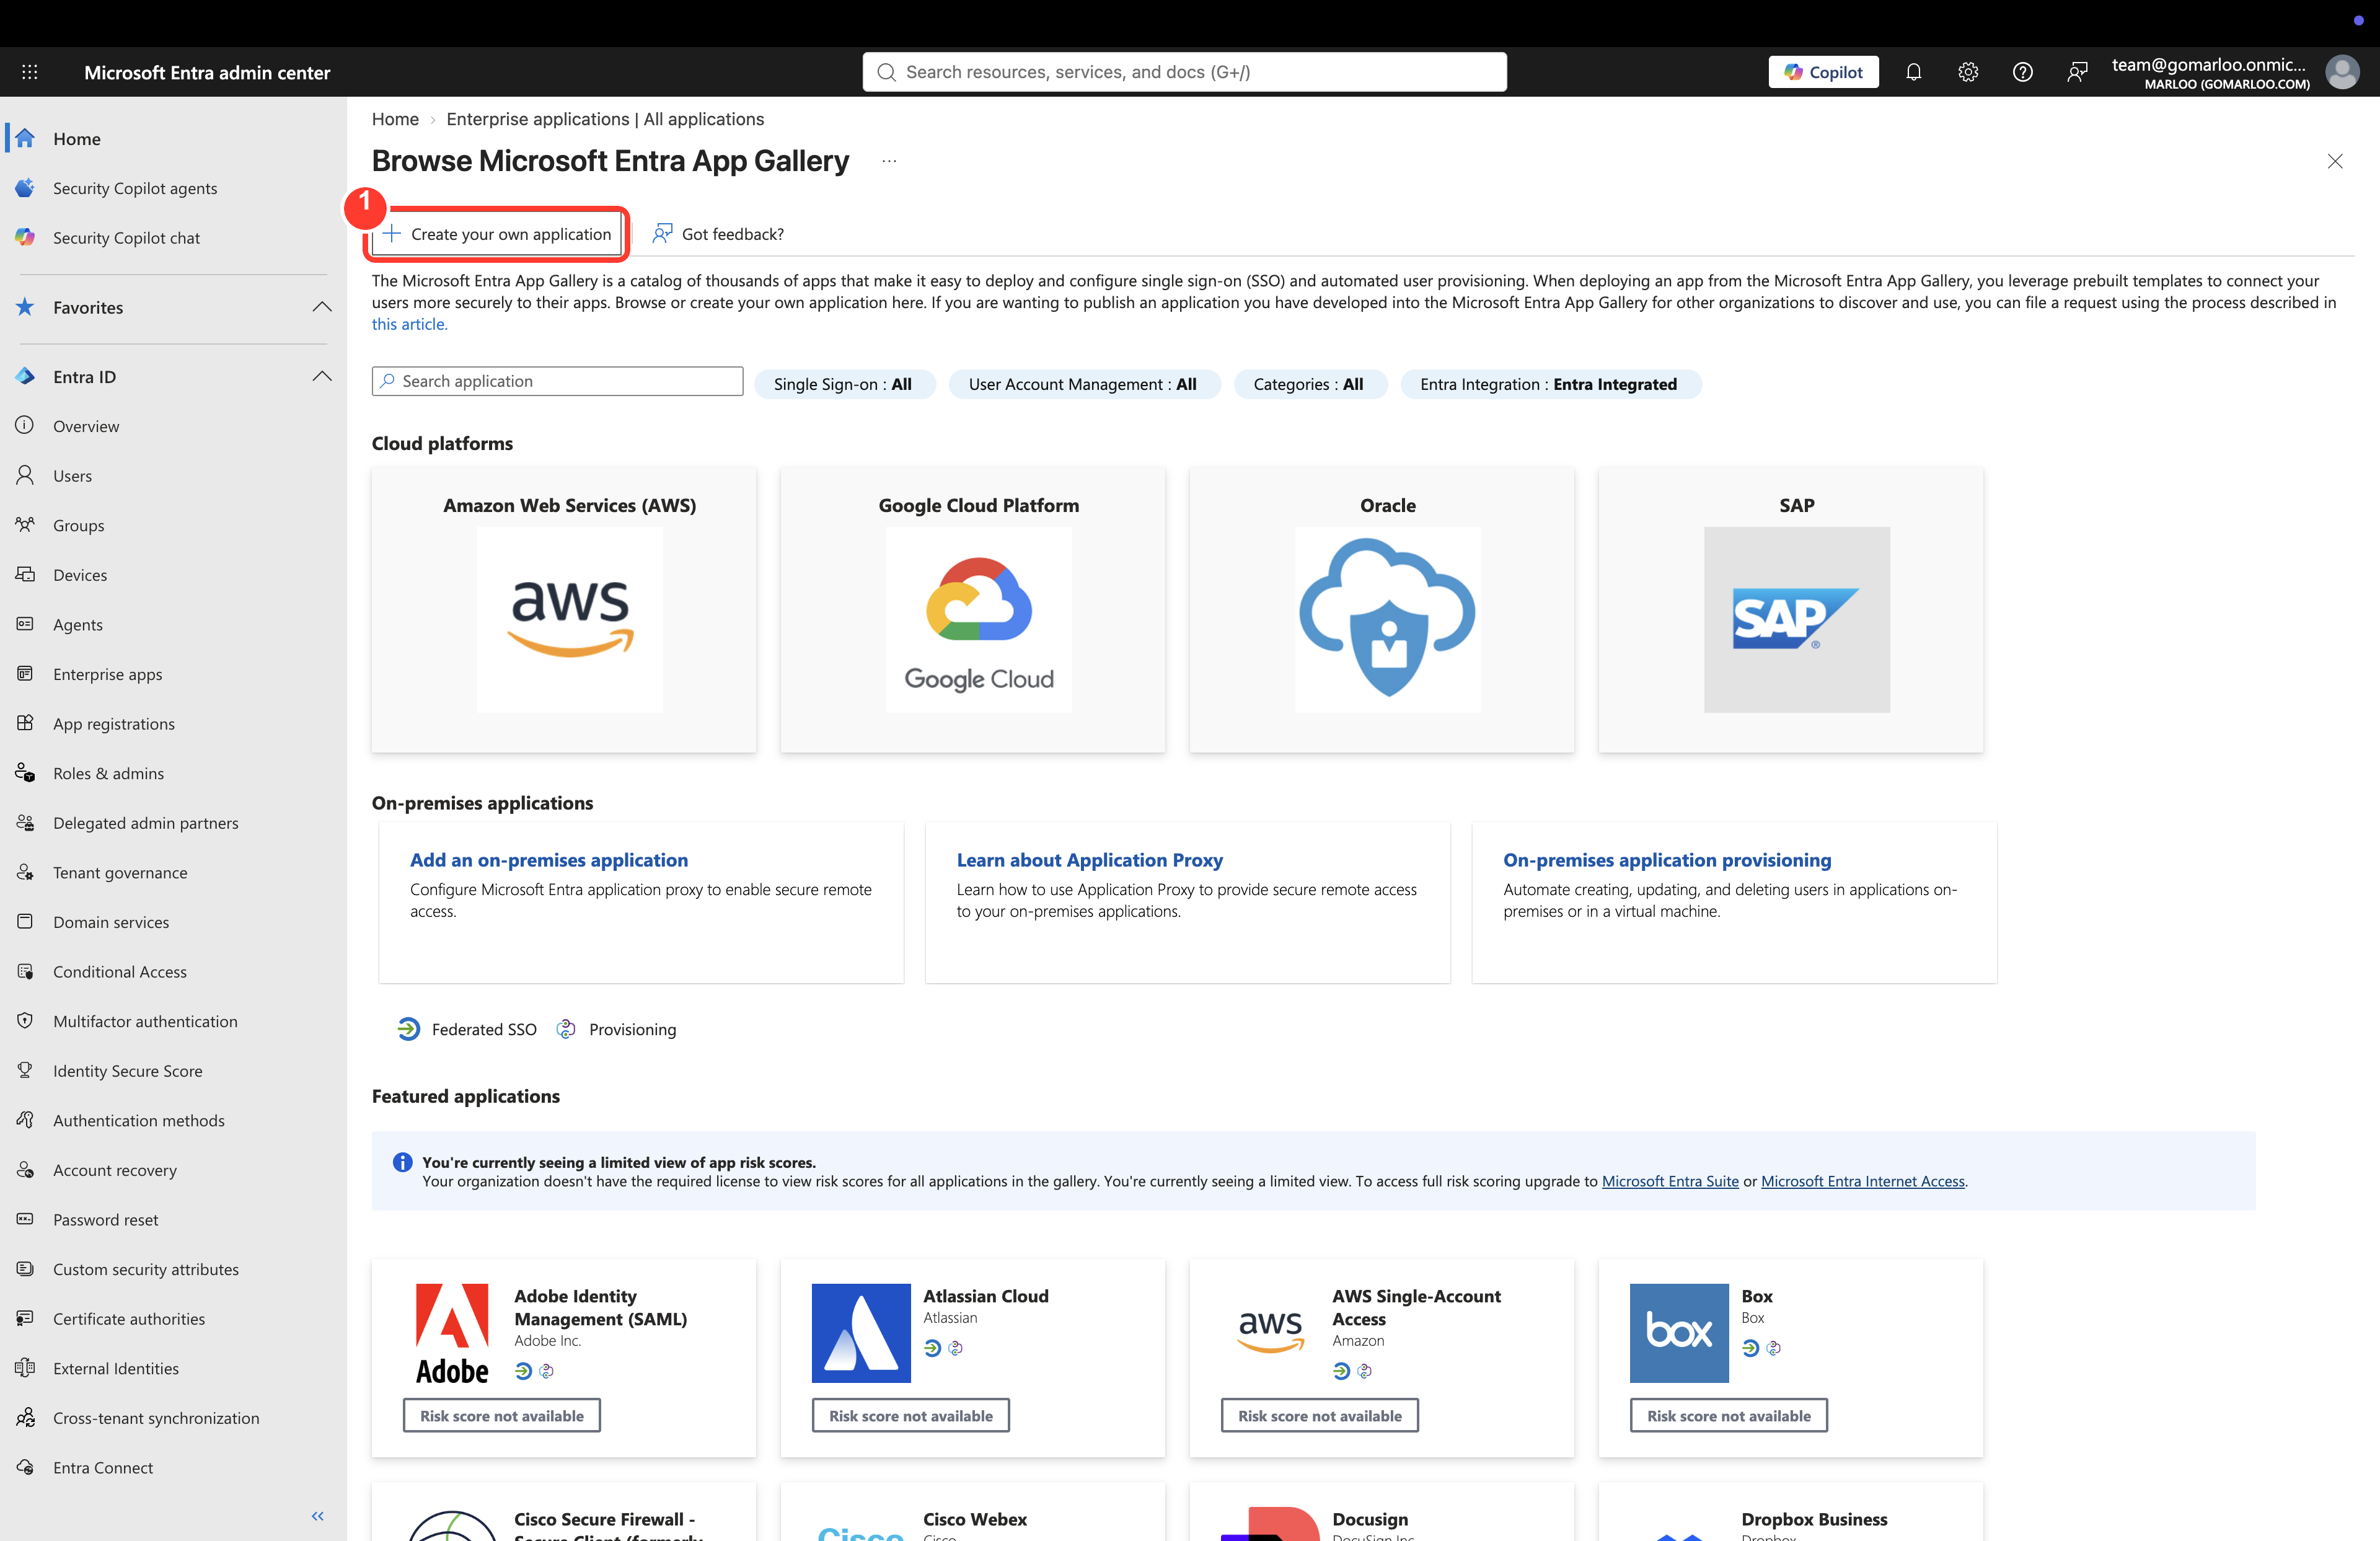
1. Start a new application. In the Microsoft Entra admin center, go to Entra ID > Enterprise apps > All applications, click New application, then Create your own application.
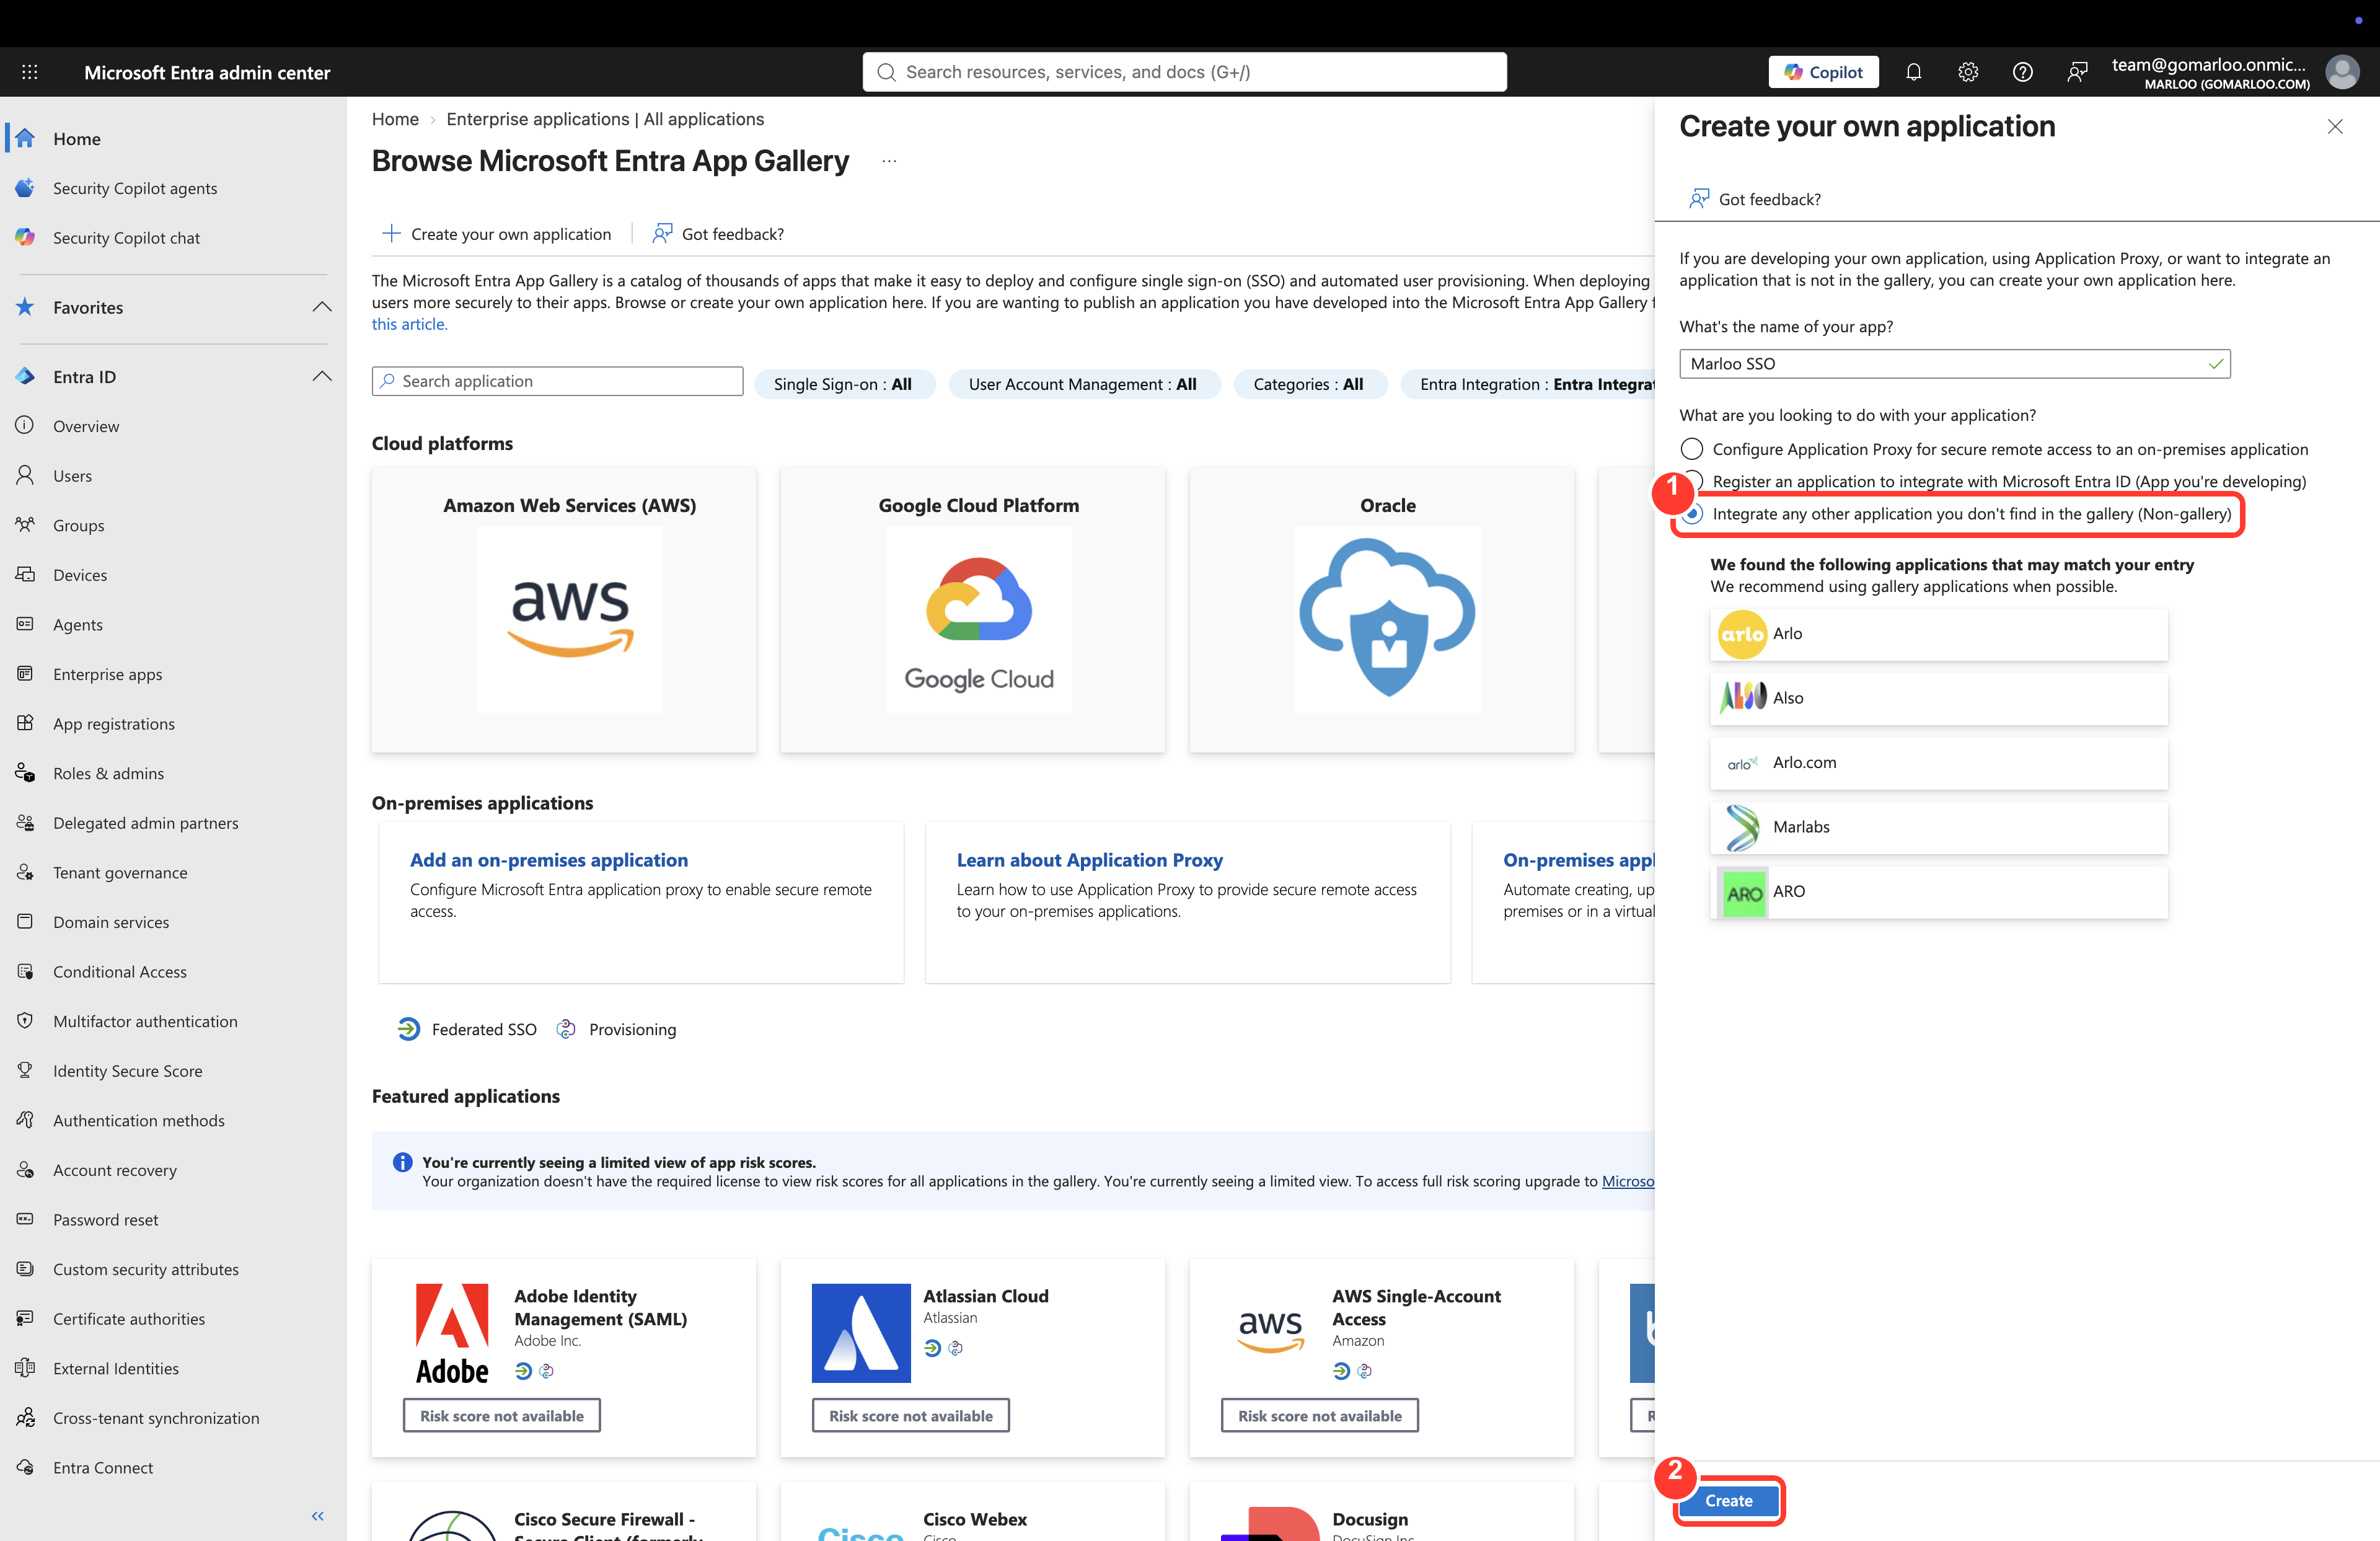
2. Create it as a non-gallery application. Name it something your team will recognize, such as "Marloo", then choose Integrate any other application you don't find in the gallery (Non-gallery) and click Create.
This choice matters. The middle option, "Register an application to integrate with Microsoft Entra ID", creates an app registration, which is for OAuth and OpenID Connect. SAML single sign-on is not available on apps created that way.
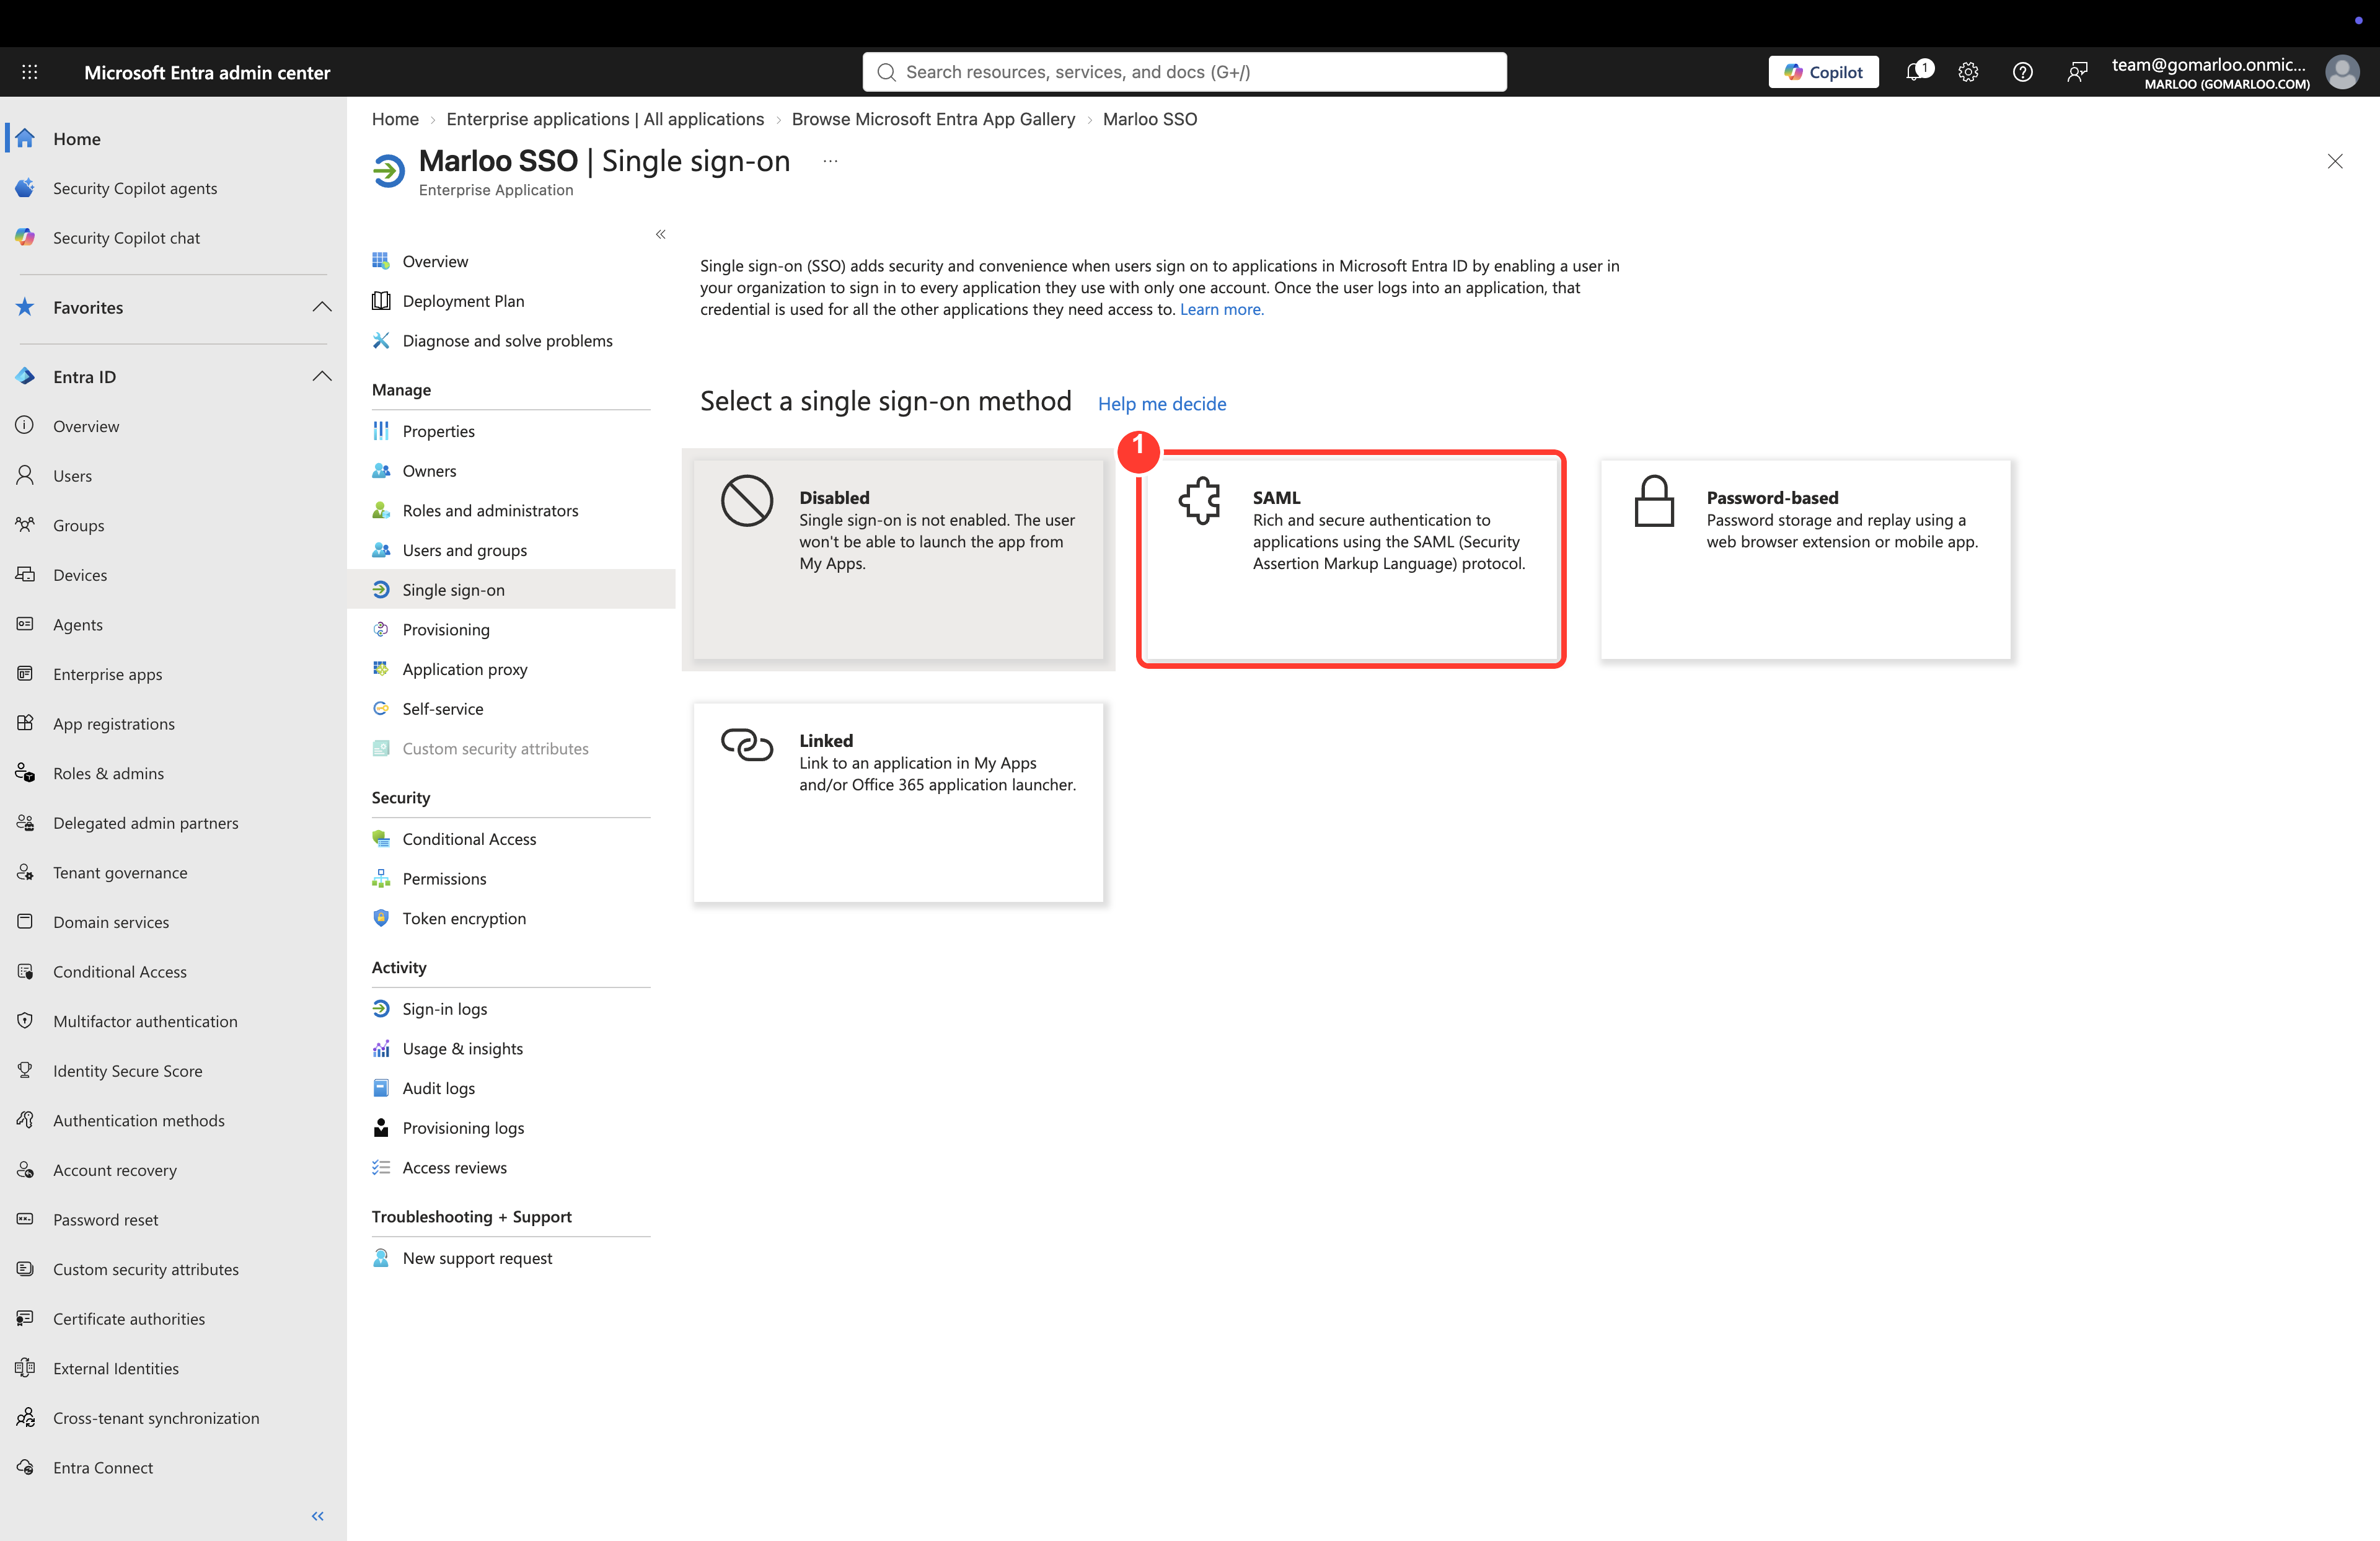
3. Choose SAML single sign-on. On the new application, open Single sign-on and select SAML.
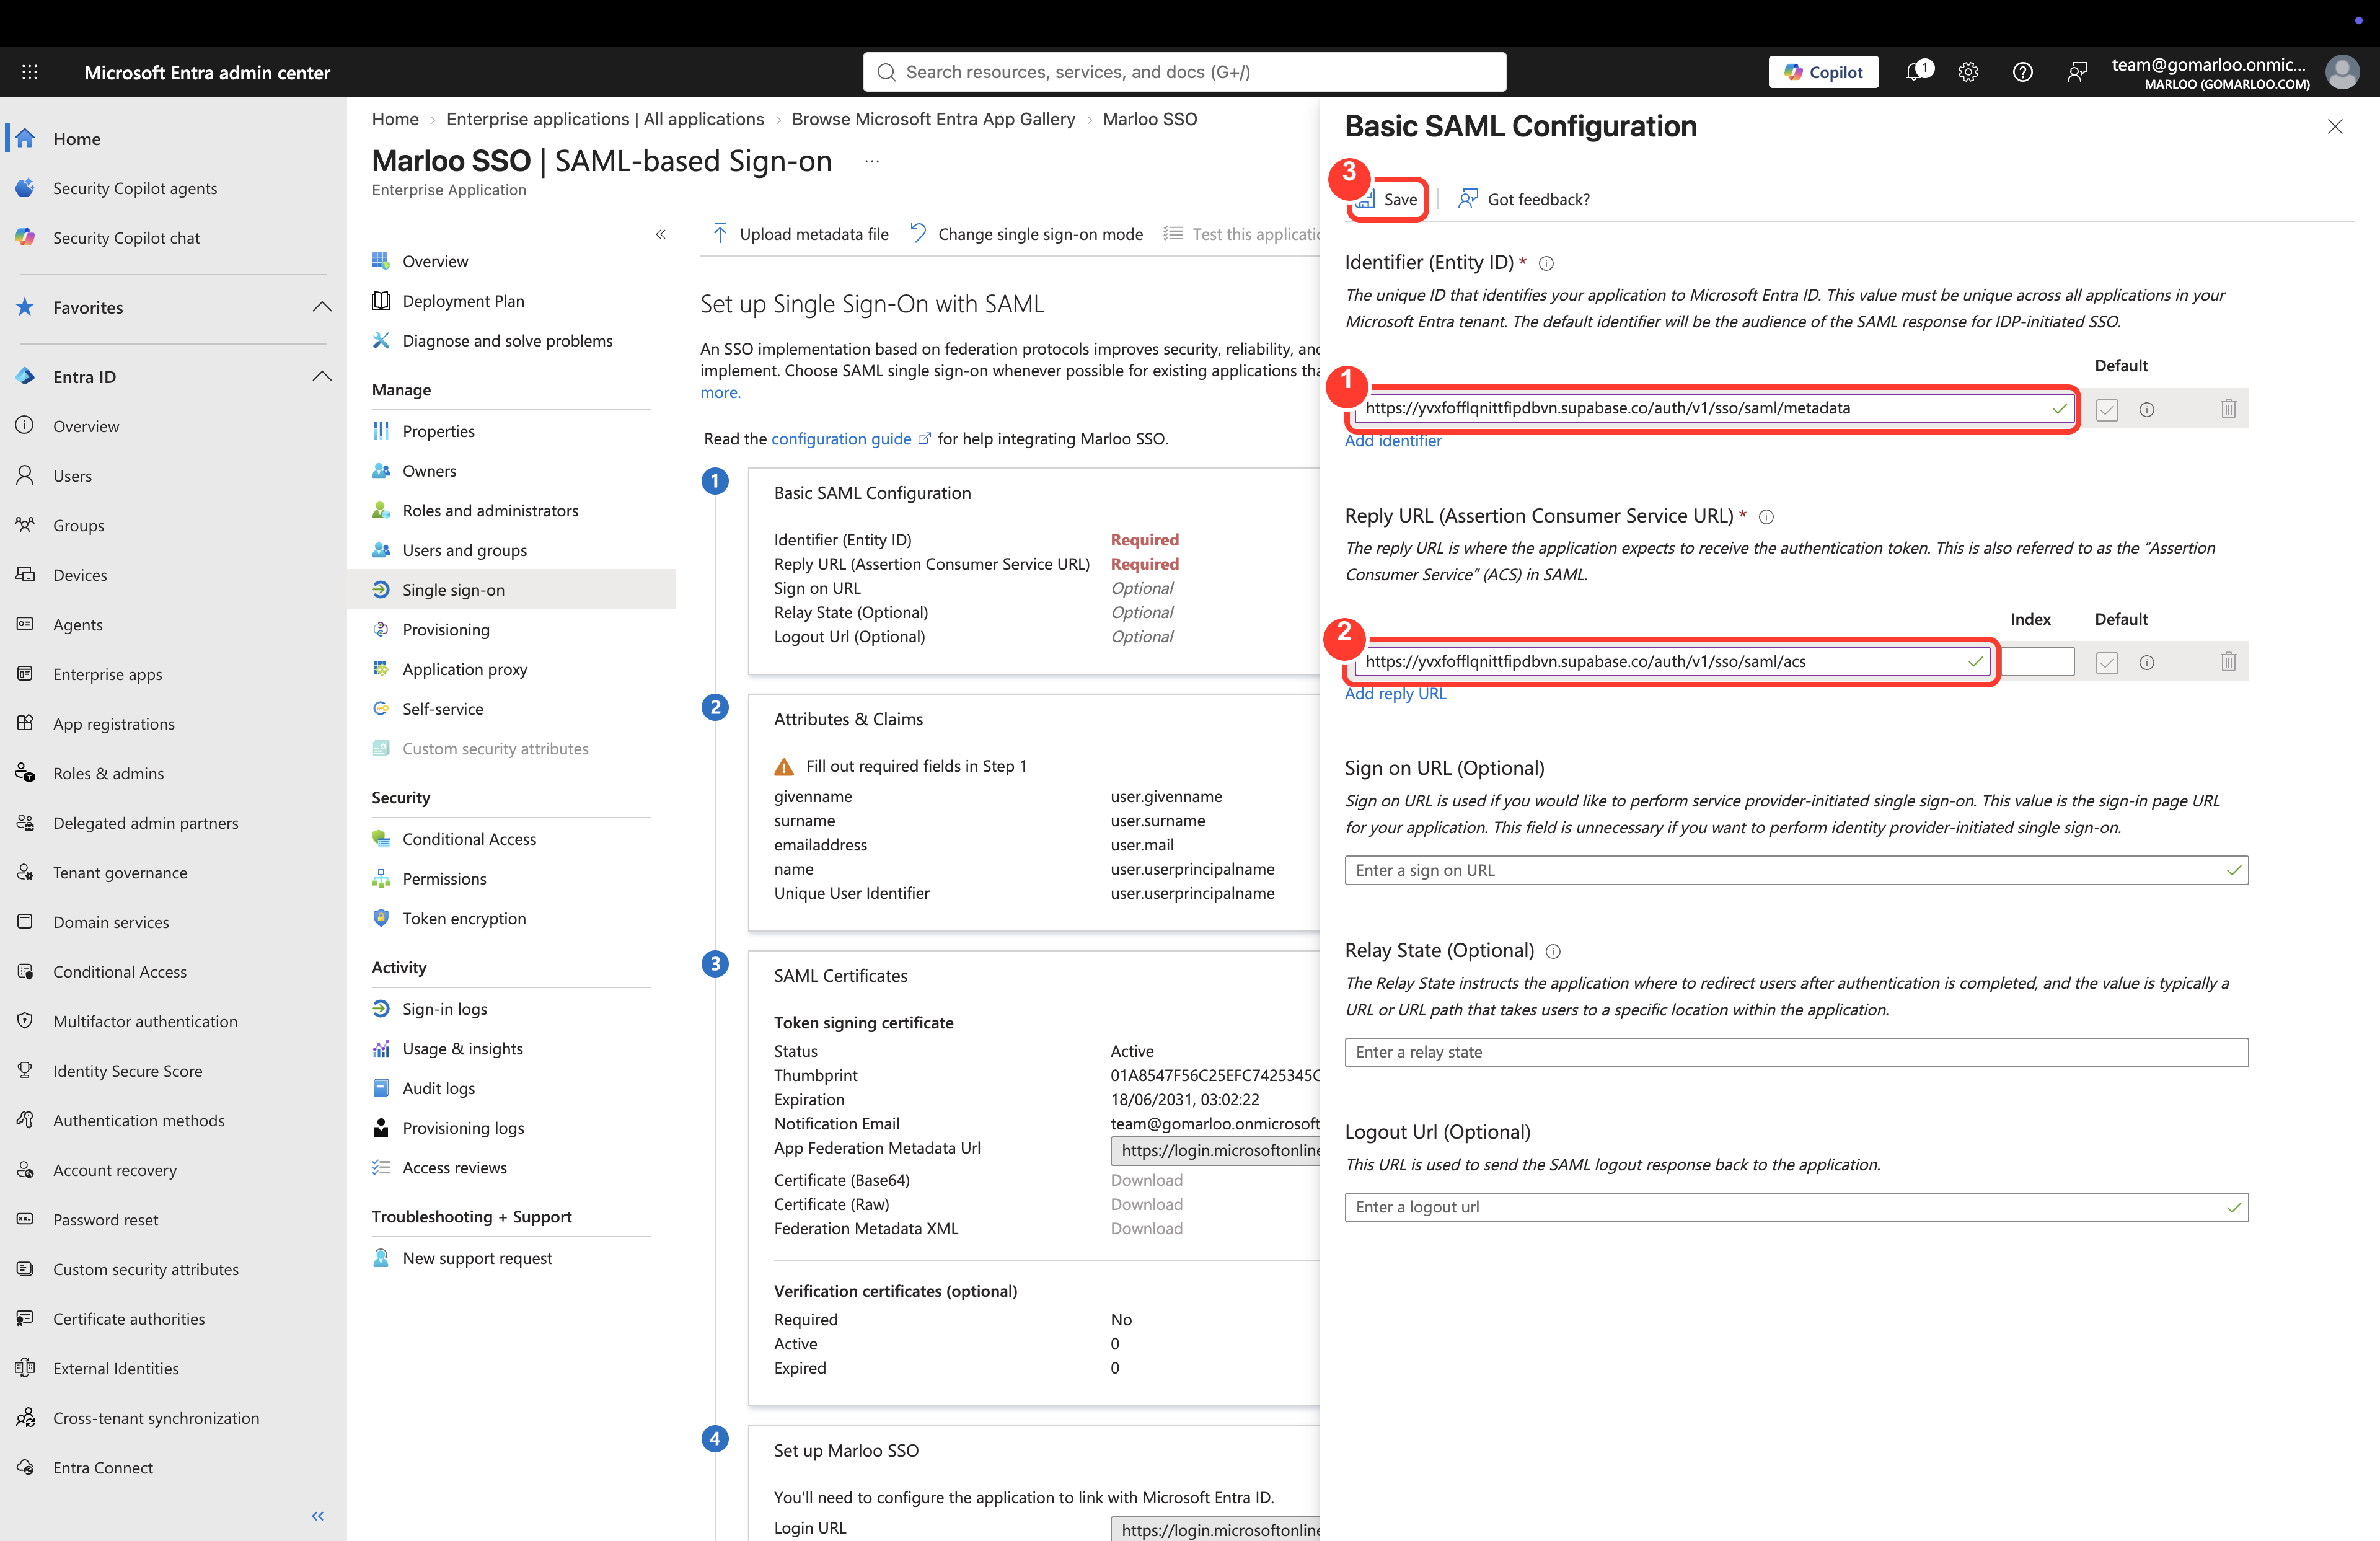
4. Enter Marloo's service provider details. Edit Basic SAML Configuration and enter:
| Field | Value |
|---|---|
| Identifier (Entity ID) | https://yvxfofflqnittfipdbvn.supabase.co/auth/v1/sso/saml/metadata |
| Reply URL (Assertion Consumer Service URL) | https://yvxfofflqnittfipdbvn.supabase.co/auth/v1/sso/saml/acs |
| Sign on URL, Relay State, Logout Url | Leave blank |
Click Save.
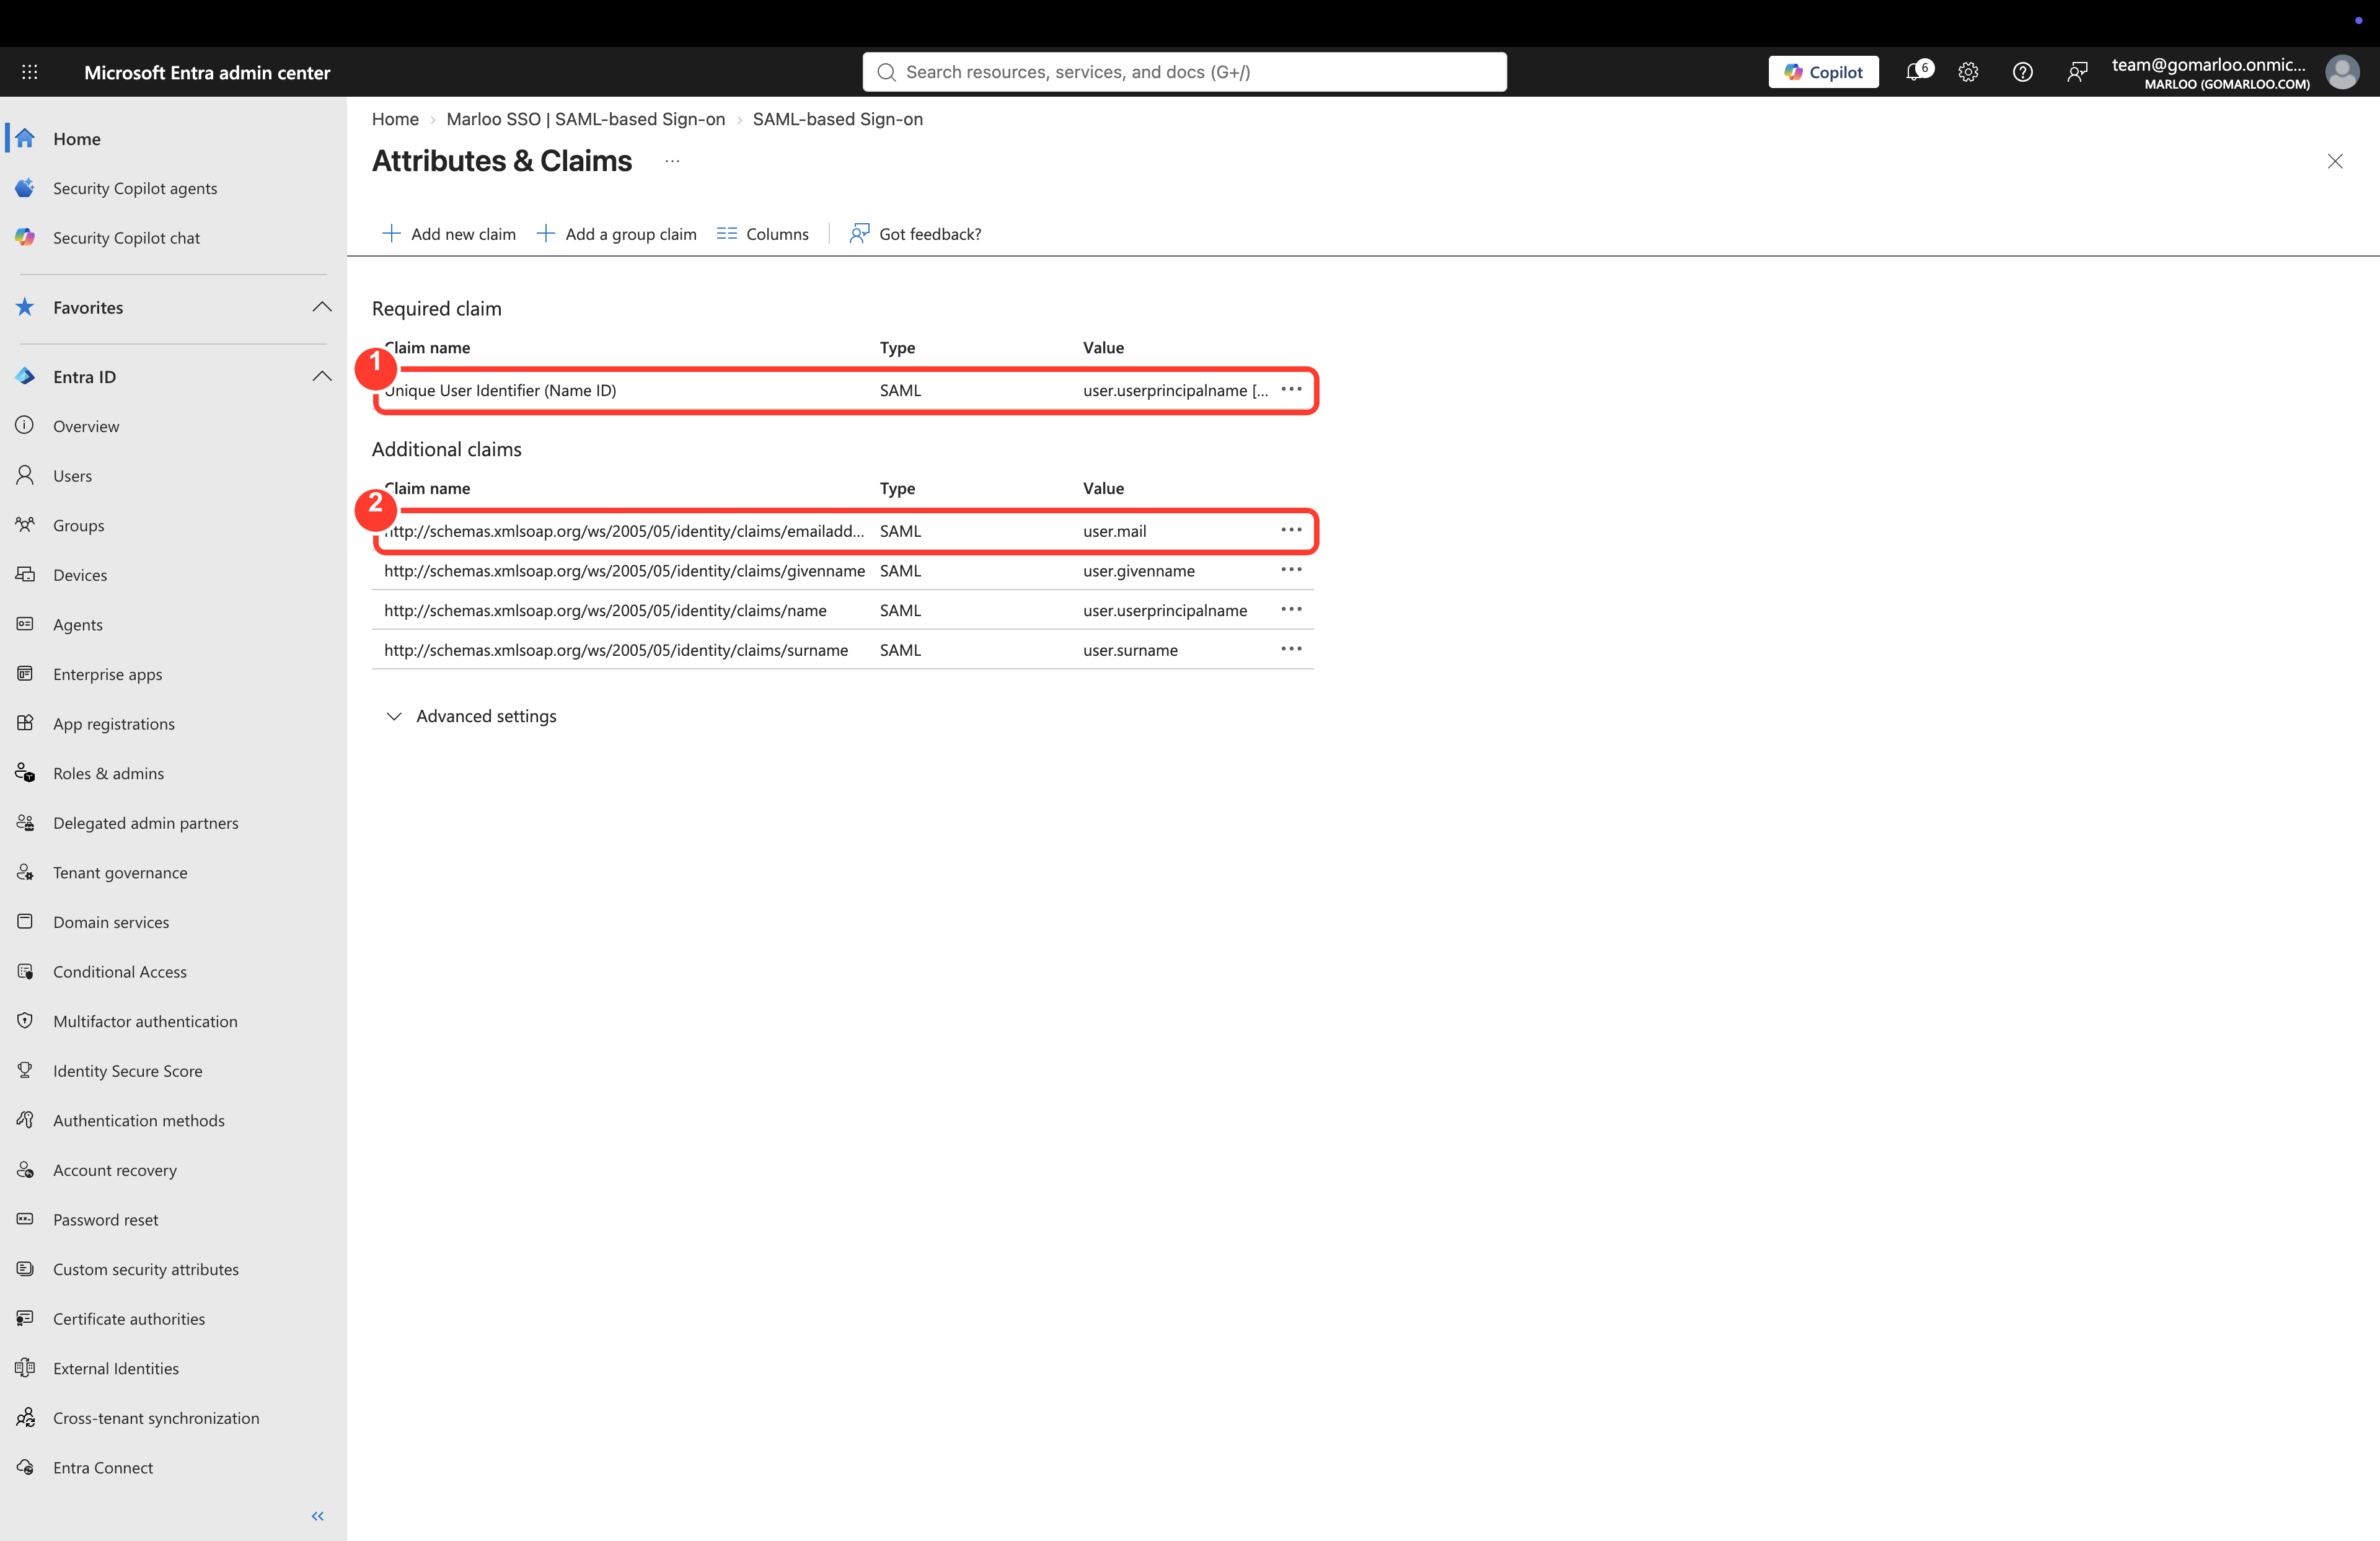
5. Check the attributes and claims. Entra already sends everything Marloo needs, so there is usually nothing to change here. Open Attributes & Claims and confirm you see:
| Claim | Value |
|---|---|
...claims/emailaddress | user.mail (required for sign-in to work) |
...claims/givenname | user.givenname |
...claims/surname | user.surname |
If your accounts don't have a mailbox, the user.mail attribute may be empty. Check it is populated on the users you plan to assign, or the assertion arrives with no email address and sign-in fails.
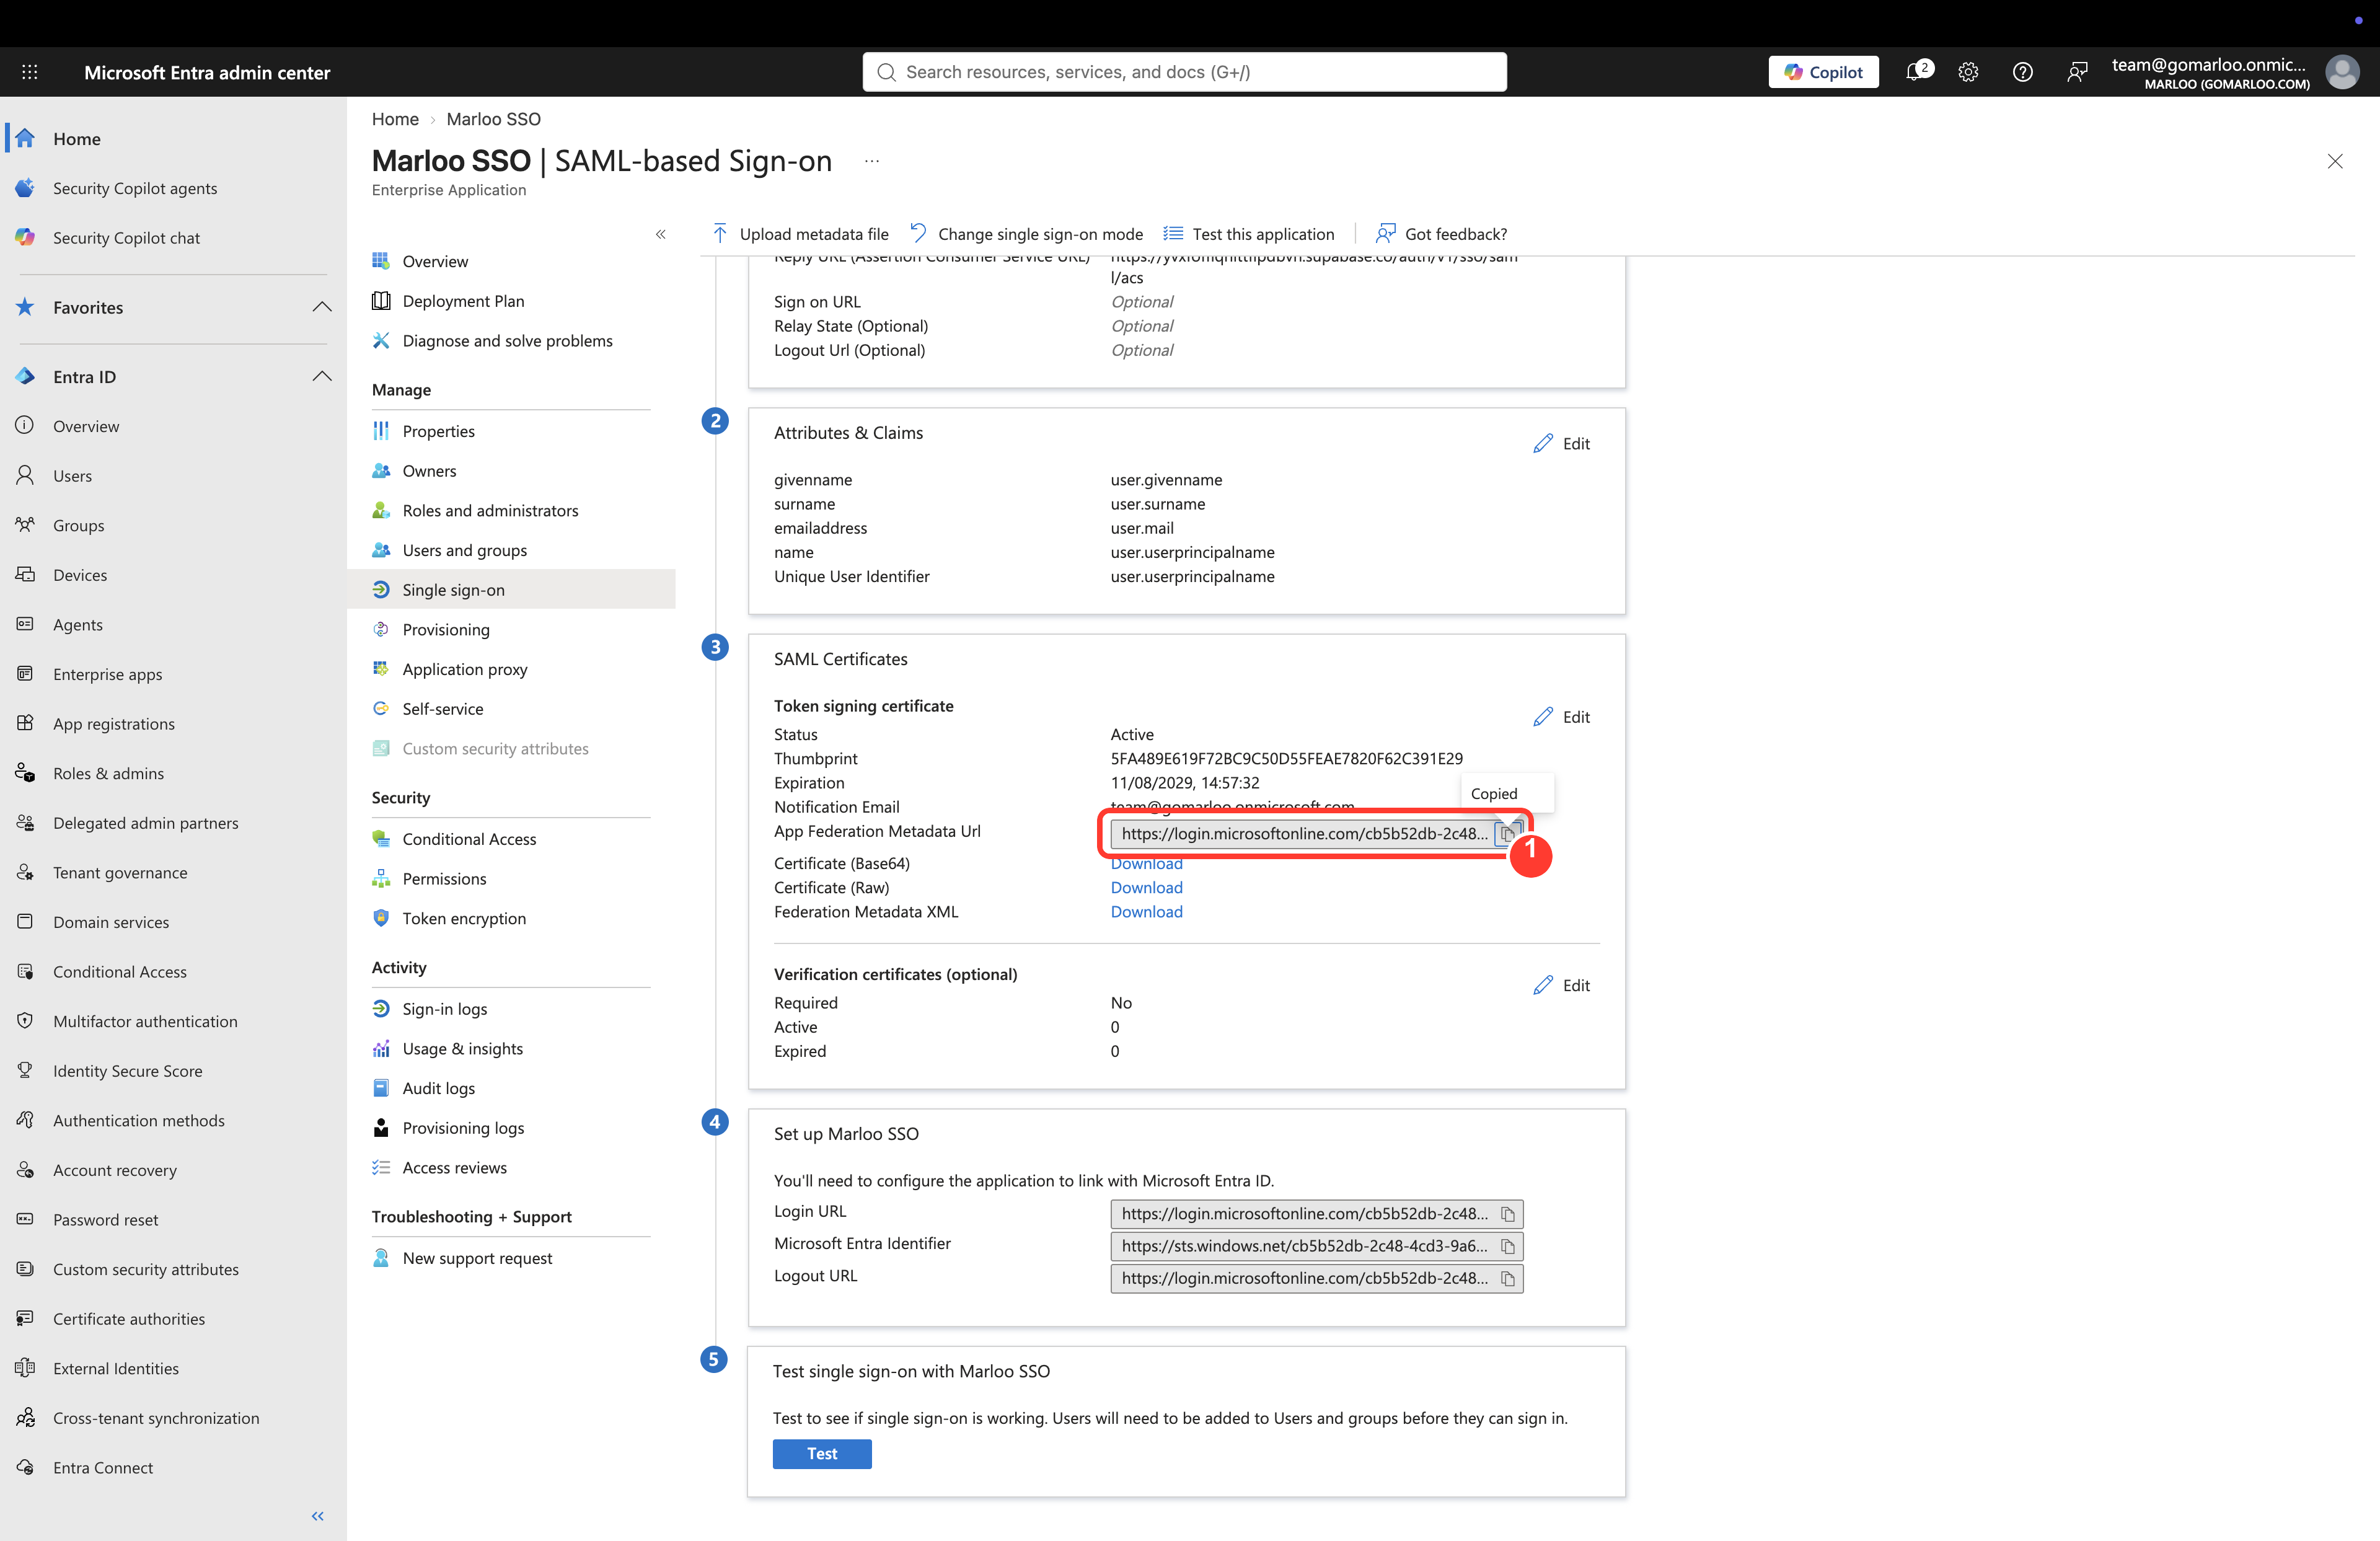
6. Copy the metadata URL. In the SAML Certificates card, copy the App Federation Metadata Url. You'll paste it into Marloo in Part 2. If you'd rather supply a file, use Federation Metadata XML > Download instead.
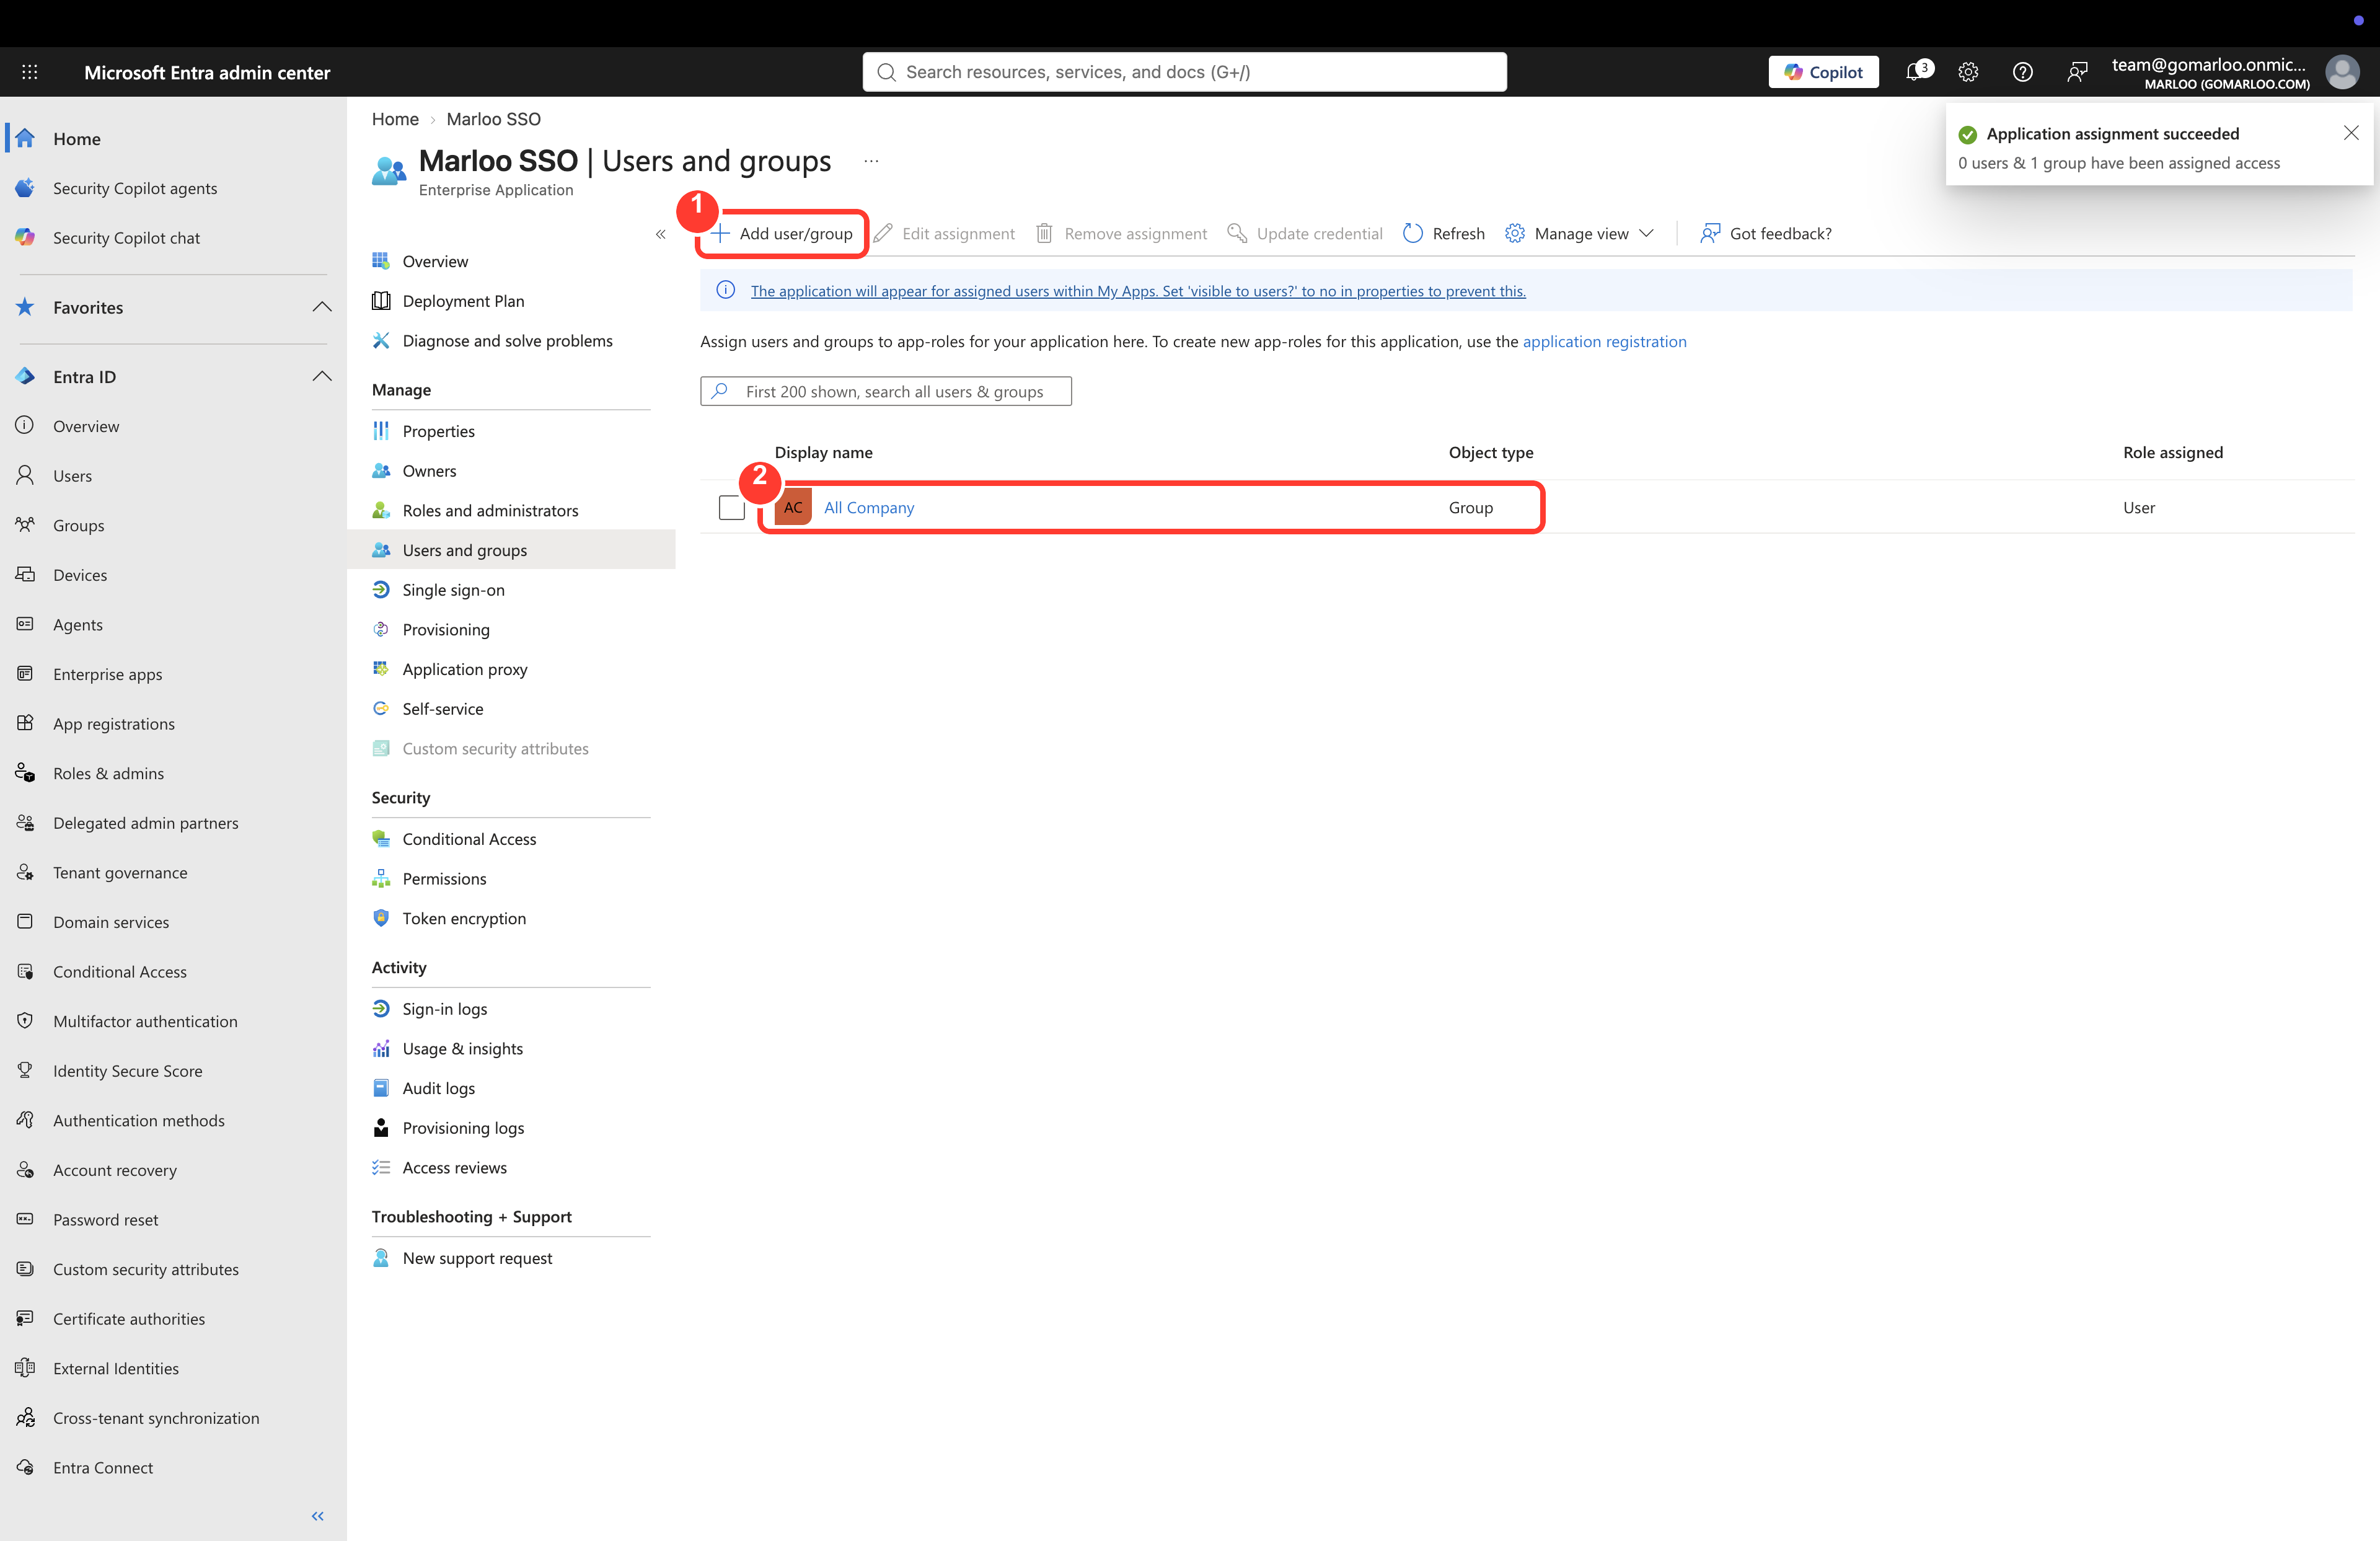
7. Assign your users. Open Users and groups > Add user/group and assign the people or groups who should be able to sign in to Marloo. Anyone who isn't assigned is stopped by Entra before they reach Marloo.
Part 2: submit the connection in Marloo
You'll need to be an Account owner of your company in Marloo.
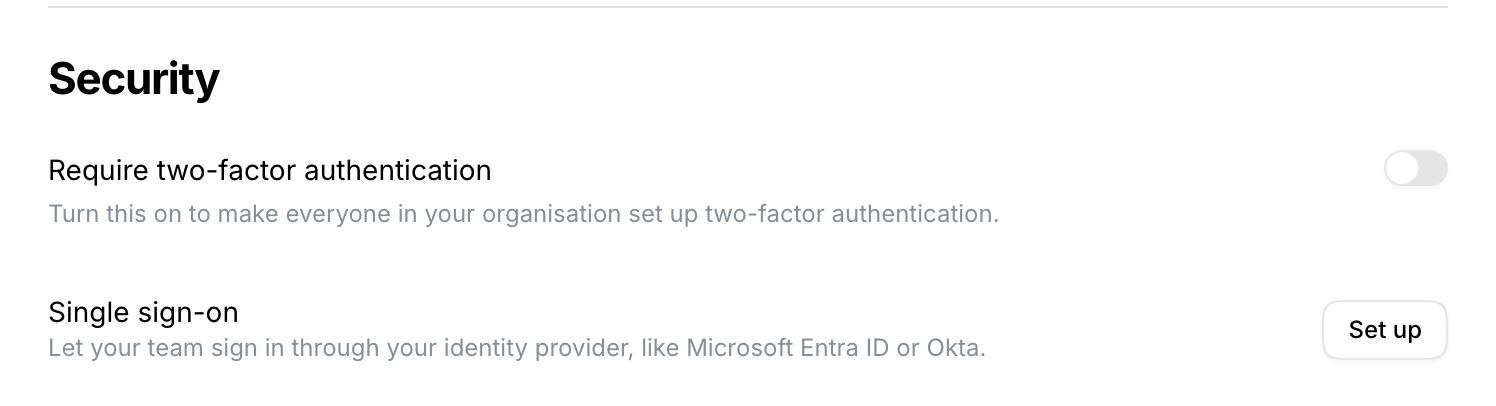
1. Open the SSO settings. Go to Settings > Company settings, scroll to Security and find Single sign-on. Click Set up.
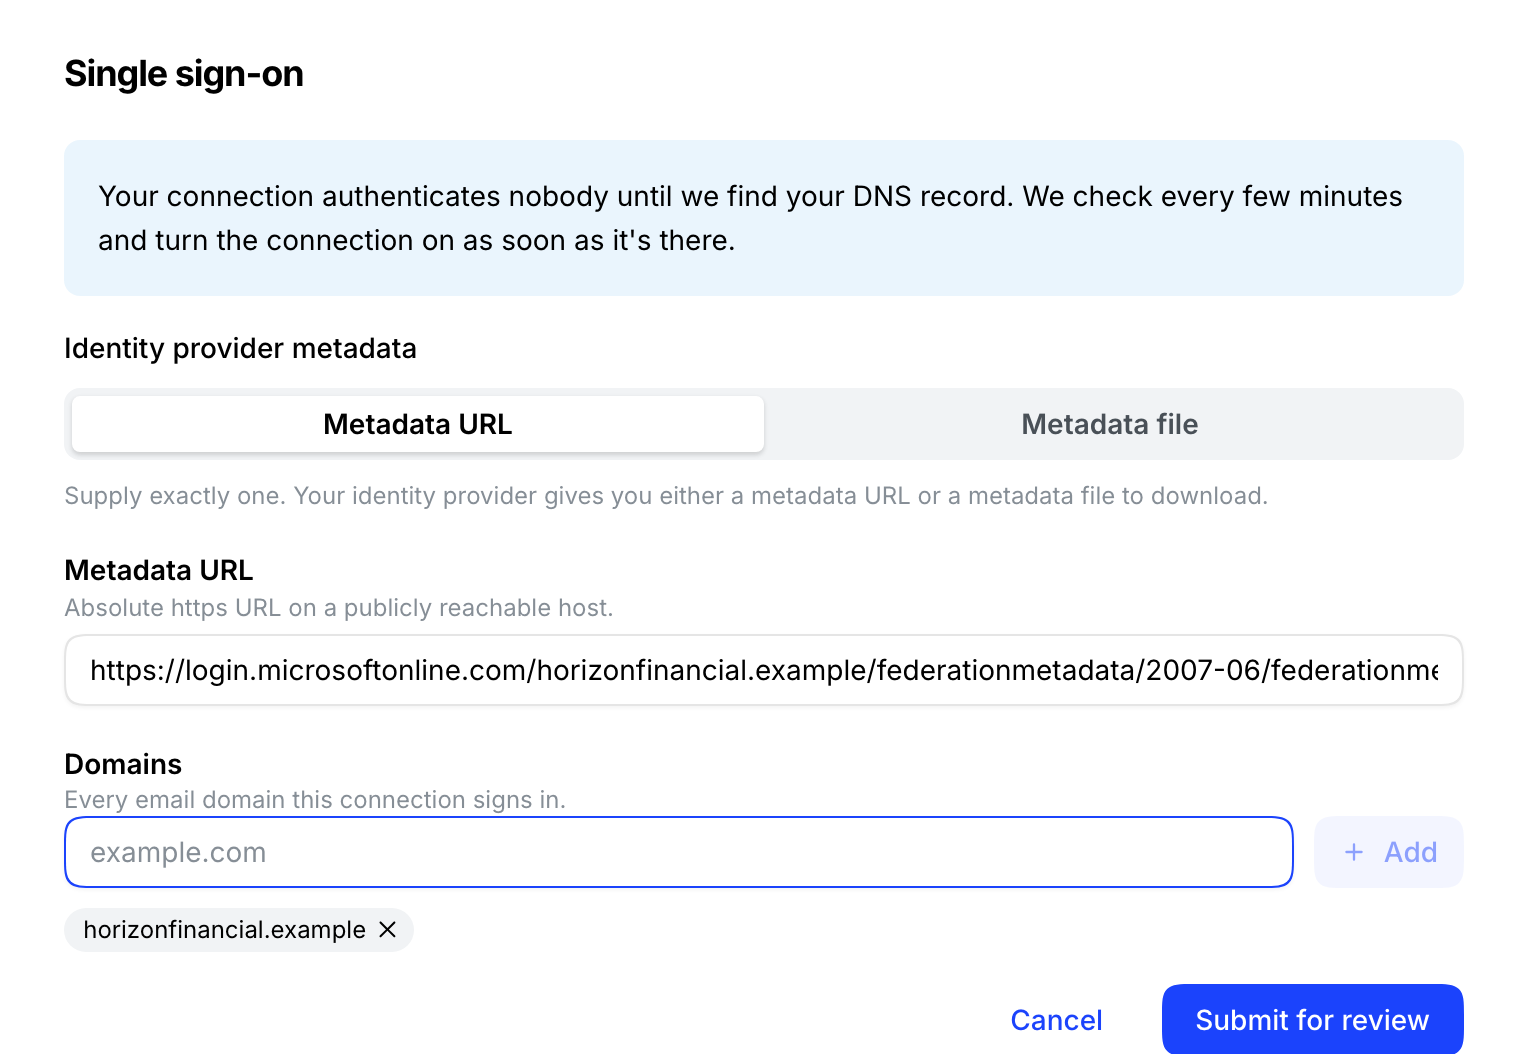
2. Fill in the connection.
- Identity provider metadata - paste your provider's metadata URL, or upload the metadata file you downloaded in Part 1. Supply exactly one.
- Domains - every email domain your team signs in with, e.g.
example.com. Add each one.
Click Submit for review.
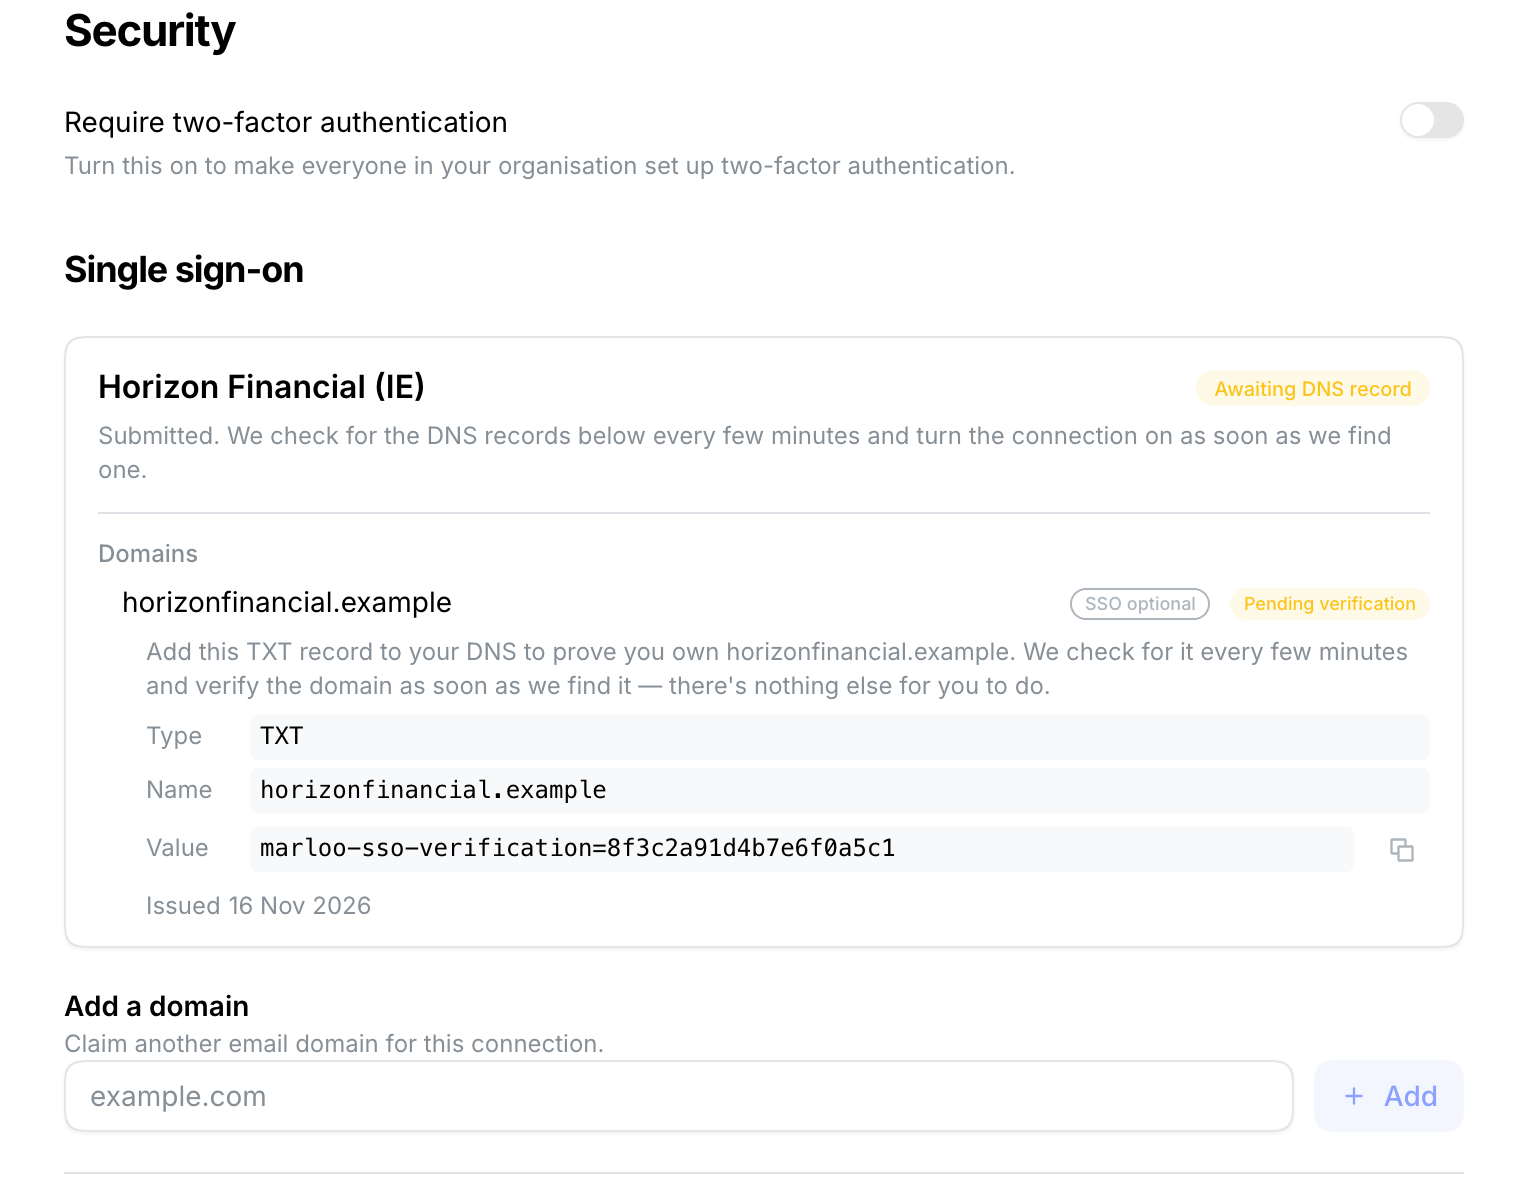
3. Add the DNS records. Your connection shows Awaiting DNS record, and each domain shows Pending verification with a TXT record to add to your DNS. The connection authenticates nobody until Marloo finds a record. Marloo checks every few minutes and verifies each domain and turns the connection on as soon as it finds the record, so there's nothing else for you to do. If a record has expired, contact support for a replacement.
What your team sees once SSO is active
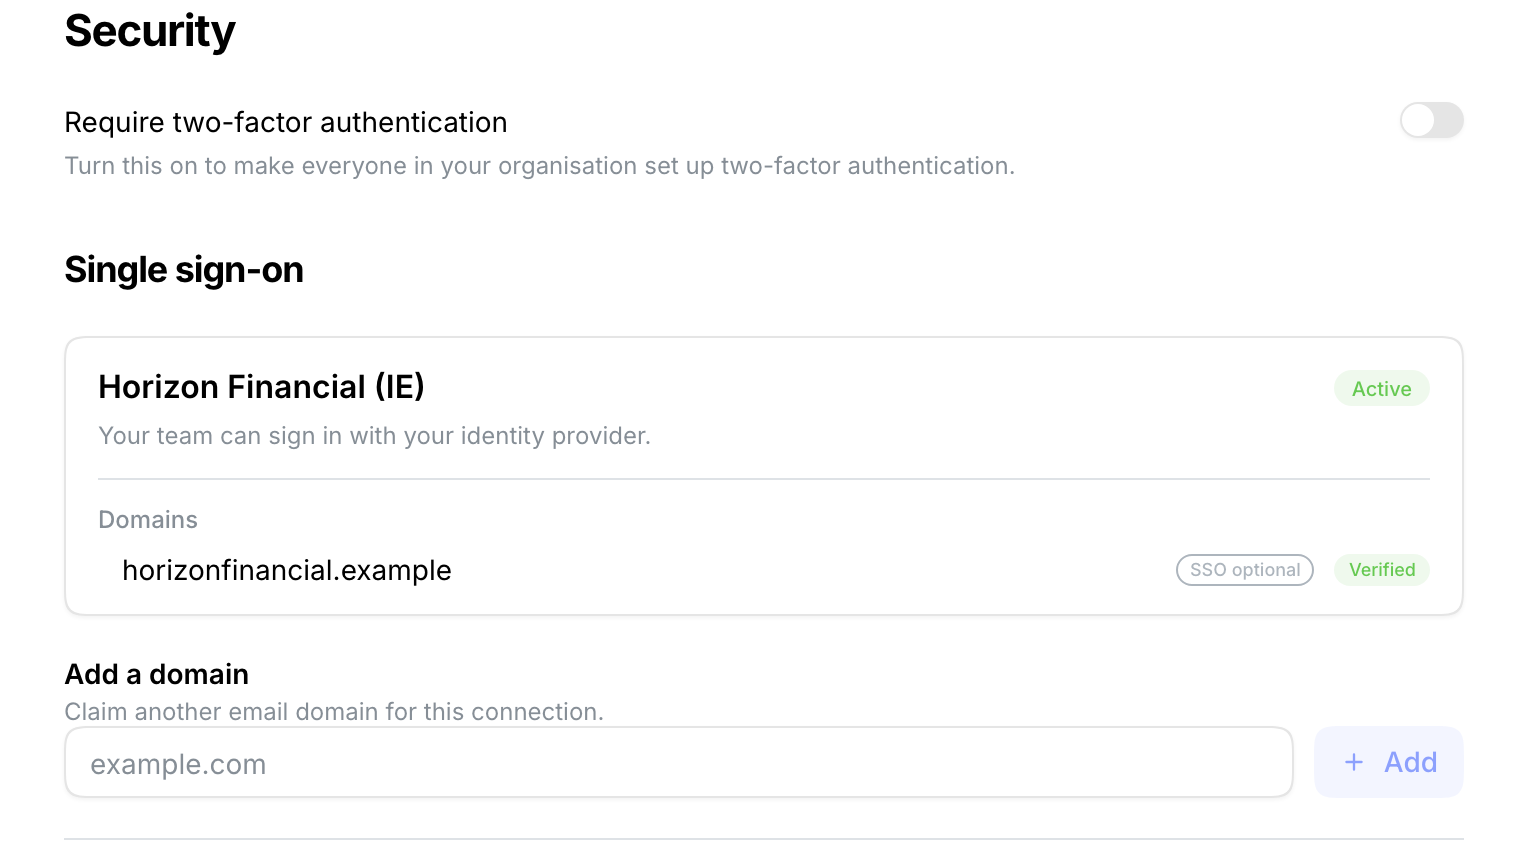
When the connection is live, the Single sign-on section shows it as Active and each domain as Verified.
- The Marloo login page asks for an email first. Anyone on your verified domains then sees Continue with SSO and signs in through your identity provider.
- Existing accounts link automatically. Team members who already used Marloo with a password (or Google sign-in) land in their existing account with all their data the first time they use SSO.
- New team members who sign in with SSO for the first time get a Marloo account automatically and can request access to your company in Marloo. Your Account owners are notified and can invite them in a click.
- One account, either sign-in method. Password sign-in keeps working alongside SSO, and anyone whose account started with SSO can set a password at any time with Forgot password on the login page. The reset link goes to their work mailbox and the password attaches to the same account, so data is never split across two accounts. This is also the way back into Marloo if your firm ever stops using SSO.
- Each email is protected from the moment it first uses SSO. Nobody can create a separate password account with a team member's email: attempting to sign up with it shows "User already registered". The only way to add a password is the email reset link above.
- When you're ready to require SSO for everyone, contact us. We'll agree a date, communicate a grace window, and turn on enforcement for your domains. Under enforcement, password sign-in and password resets are switched off for your domains.
Troubleshooting
"SAML Assertion does not contain an email address" after signing in at your IdP
Your identity provider isn't sending the email in a way Marloo can read. In Google Workspace, check both that Name ID format is EMAIL and that the Primary email attribute mapping from Part 1 step 5 is configured. In Microsoft Entra ID, check the emailaddress claim is mapped to user.mail and that the attribute is actually populated on the user. Give changes a few minutes to propagate, then try again.
Google shows a 403 or "app not enabled" page
The SAML app isn't turned on for that user. Check User access on the app in the Google Admin console covers their organizational unit or group.
Microsoft shows "AADSTS50105: the signed in user is not assigned to a role for the application"
That person isn't assigned to the enterprise application. Add them under Users and groups on the app, as in Part 1 step 7.
The SSO button doesn't appear at sign-in
The connection may still be awaiting its DNS record, or the email's domain isn't on the connection. Check the Single sign-on section in Settings > Company settings. It shows the connection status, its domains and the TXT record each pending domain needs. Contact us if it's been pending longer than expected.
"User already registered" when signing up with a work email
That email already has a Marloo account. Signing in with SSO creates one automatically, and from then on the email is protected against duplicate sign-ups. This is expected. Sign in with Continue with SSO, or use Forgot password to set a password for the existing account. Either way you land in the same account.
You changed your IdP configuration (new certificate, new metadata)
Update the connection in your Marloo SSO settings with the new metadata, or contact us. Mismatched metadata is the most common cause of sign-in suddenly failing. This includes routine token signing certificate rotation in Entra ID.
Related articles
Still stuck? Talk to a human.
Email the Marloo team with what you are seeing. If you are in the app, the blue chat button in the bottom-right corner is the fastest way to reach us.