
Marloo in flowcharts: every feature in 5 steps
Every part of Marloo as a one-page flowchart. Open the one you need, print it, and keep it by your desk.
Getting set up (do once)
Quick flowchart: connect your calendar in 5 steps
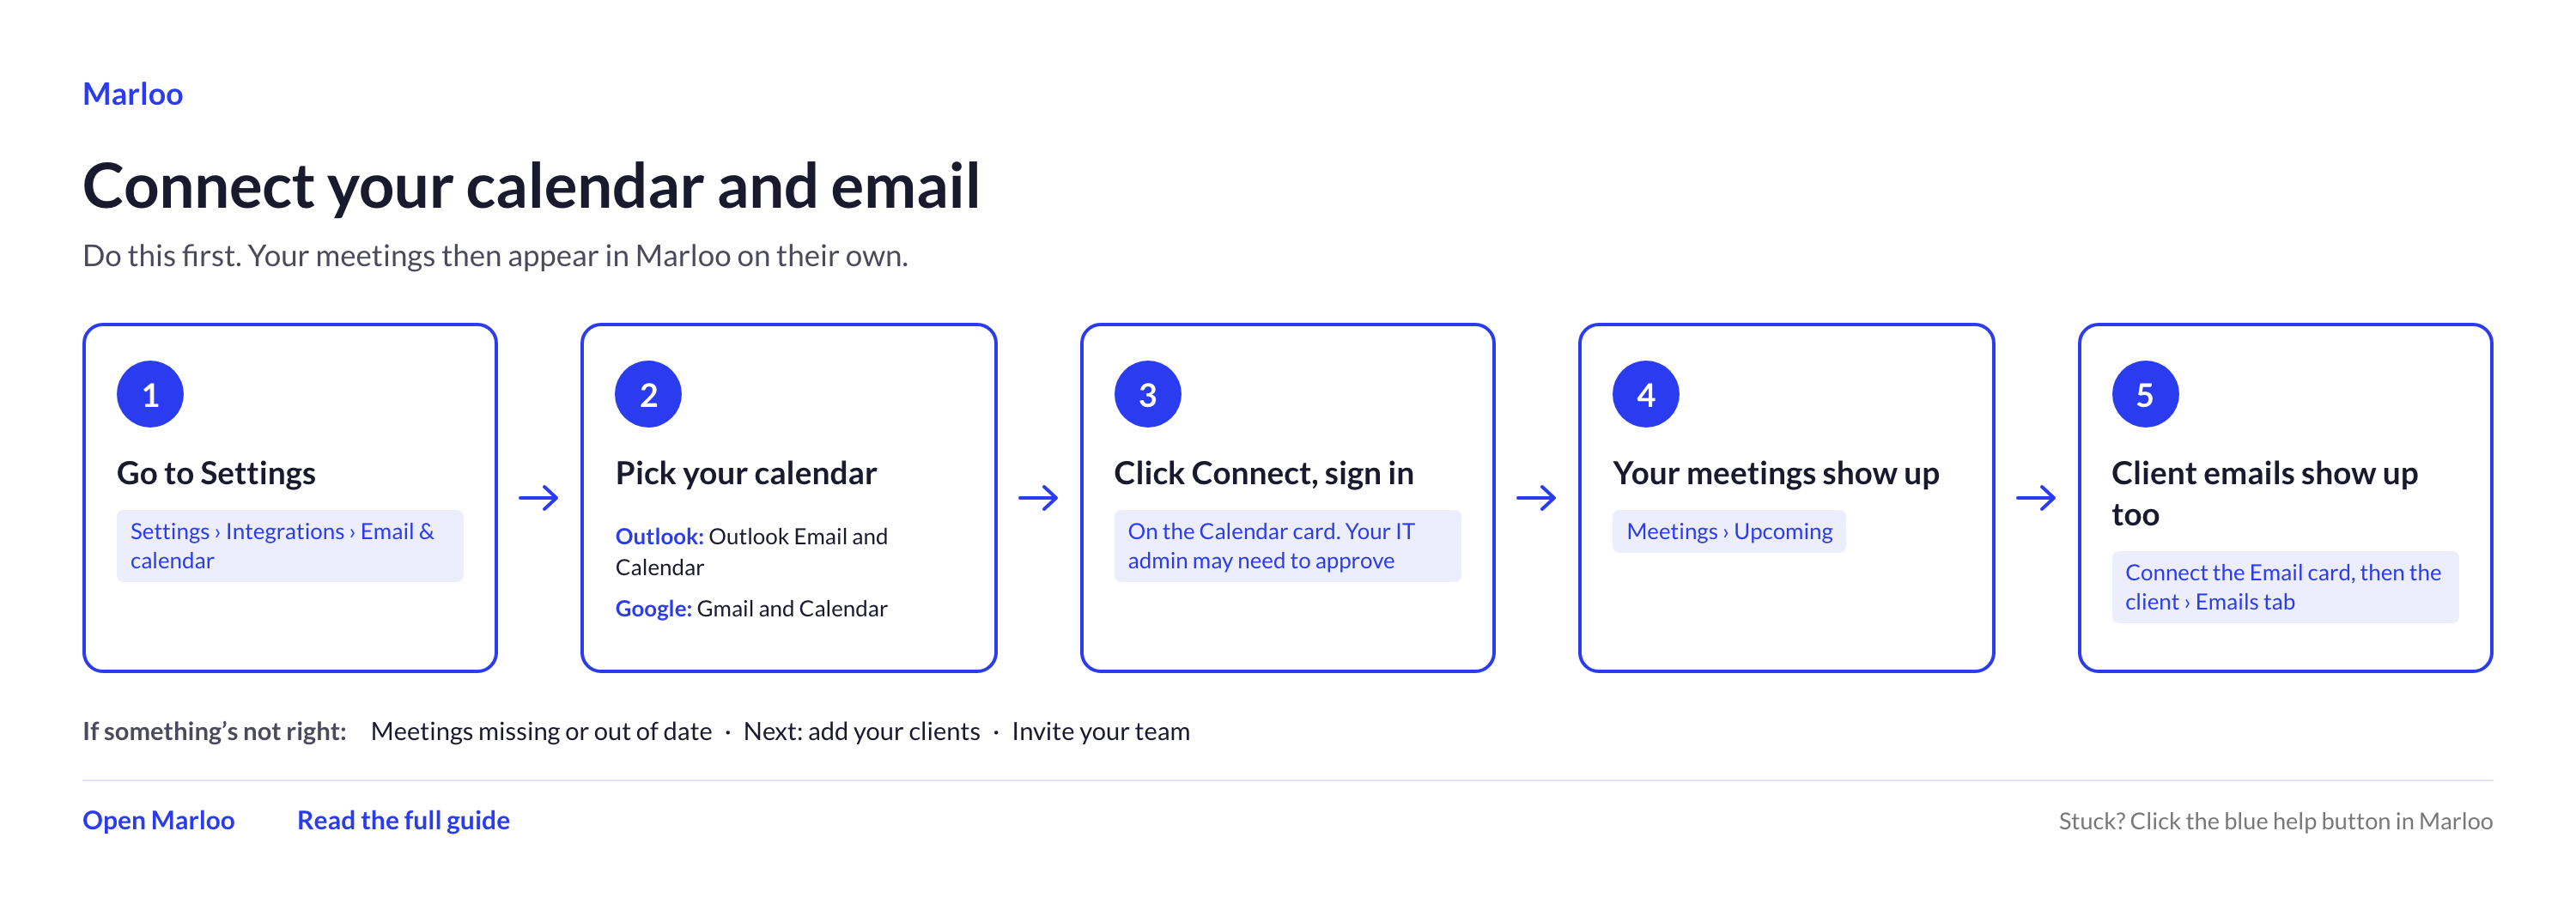
Do this first. Your meetings then appear in Marloo on their own.
- Go to Settings: Settings > Integrations > Email & calendar.
- Pick your calendar: Outlook Email and Calendar for Outlook, or Gmail and Calendar for Google.
- Click Connect and sign in on the Calendar card. Your IT admin may need to approve.
- Your meetings show up under Meetings > Upcoming.
- Client emails show up too: connect the Email card, then open the client's Emails tab.
If something's not right: meetings missing or out of date, add your clients next, or invite your team.
Quick flowchart: build a meeting template in 5 steps
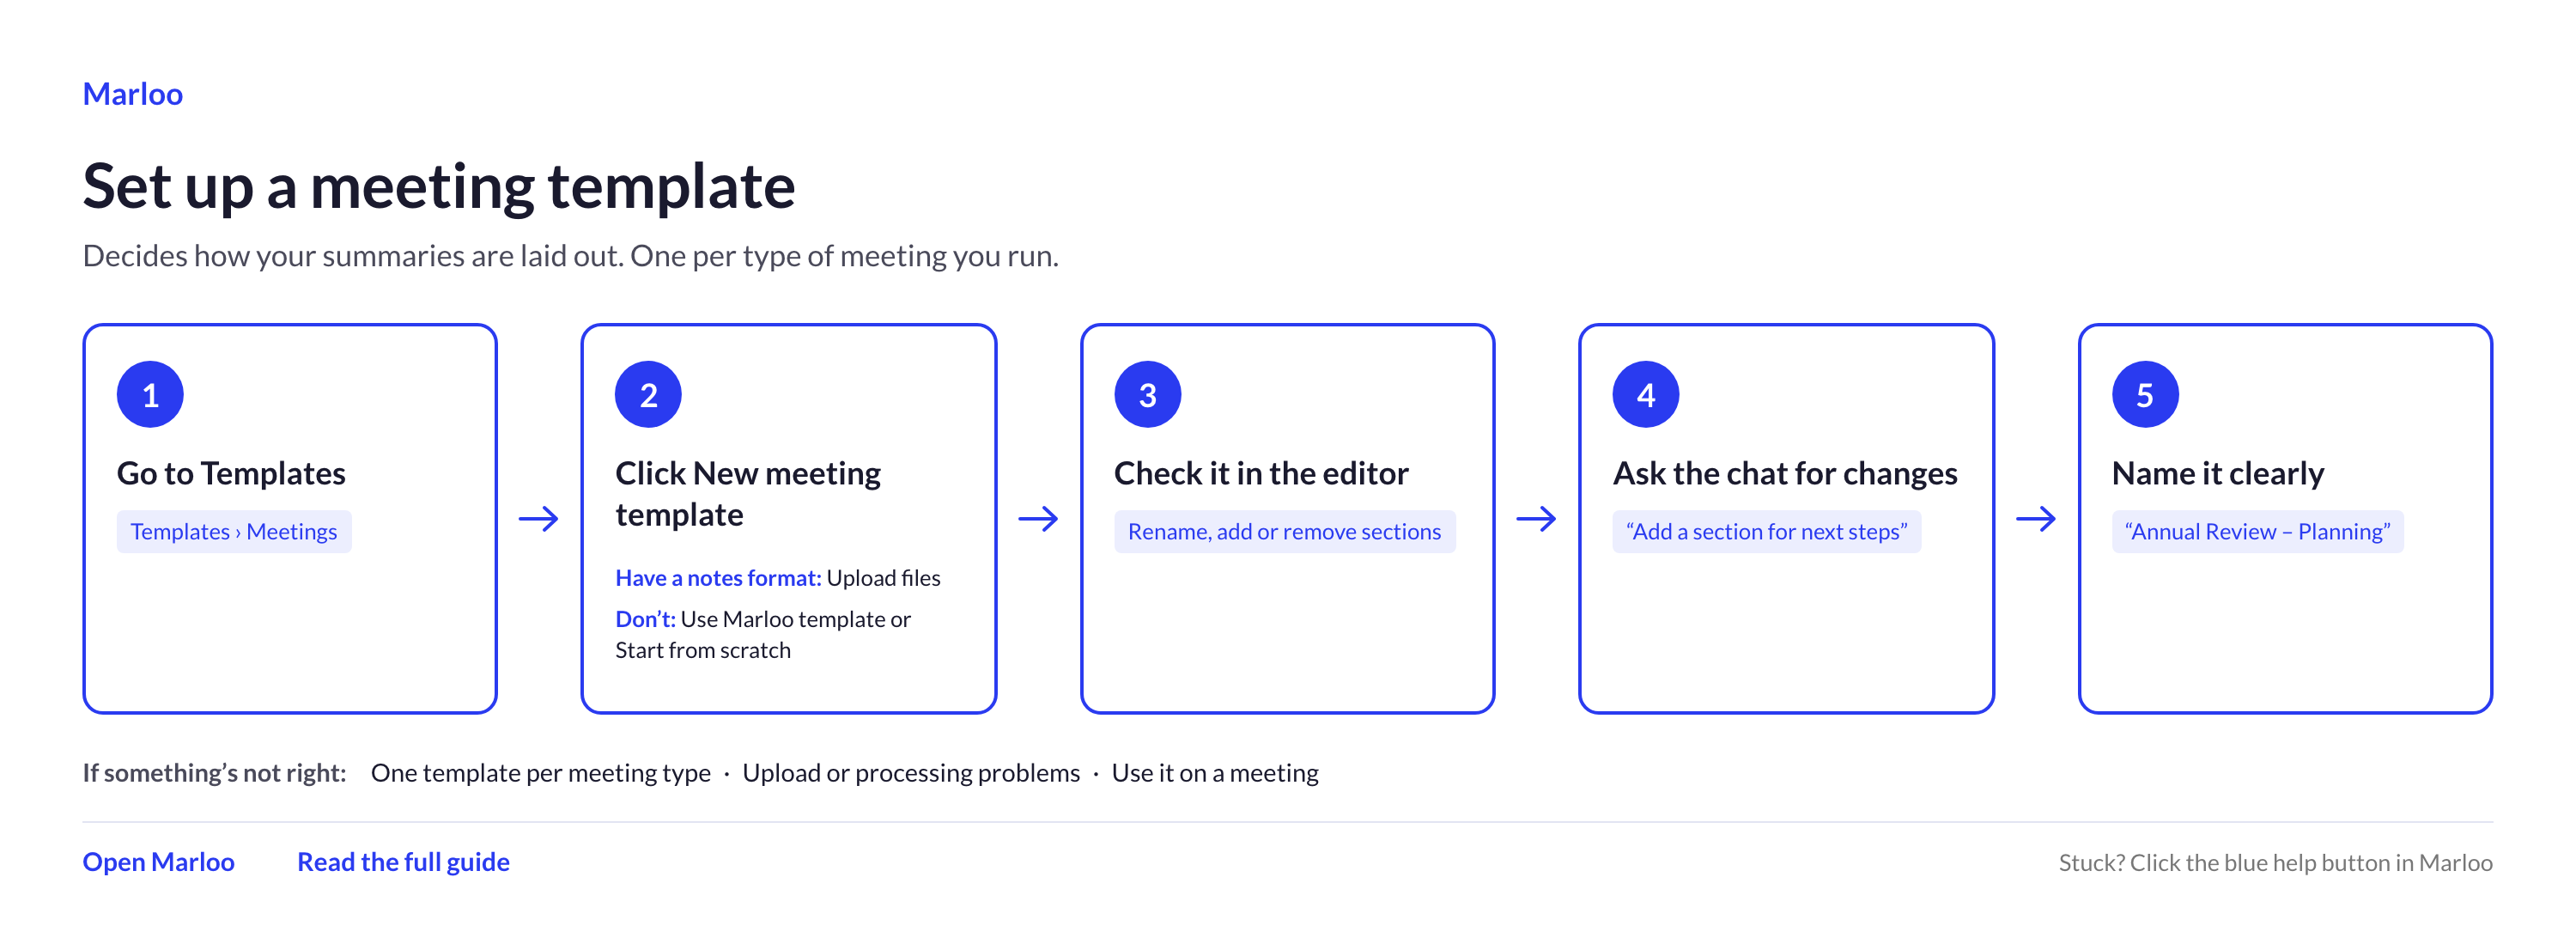
Decides how your summaries are laid out. One per type of meeting you run.
- Go to Templates: Templates > Meetings.
- Click New meeting template. If you have a notes format, upload files; if not, use a Marloo template or start from scratch.
- Check it in the editor: rename, add or remove sections.
- Ask the chat for changes, for example "Add a section for next steps".
- Name it clearly, for example "Annual Review – Planning".
If something's not right: keep one template per meeting type, check upload or processing problems, or use it on a meeting.
Quick flowchart: build a document template in 6 steps
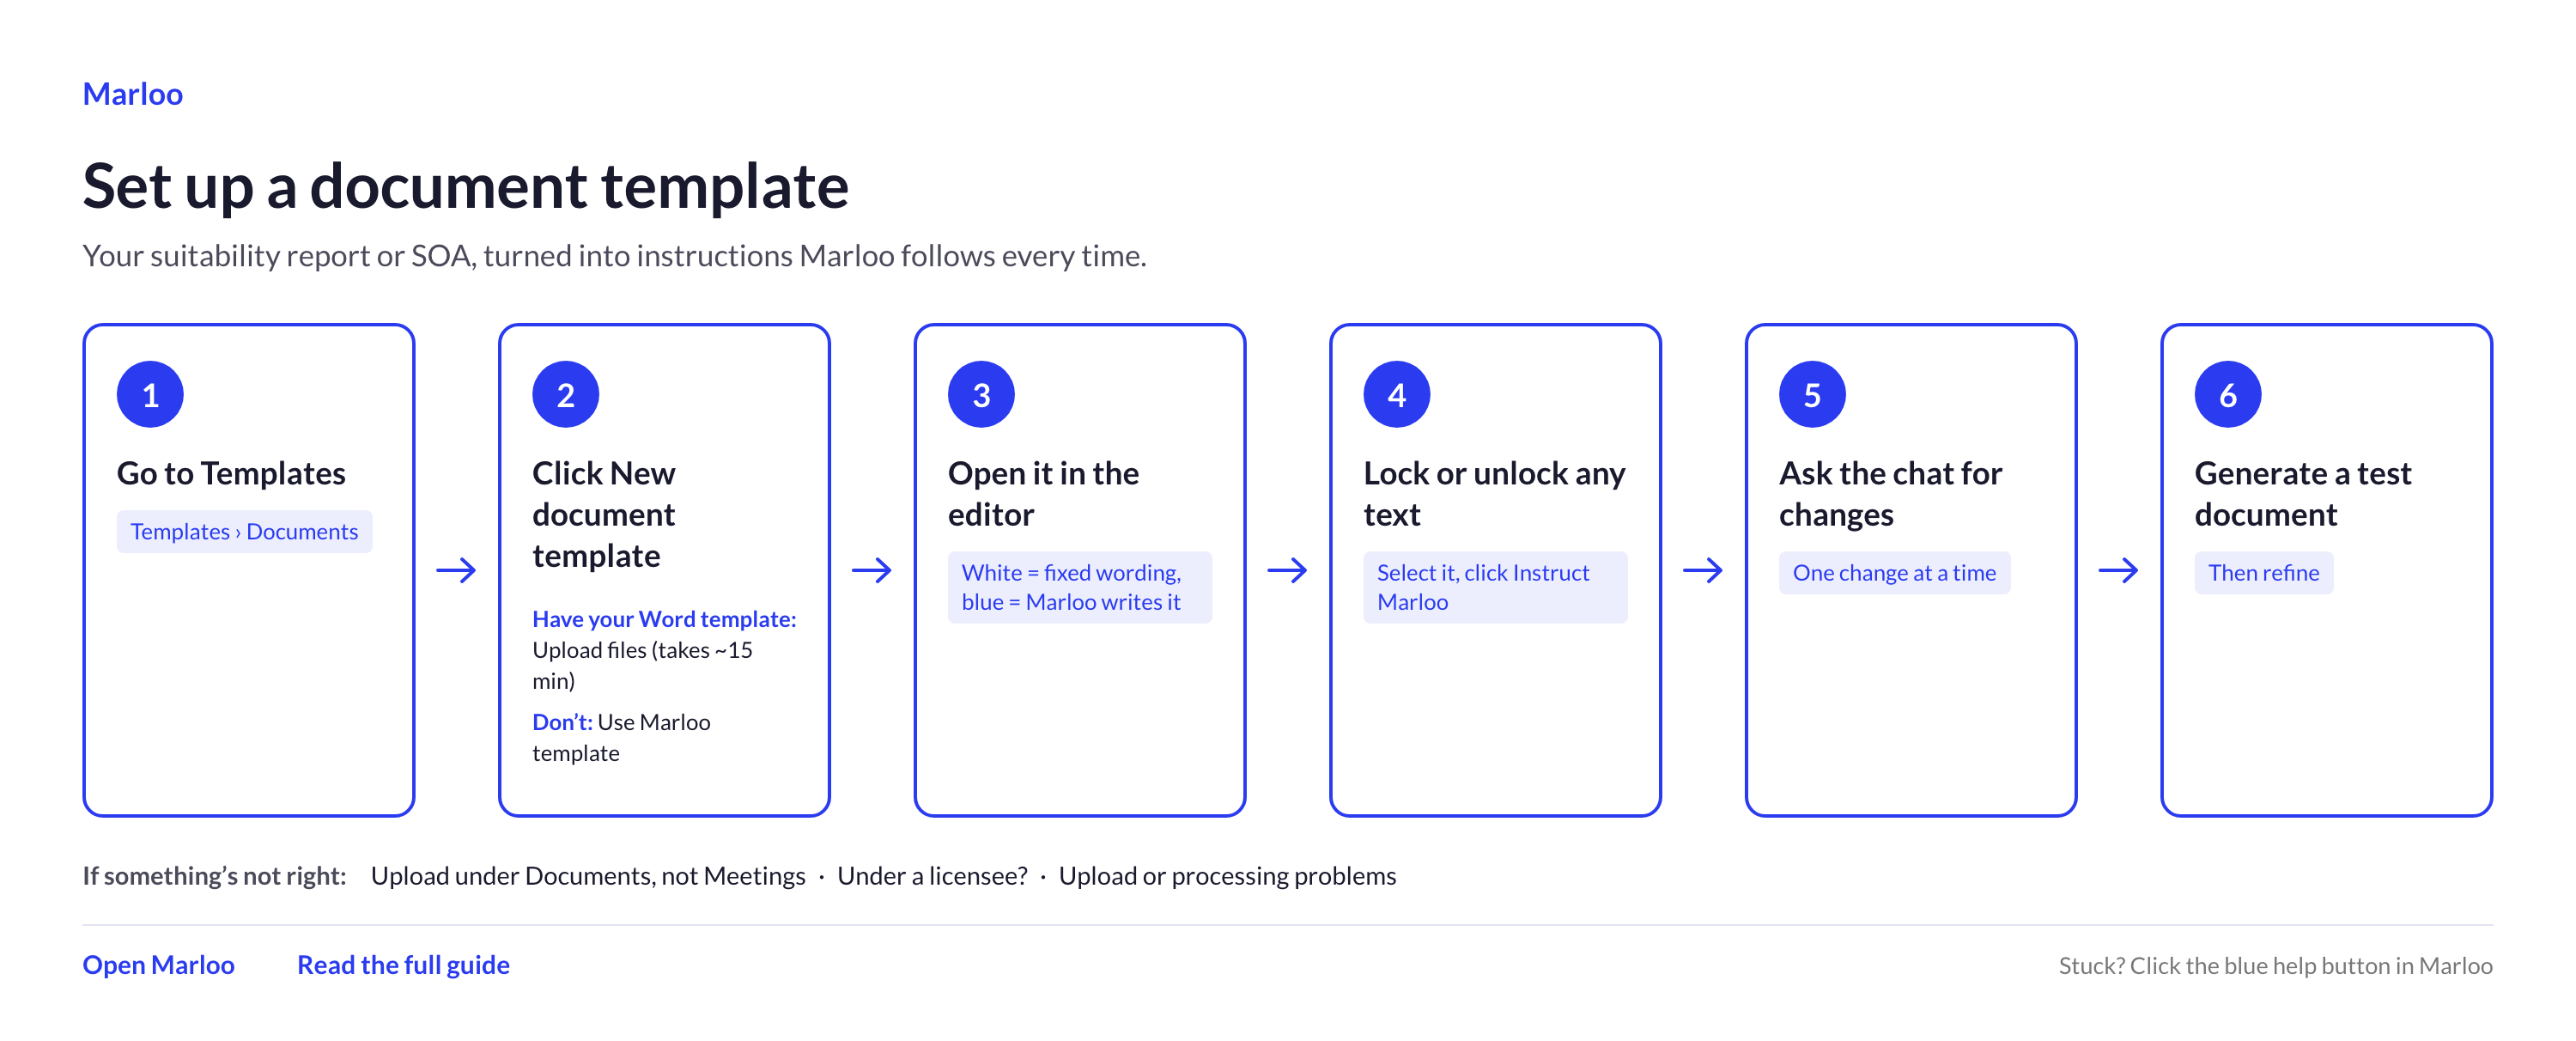
Your financial plan, turned into instructions Marloo follows every time.
- Go to Templates: Templates > Documents.
- Click New document template. If you have your Word template, upload files (takes about 15 minutes); if not, use a Marloo template.
- Open it in the editor. Fixed wording has a white background; text Marloo writes has a blue background.
- Lock or unlock any text: select it and click Instruct Marloo.
- Ask the chat for changes, one change at a time.
- Generate a test document, then refine.
If something's not right: upload under Documents, not Meetings; check if you're under an organization; or check upload or processing problems.
Quick flowchart: brand your exports in 6 steps
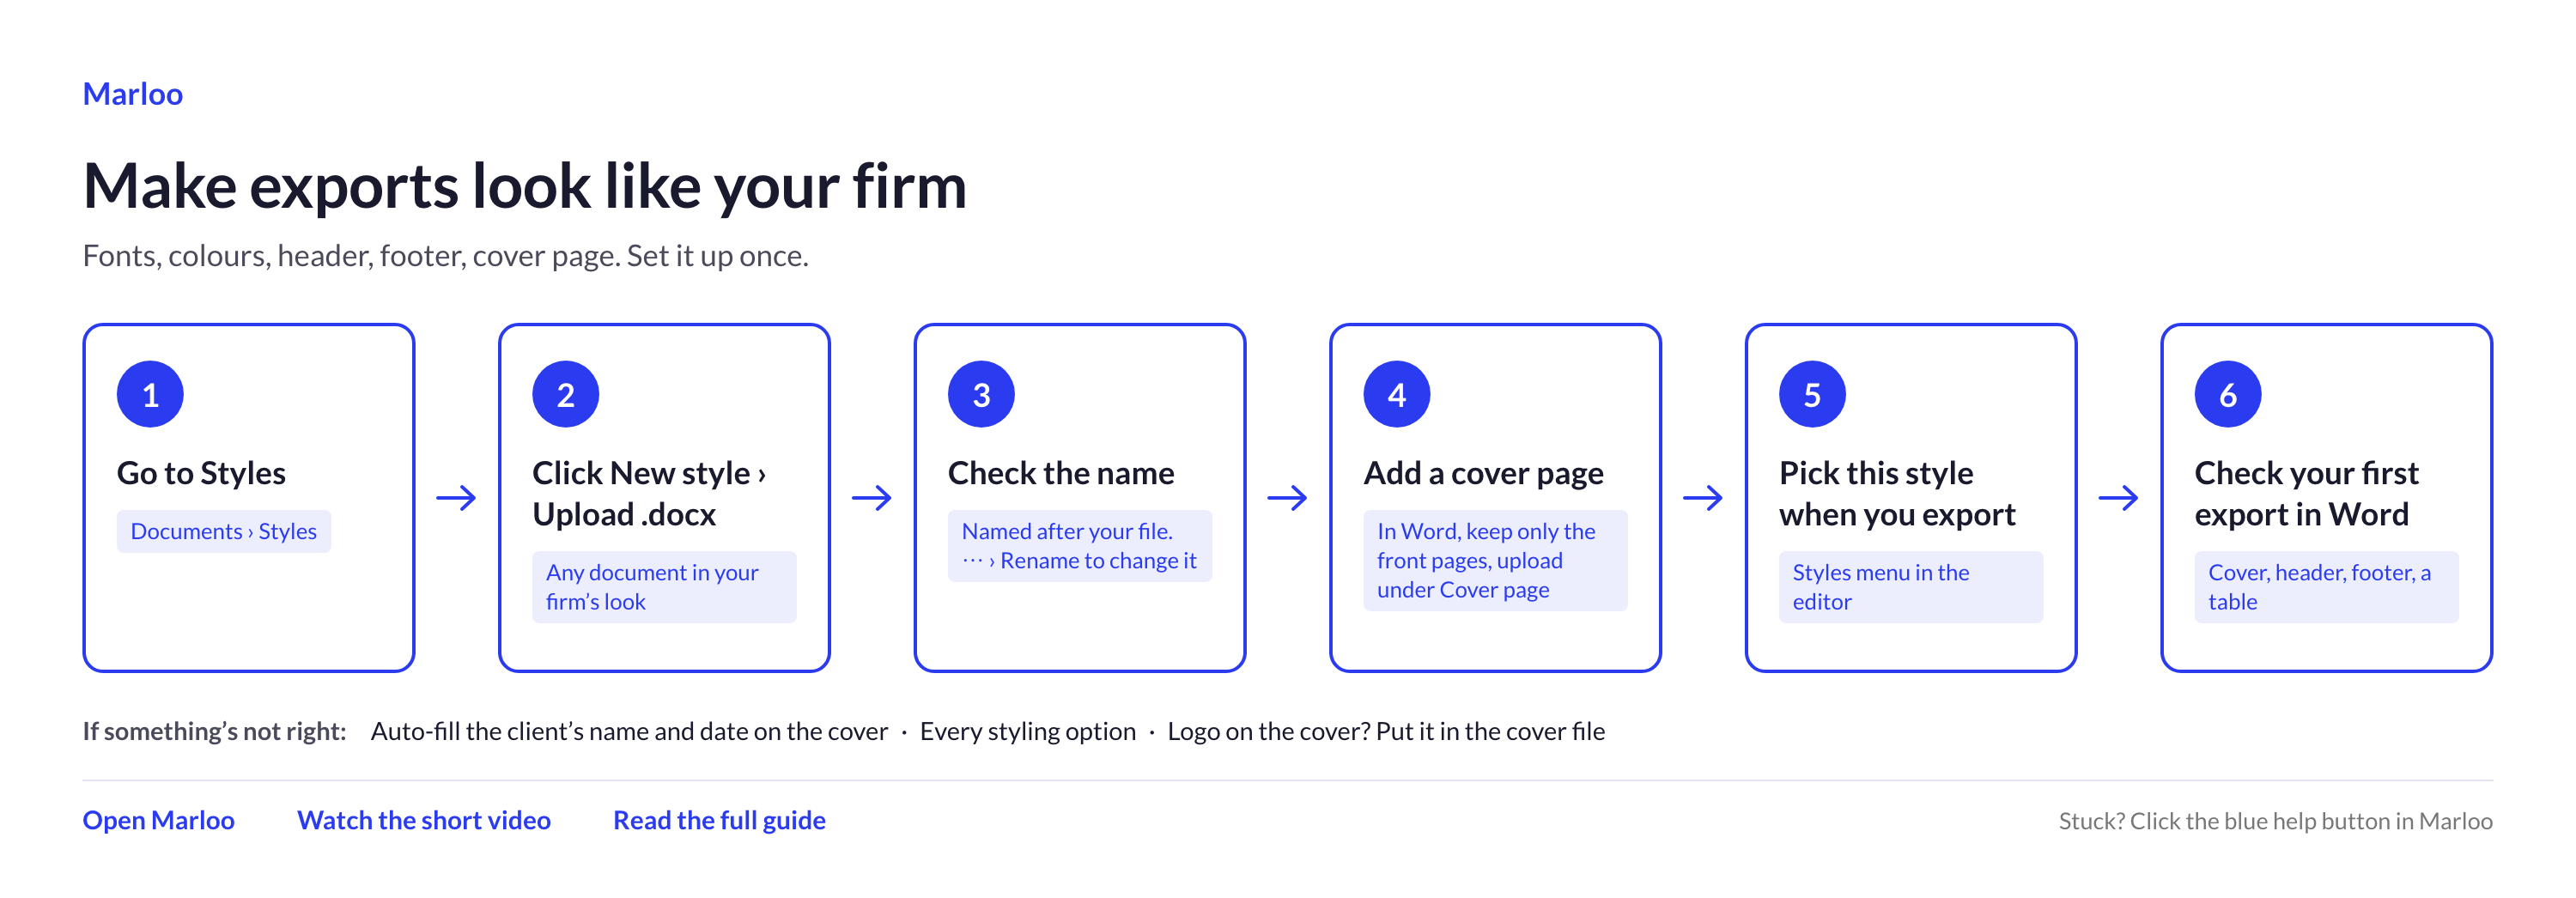
Fonts, colors, header, footer, cover page. Set it up once.
- Go to Styles: Documents > Styles.
- Click New style > Upload .docx, using any document in your firm's look.
- Check the name. It's named after your file; use the three-dot menu > Rename to change it.
- Add a cover page. In Word, keep only the front pages, then upload the file under Cover page.
- Pick this style when you export, from the Styles menu in the editor.
- Check your first export in Word: the cover, header, footer and a table.
If something's not right: auto-fill the client's name and date on the cover, see every styling option, or put your logo in the cover file.
Quick flowchart: teach Marloo your firm's way in 5 steps
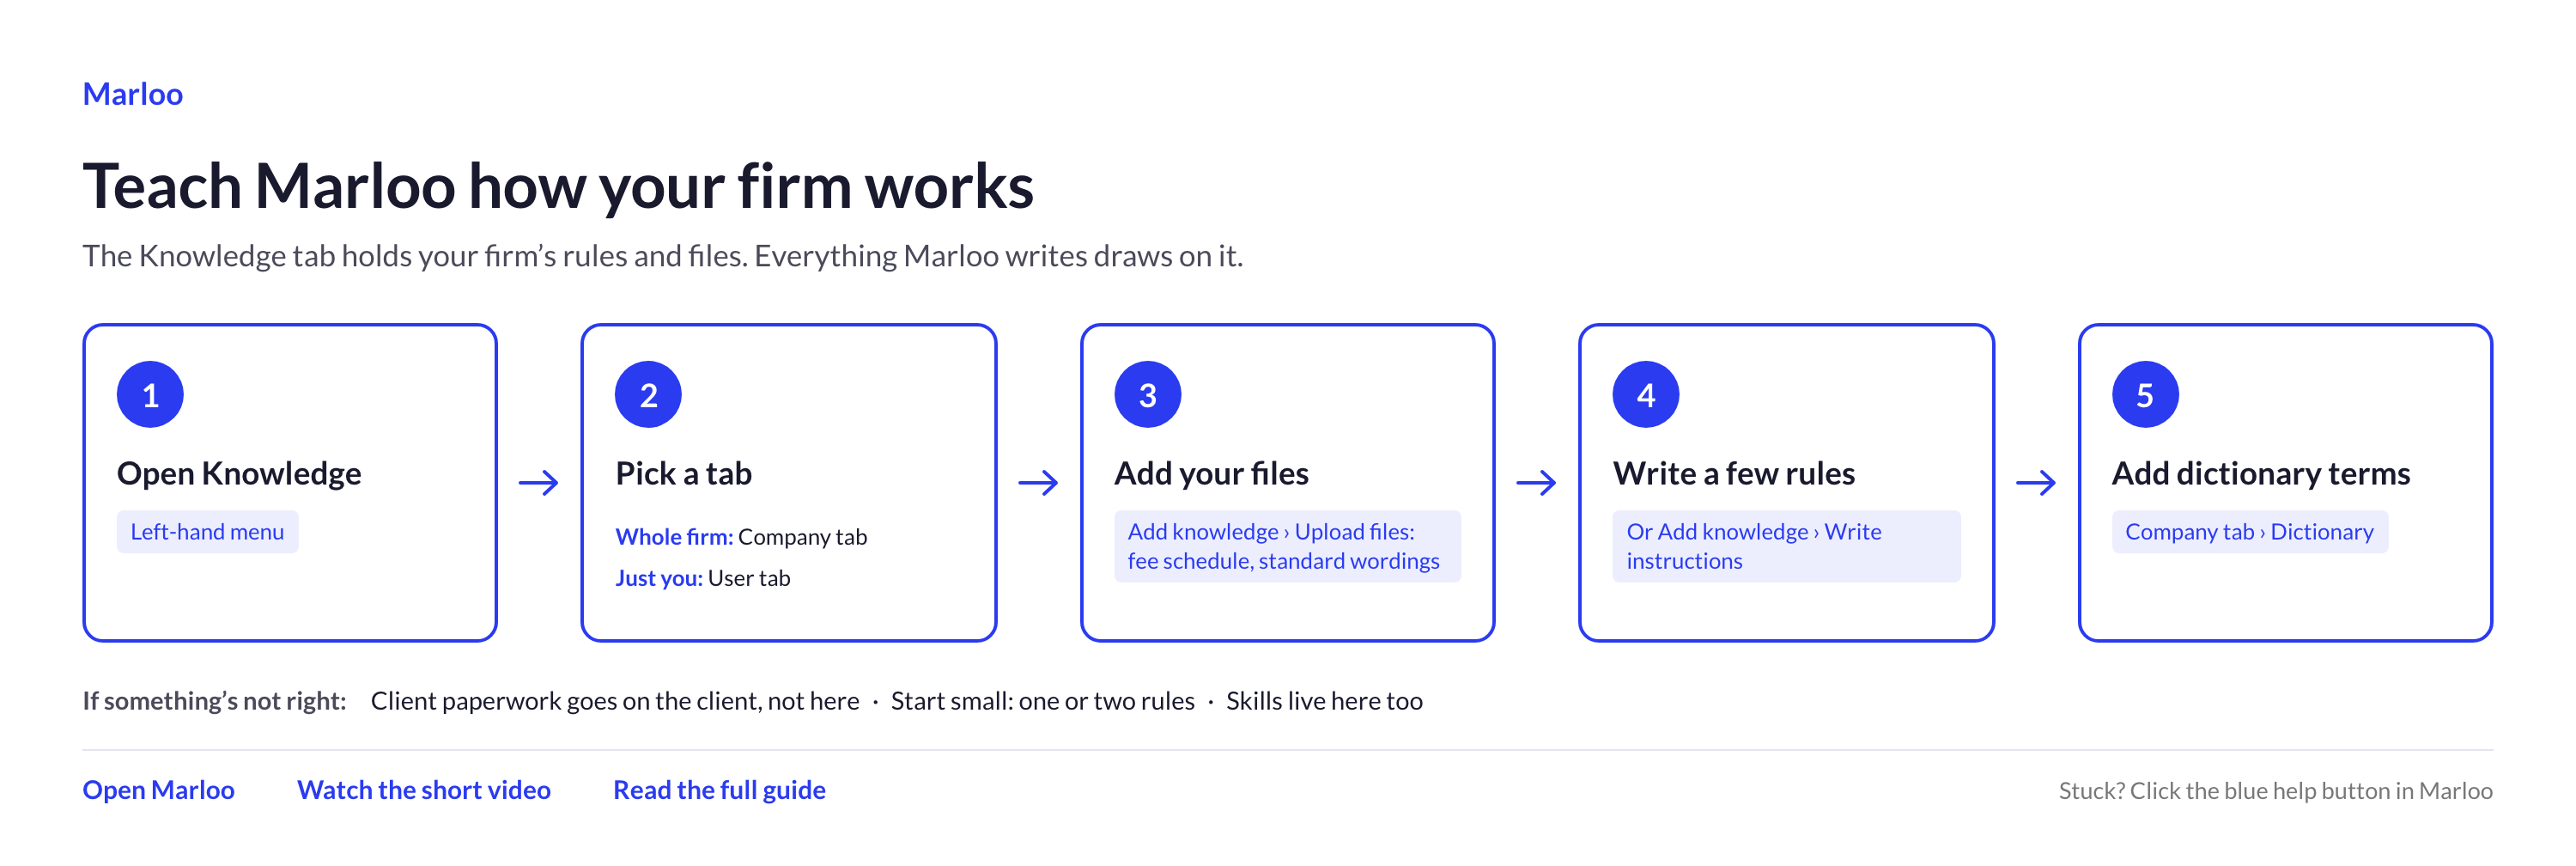
The Knowledge tab holds your firm's rules and files. Everything Marloo writes draws on it.
- Open Knowledge from the left-hand menu.
- Pick a tab: Company for the whole firm, User for just you.
- Add your files: Add knowledge > Upload files, such as your fee schedule and standard wordings.
- Write a few rules: Add knowledge > Write instructions.
- Add dictionary terms: Company tab > Dictionary.
If something's not right: client paperwork goes on the client, not here; start small with one or two rules; Skills live here too.
Read the full guide: Understanding the Knowledge tab in Marloo
Every meeting
Quick flowchart: get Marloo into a call in 5 steps
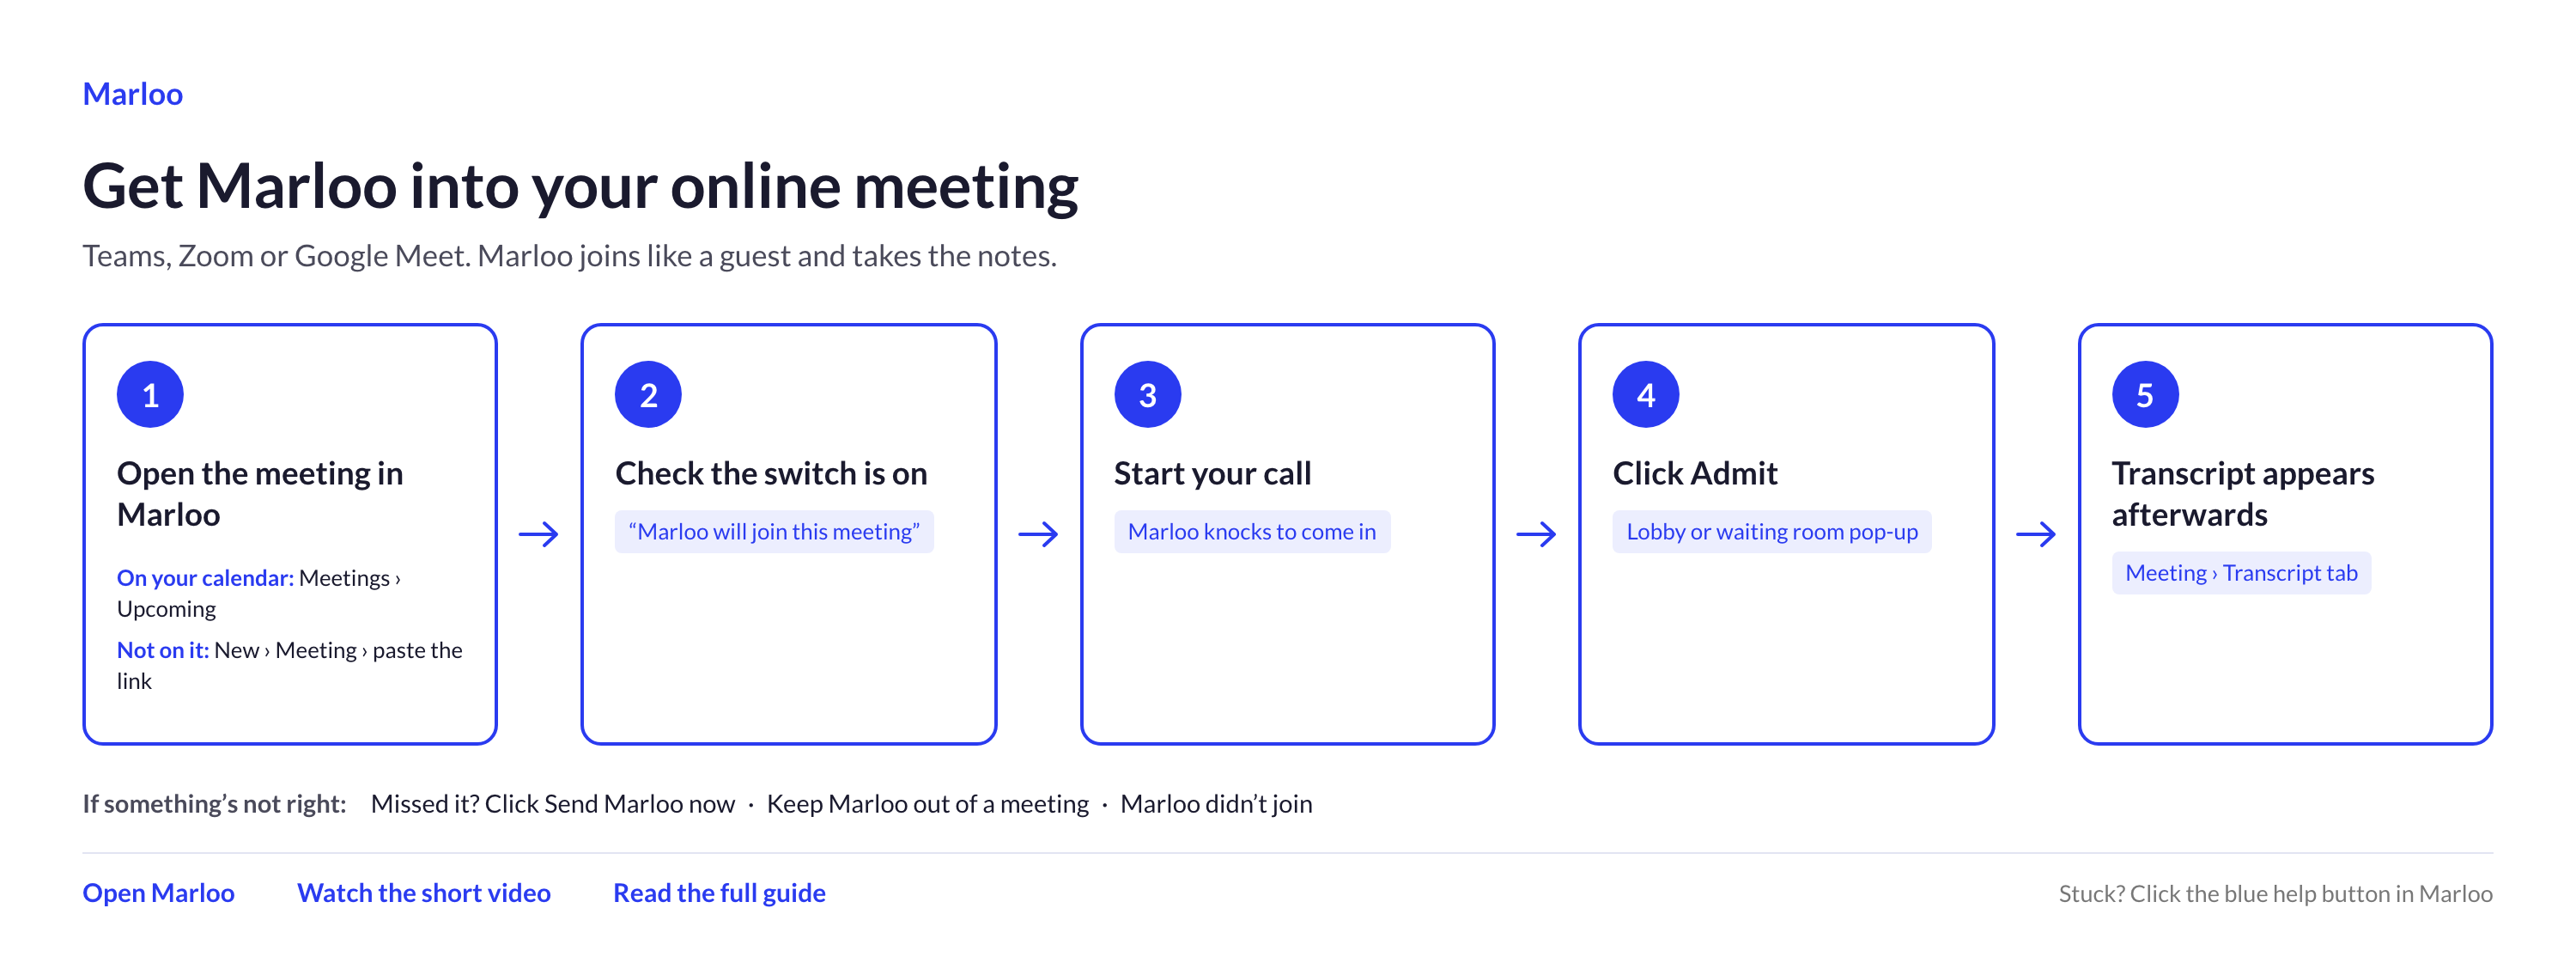
Teams, Zoom or Google Meet. Marloo joins like a guest and takes the notes.
- Open the meeting in Marloo. If it's on your calendar, go to Meetings > Upcoming; if not, click New > Meeting and paste the link.
- Check the switch is on: it reads "Marloo will join this meeting".
- Start your call. Marloo knocks to come in.
- Click Admit in the lobby or waiting room pop-up.
- The transcript appears afterwards on the meeting's Transcript tab.
If something's not right: missed it? Click Send Marloo now. You can also keep Marloo out of a meeting, or see what to do if Marloo didn't join.
Quick flowchart: record it yourself in 5 steps
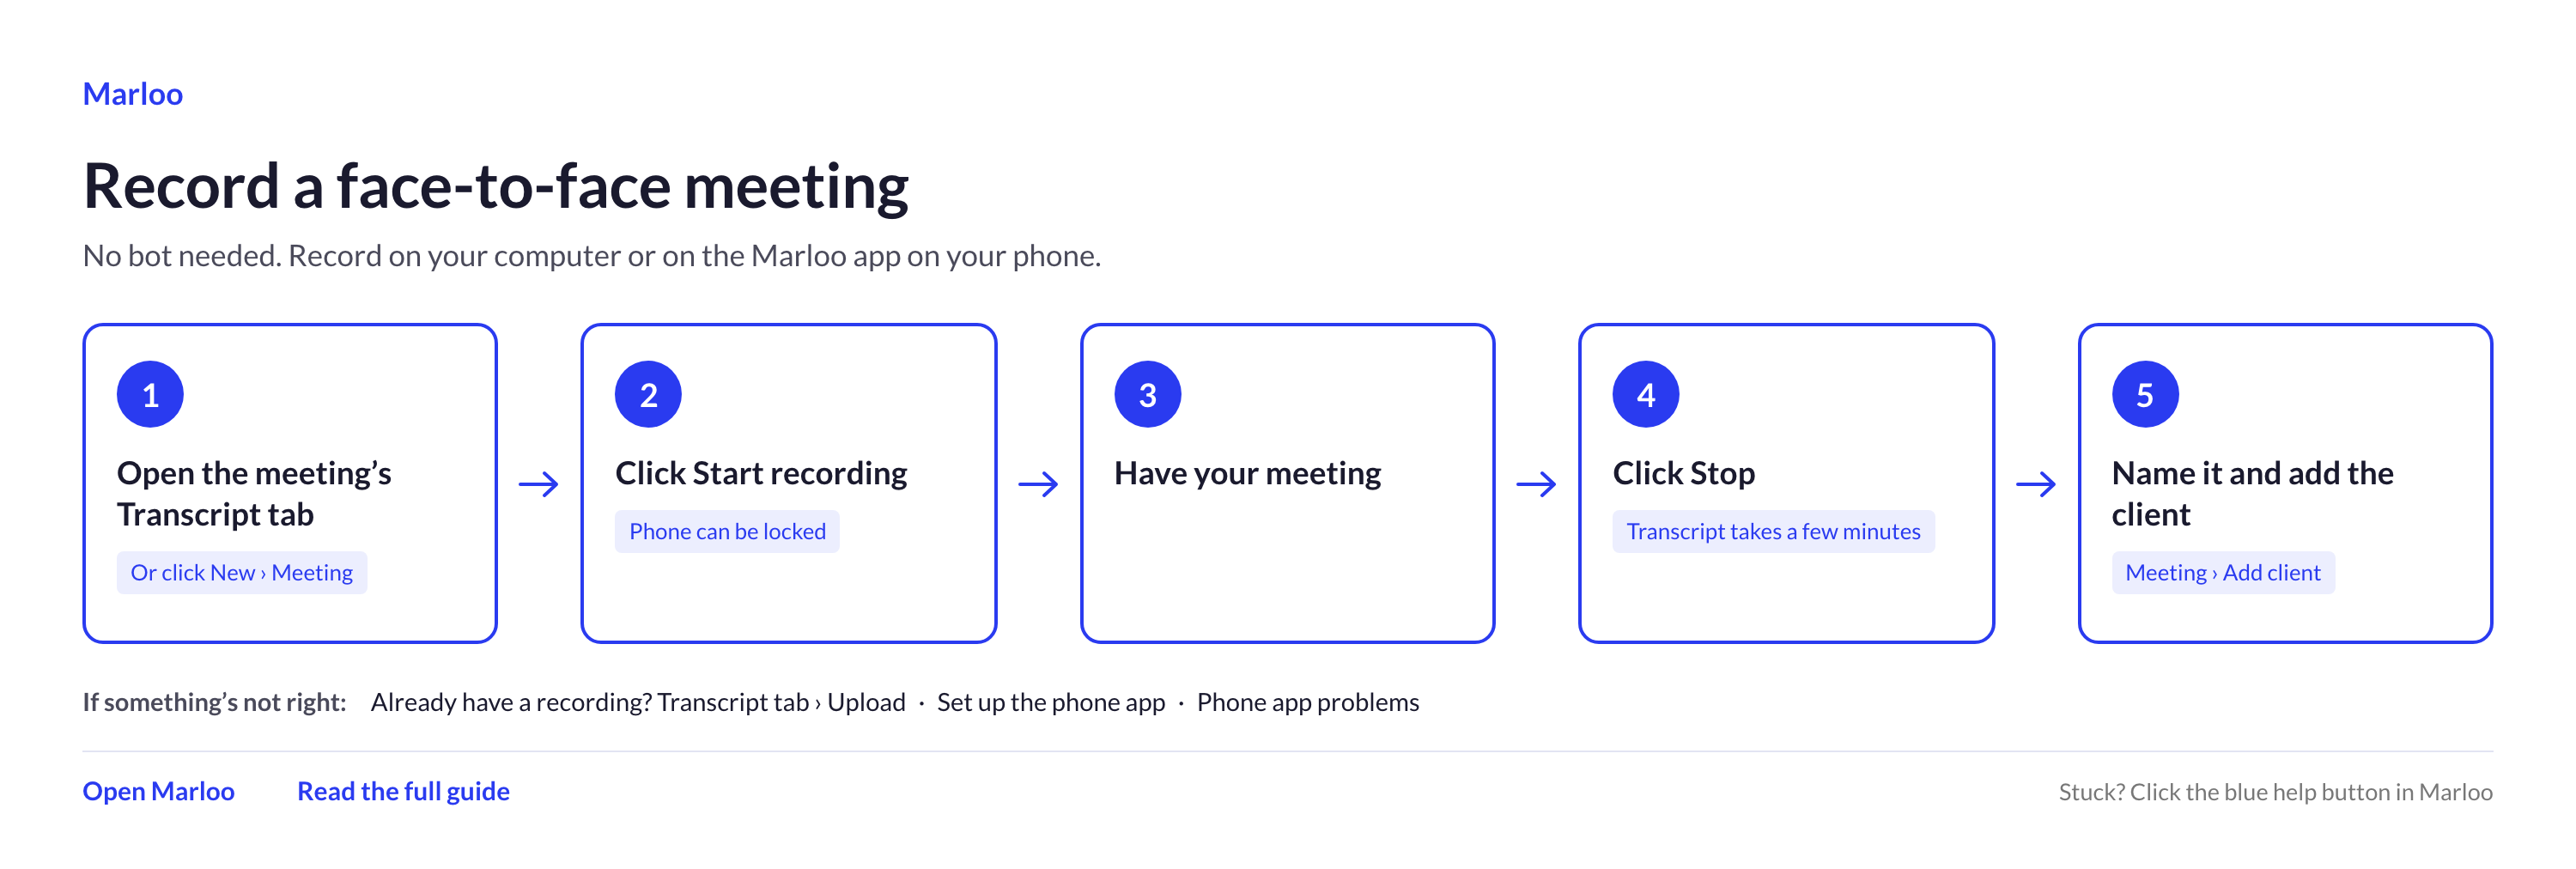
No bot needed. Record on your computer or on the Marloo app on your phone.
- Open the meeting's Transcript tab, or click New > Meeting.
- Click Start recording. Your phone can be locked.
- Have your meeting.
- Click Stop. The transcript takes a few minutes.
- Name it and add the client with Add client on the meeting.
If something's not right: already have a recording? Use Transcript tab > Upload. You can also set up the phone app, or fix phone app problems.
Read the full guide: Upload a recording or record a meeting yourself
Quick flowchart: meeting to summary in 5 steps
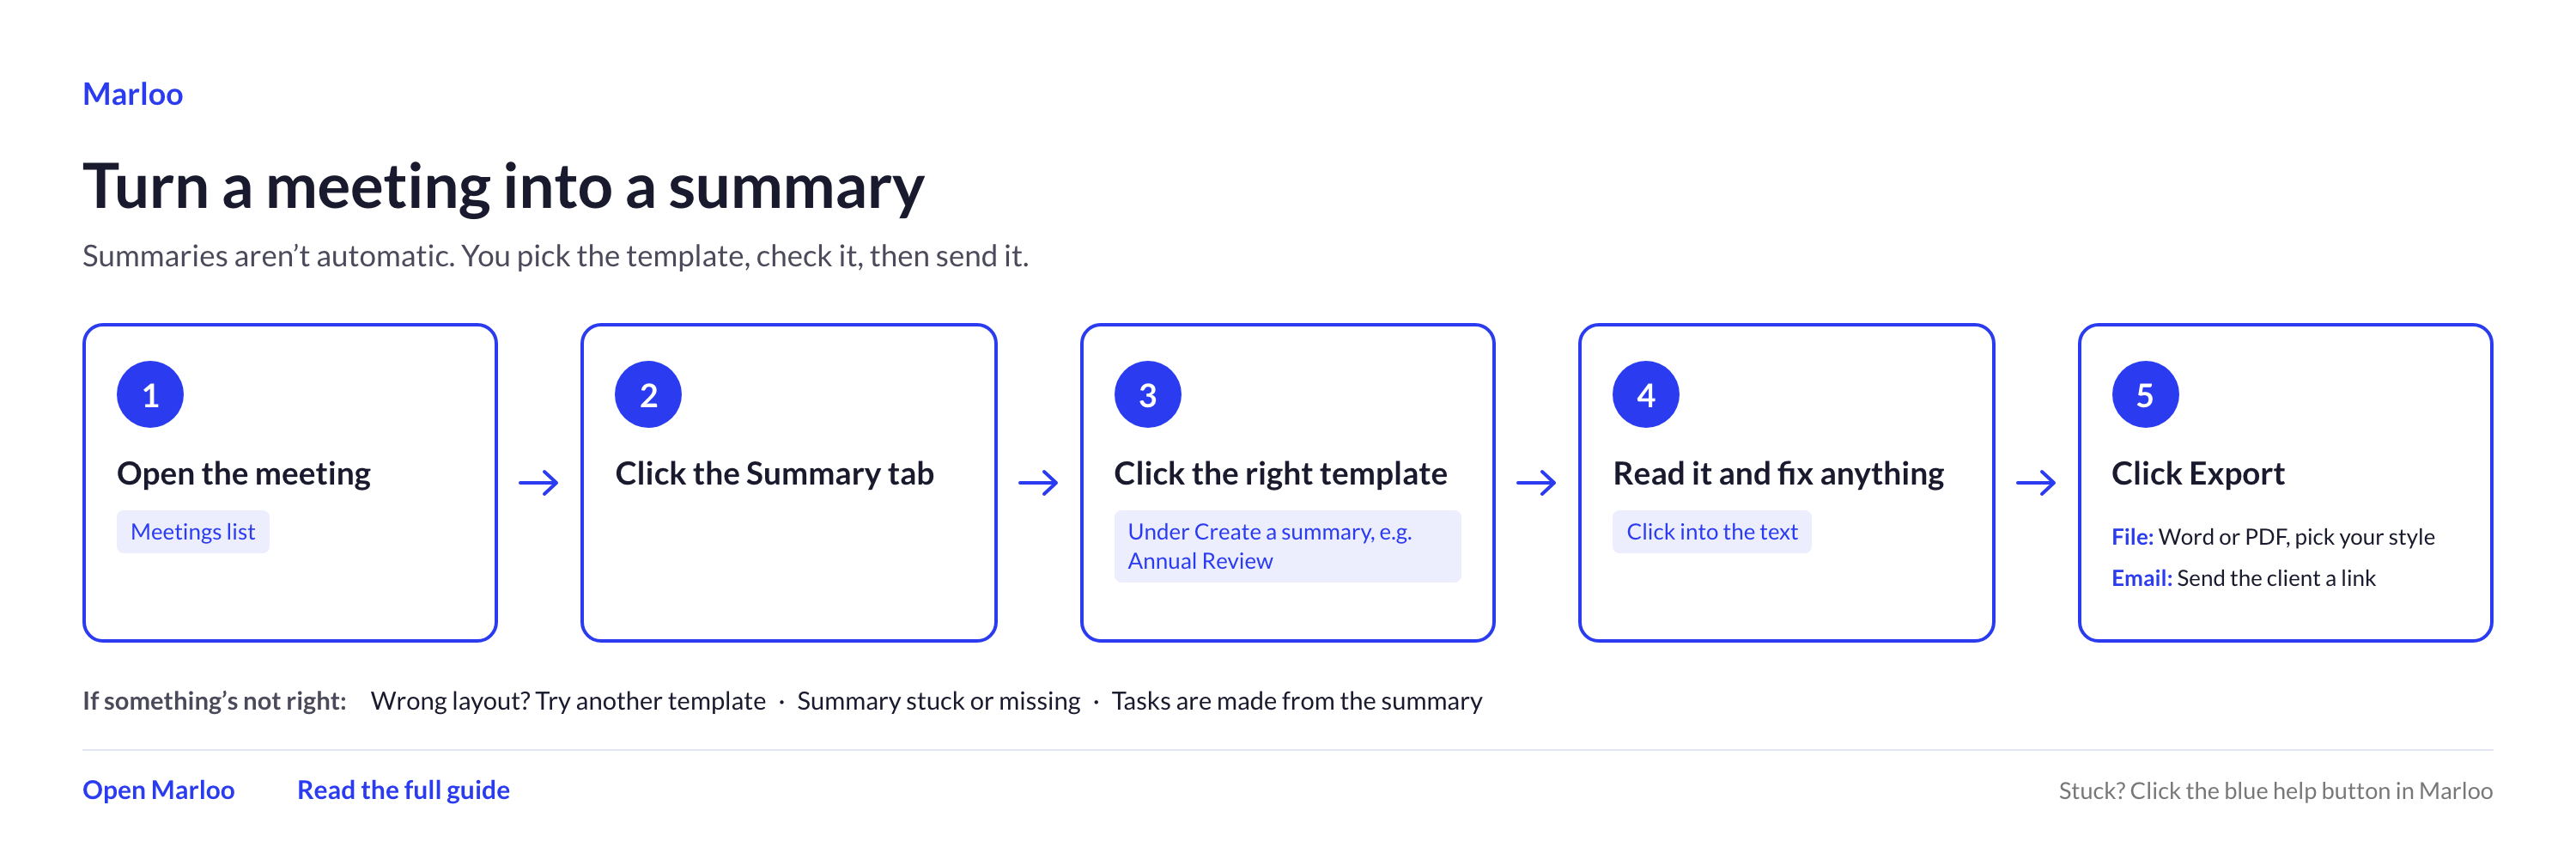
Summaries aren't automatic. You pick the template, check it, then send it.
- Open the meeting from the Meetings list.
- Click the Summary tab.
- Click the right template under Create a summary, for example Annual Review.
- Read it and fix anything by clicking into the text.
- Click Export: a Word or PDF file in your style, or an email that sends the client a link.
If something's not right: wrong layout? Try another template. Also: summary stuck or missing; tasks are made from the summary.
Read the full guide: Generate, edit and export a meeting summary
Quick flowchart: from summary to done in 5 steps
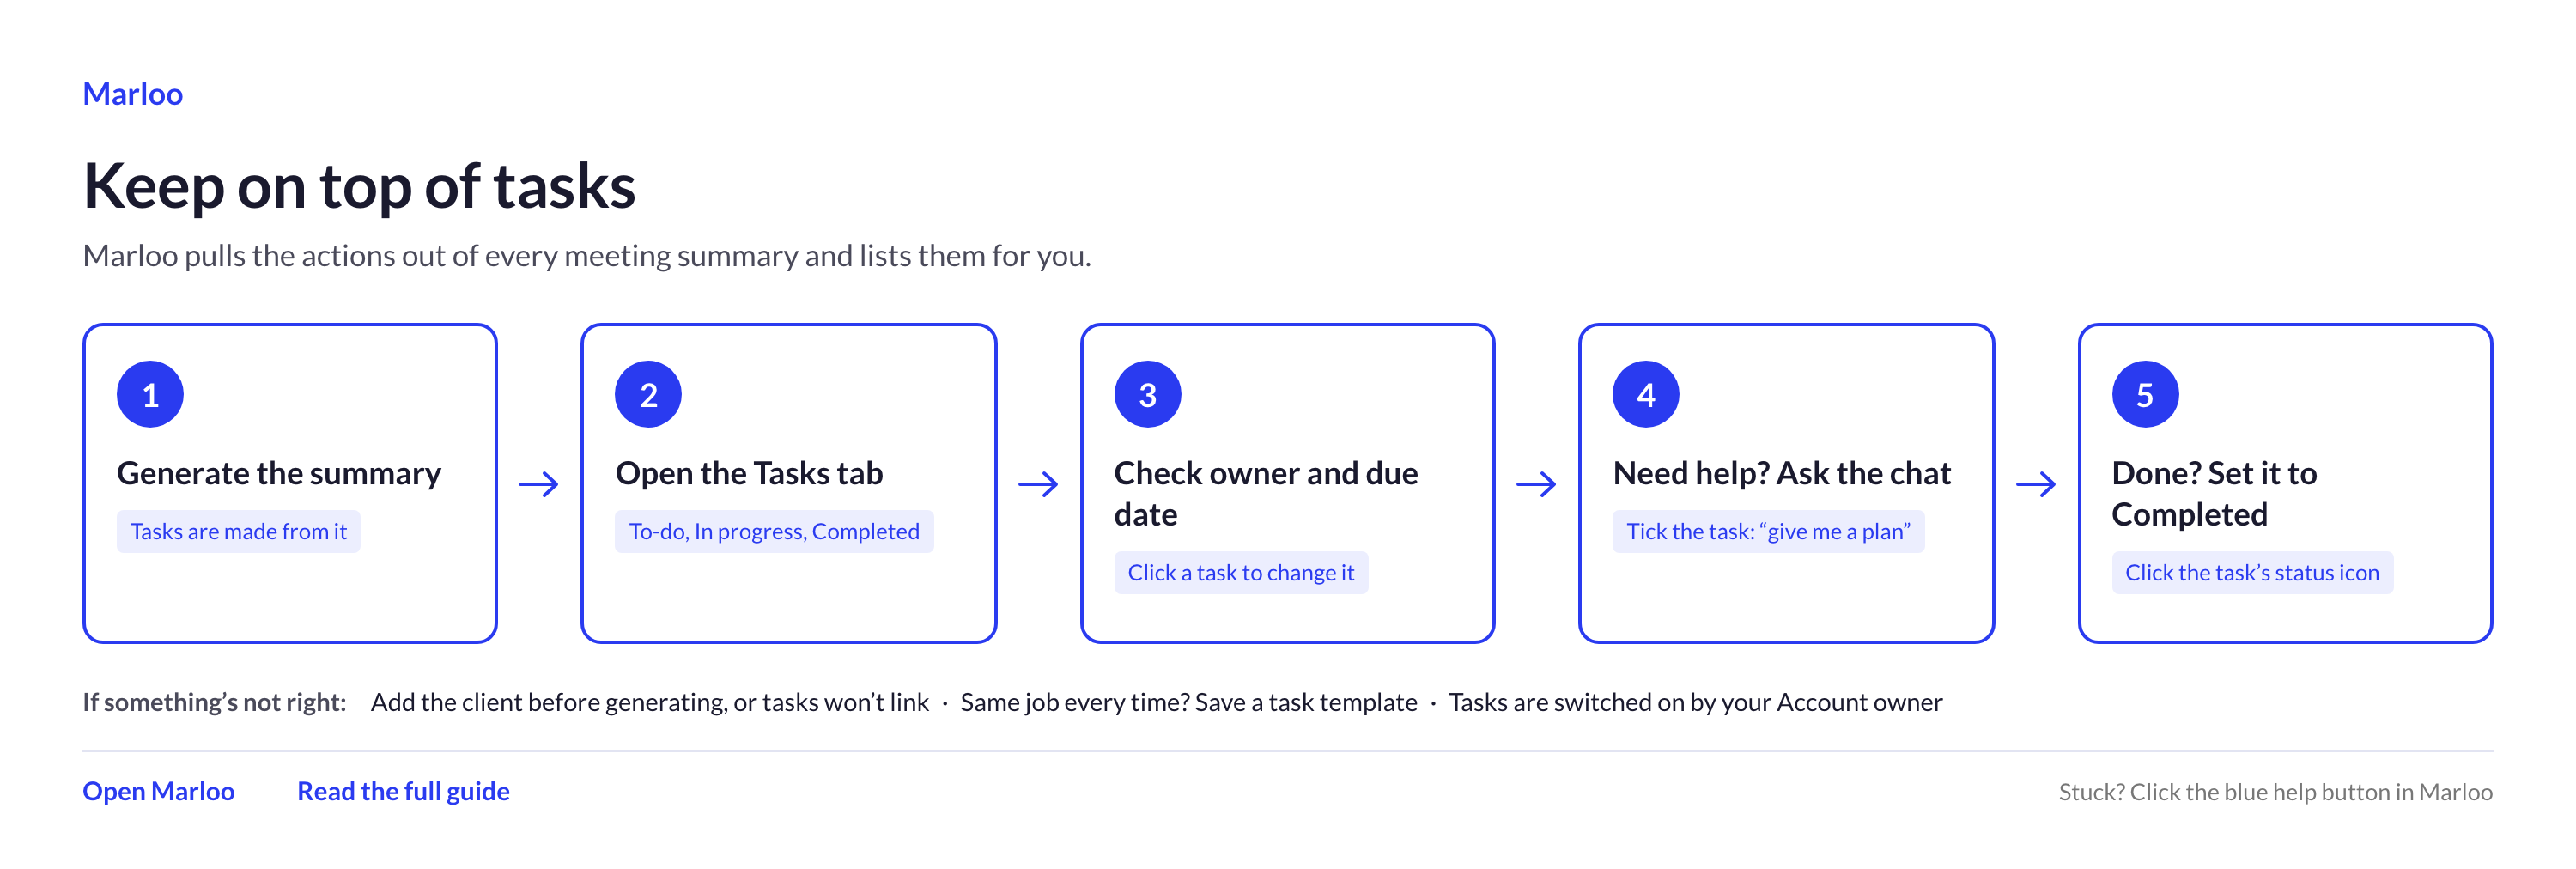
Marloo pulls the actions out of every meeting summary and lists them for you.
- Generate the summary. Tasks are made from it.
- Open the Tasks tab: To-do, In progress, Completed.
- Check the owner and due date. Click a task to change it.
- Need help? Ask the chat, for example select the task and ask "give me a plan".
- Done? Set it to Completed by clicking the task's status icon.
If something's not right: add the client before generating, or tasks won't link; for the same job every time, save a task template; tasks are switched on by your Account owner.
Every client
Quick flowchart: add documents to a client in 5 steps
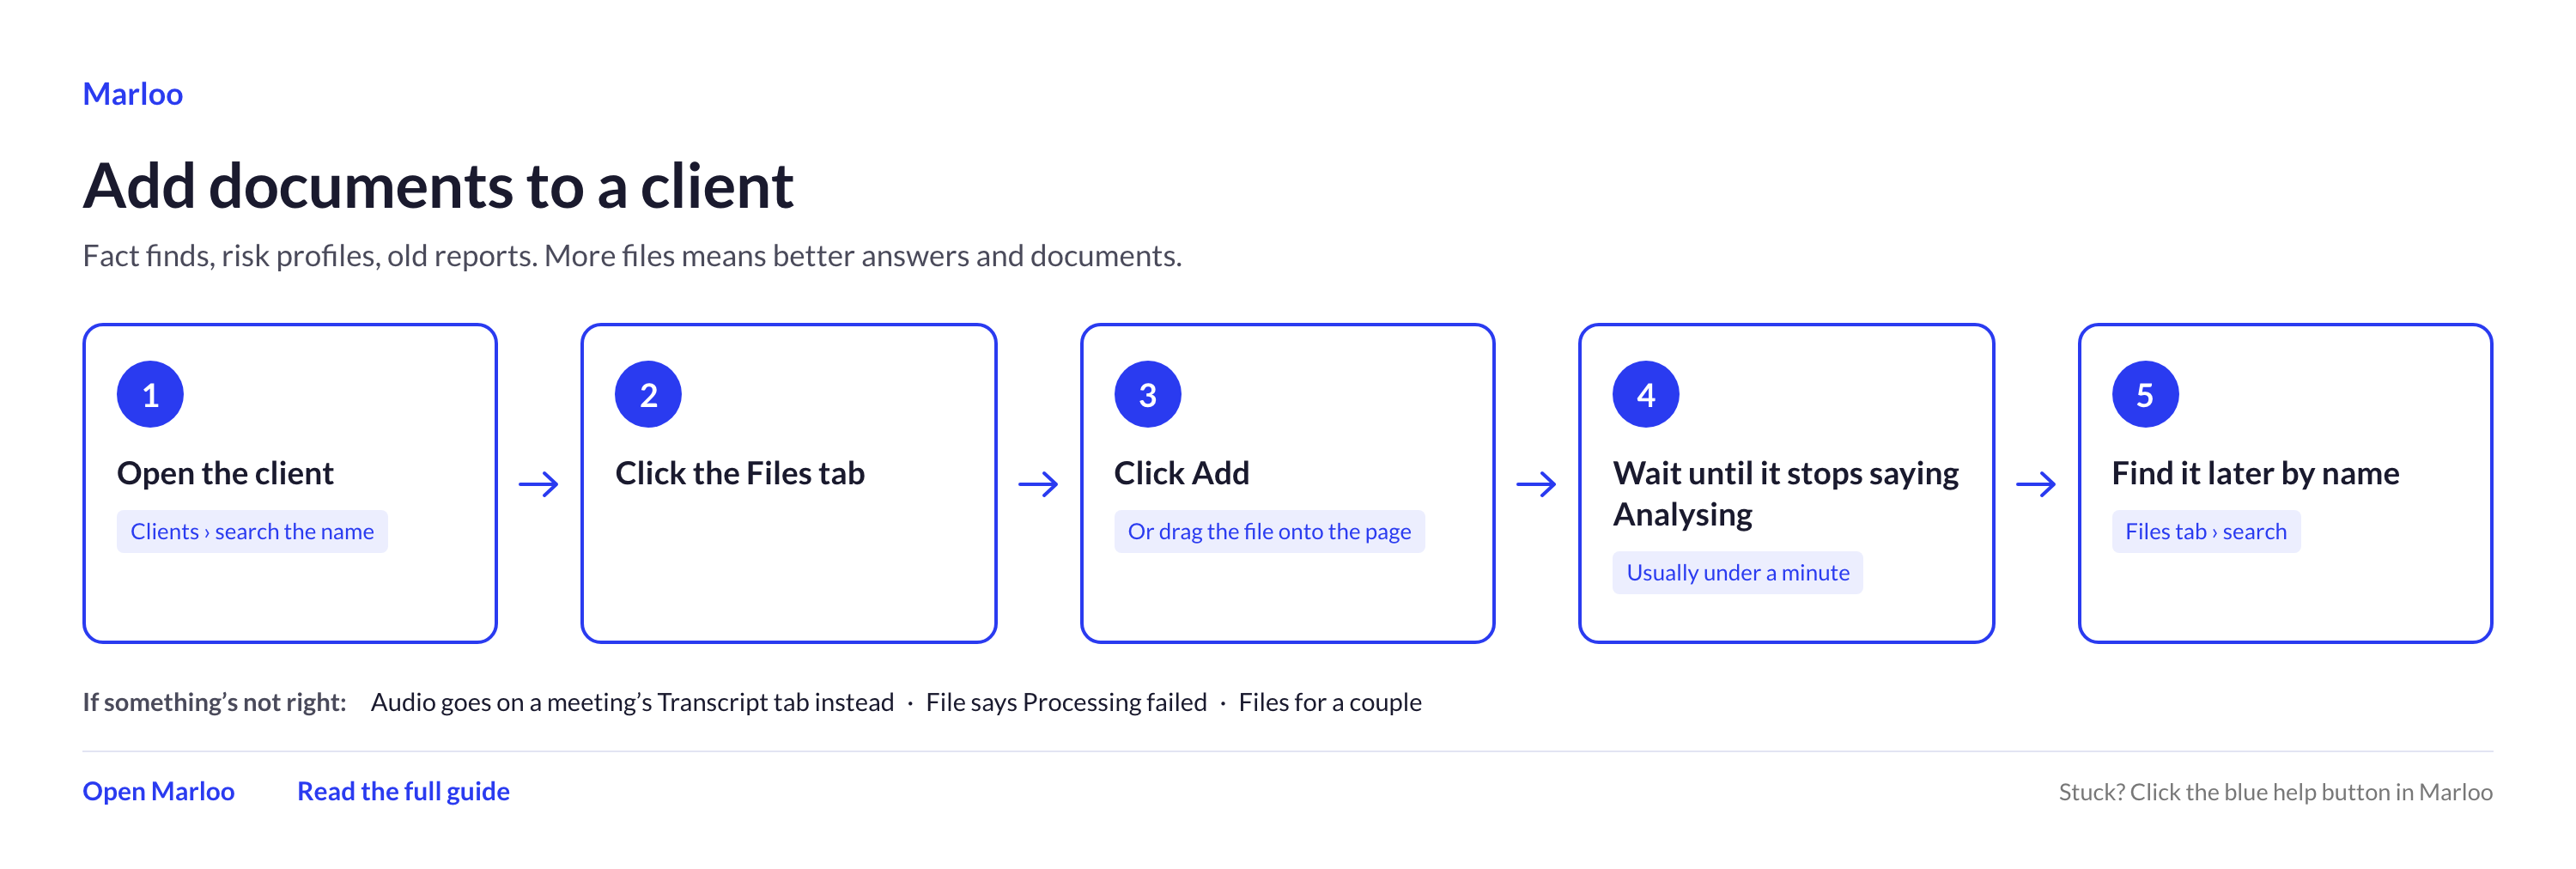
Fact finds, risk profiles, old reports. More files means better answers and documents.
- Open the client: Clients, then search the name.
- Click the Files tab.
- Click Add, or drag the file onto the page.
- Wait until it stops saying Analyzing. Usually under a minute.
- Find it later by name with the search on the Files tab.
If something's not right: audio goes on a meeting's Transcript tab instead; a file says Processing failed; files for a couple.
Read the full guide: Upload, find and organize files on a client
Quick flowchart: fill a form in 6 steps
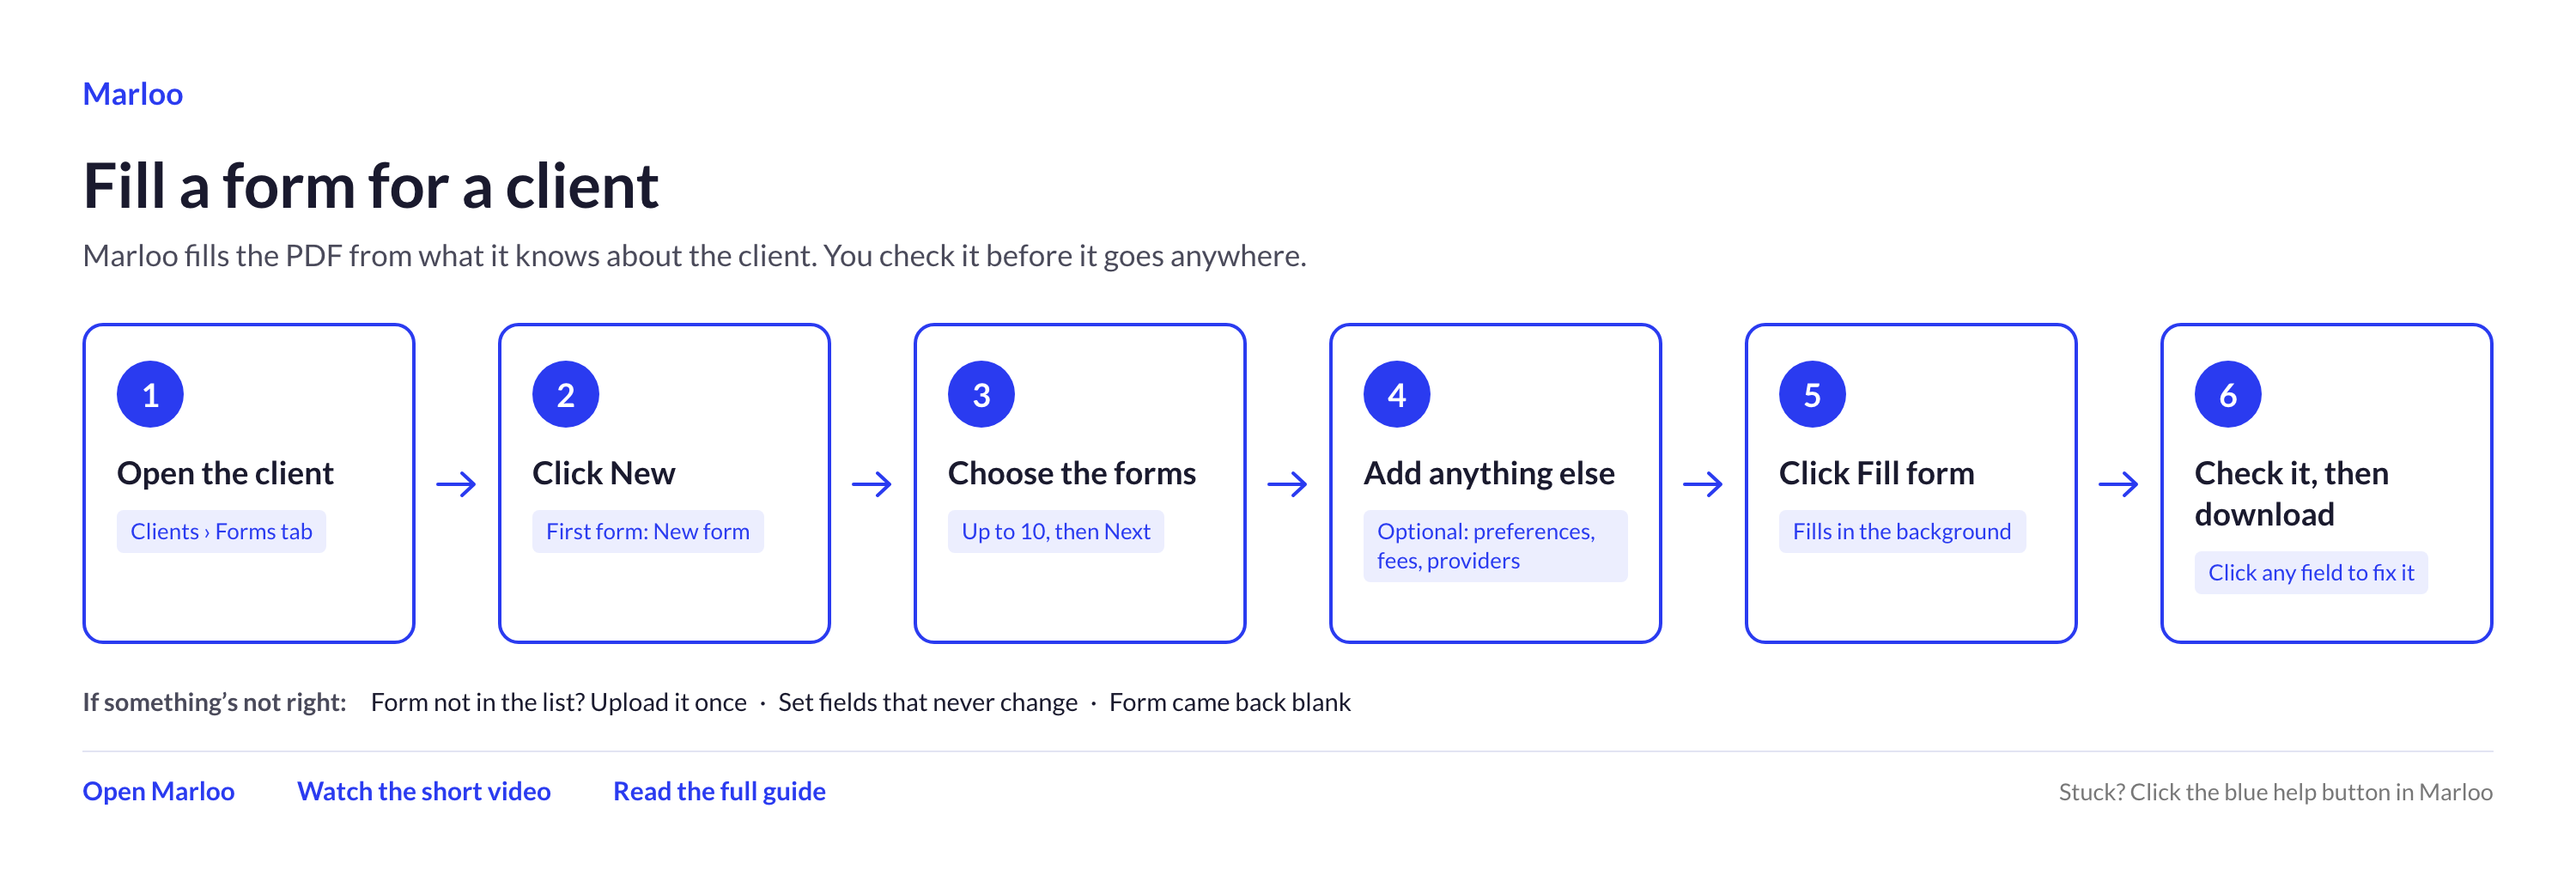
Marloo fills the PDF from what it knows about the client. You check it before it goes anywhere.
- Open the client and go to the Forms tab.
- Click New. For the first form, choose New form.
- Choose the forms, up to 10, then click Next.
- Add anything else (optional): preferences, fees, providers.
- Click Fill form. It fills in the background.
- Check it, then download. Click any field to fix it.
If something's not right: form not in the list? Upload it once. You can also set fields that never change, or see what to do if a form came back blank.
Read the full guide: Fill client forms and send them for signature
Quick flowchart: generate an advice document in 6 steps
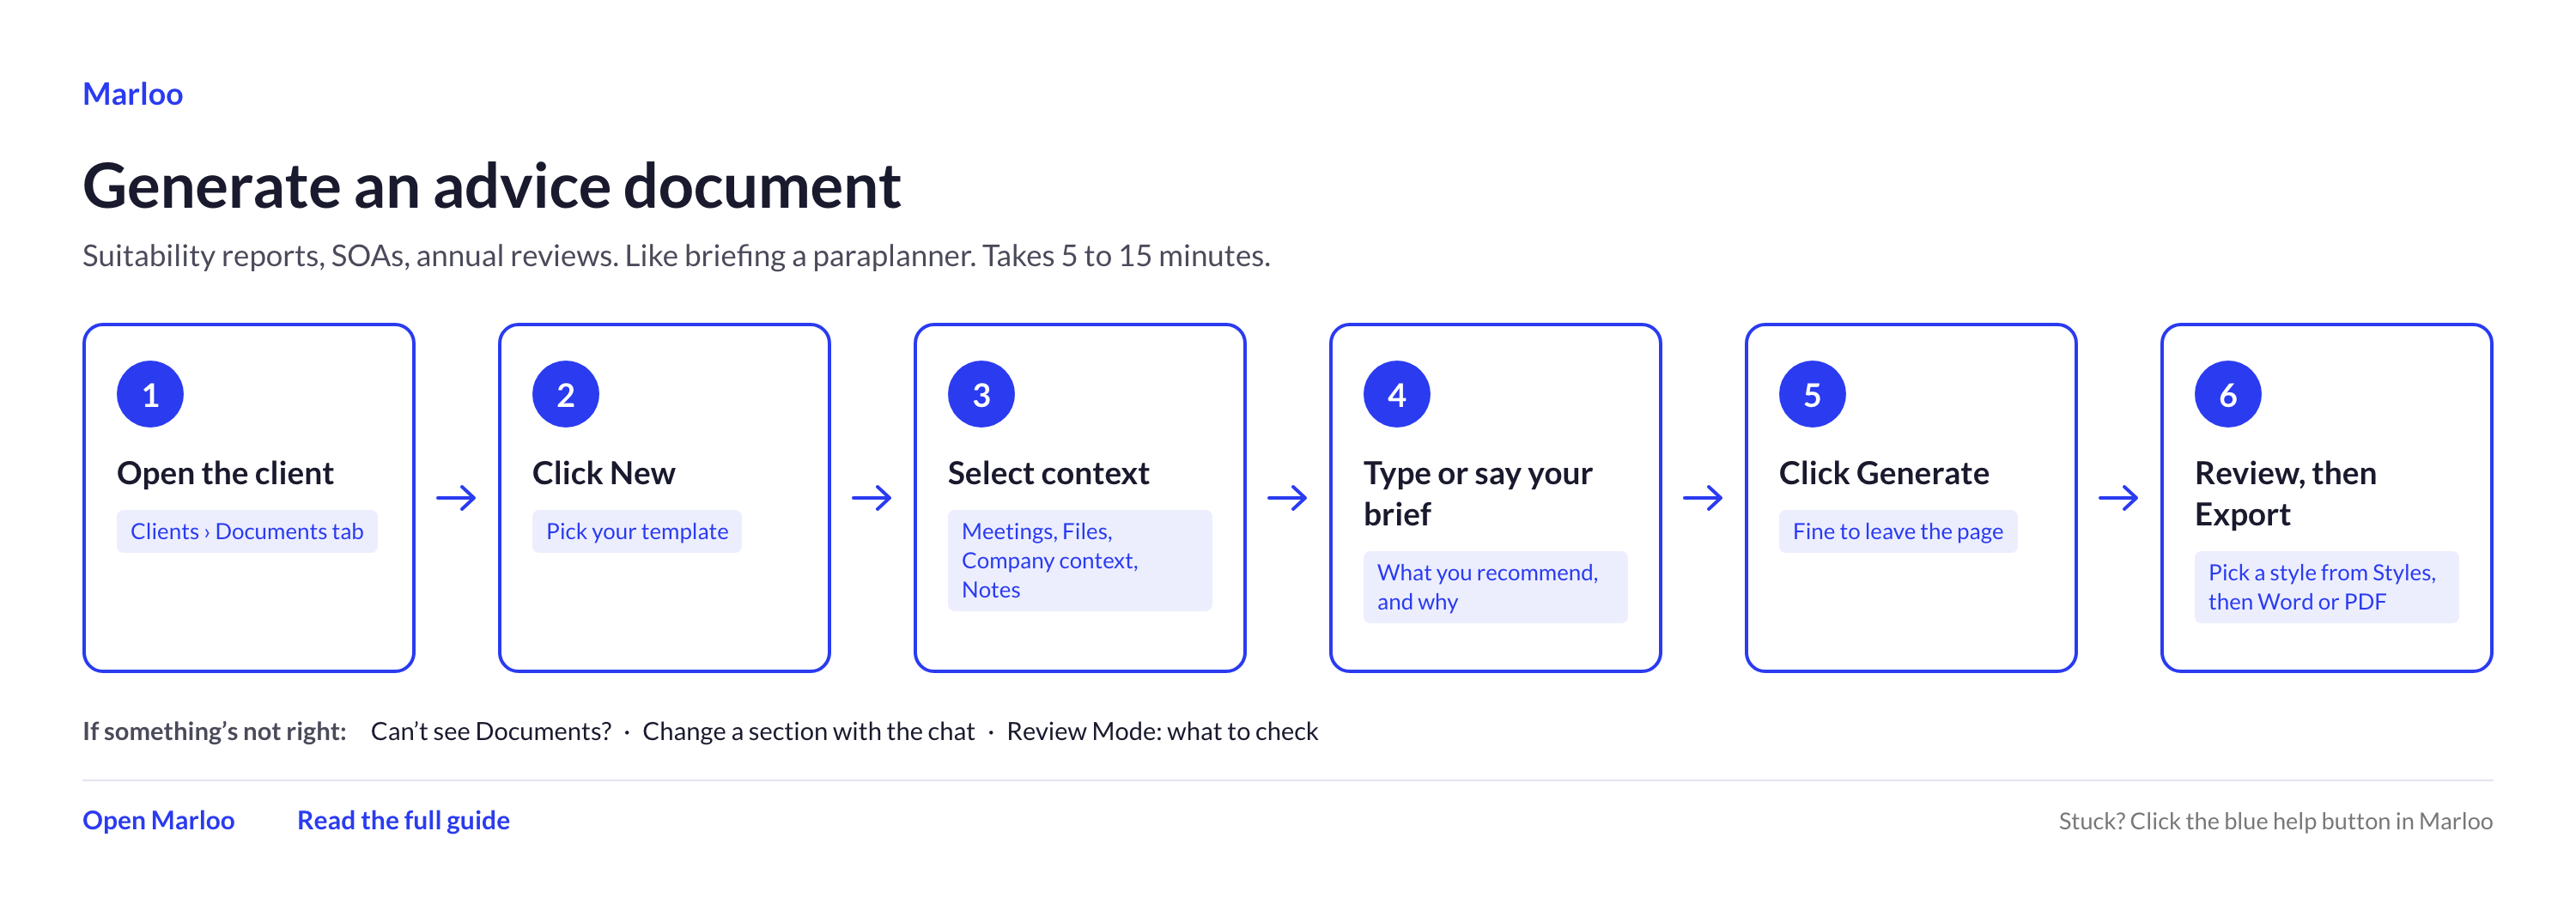
Financial plans, annual reviews and more. Like briefing a paraplanner. Takes 5 to 15 minutes.
- Open the client and go to the Documents tab.
- Click New and pick your template.
- Select context: meetings, files, company context, notes.
- Type or say your brief: what you recommend, and why.
- Click Generate. It's fine to leave the page.
- Review, then Export: pick a style from Styles, then Word or PDF.
If something's not right: can't see Documents? Change a section with the chat; check Review Mode for what to check.
Any time
Quick flowchart: ask Marloo anything in 5 steps
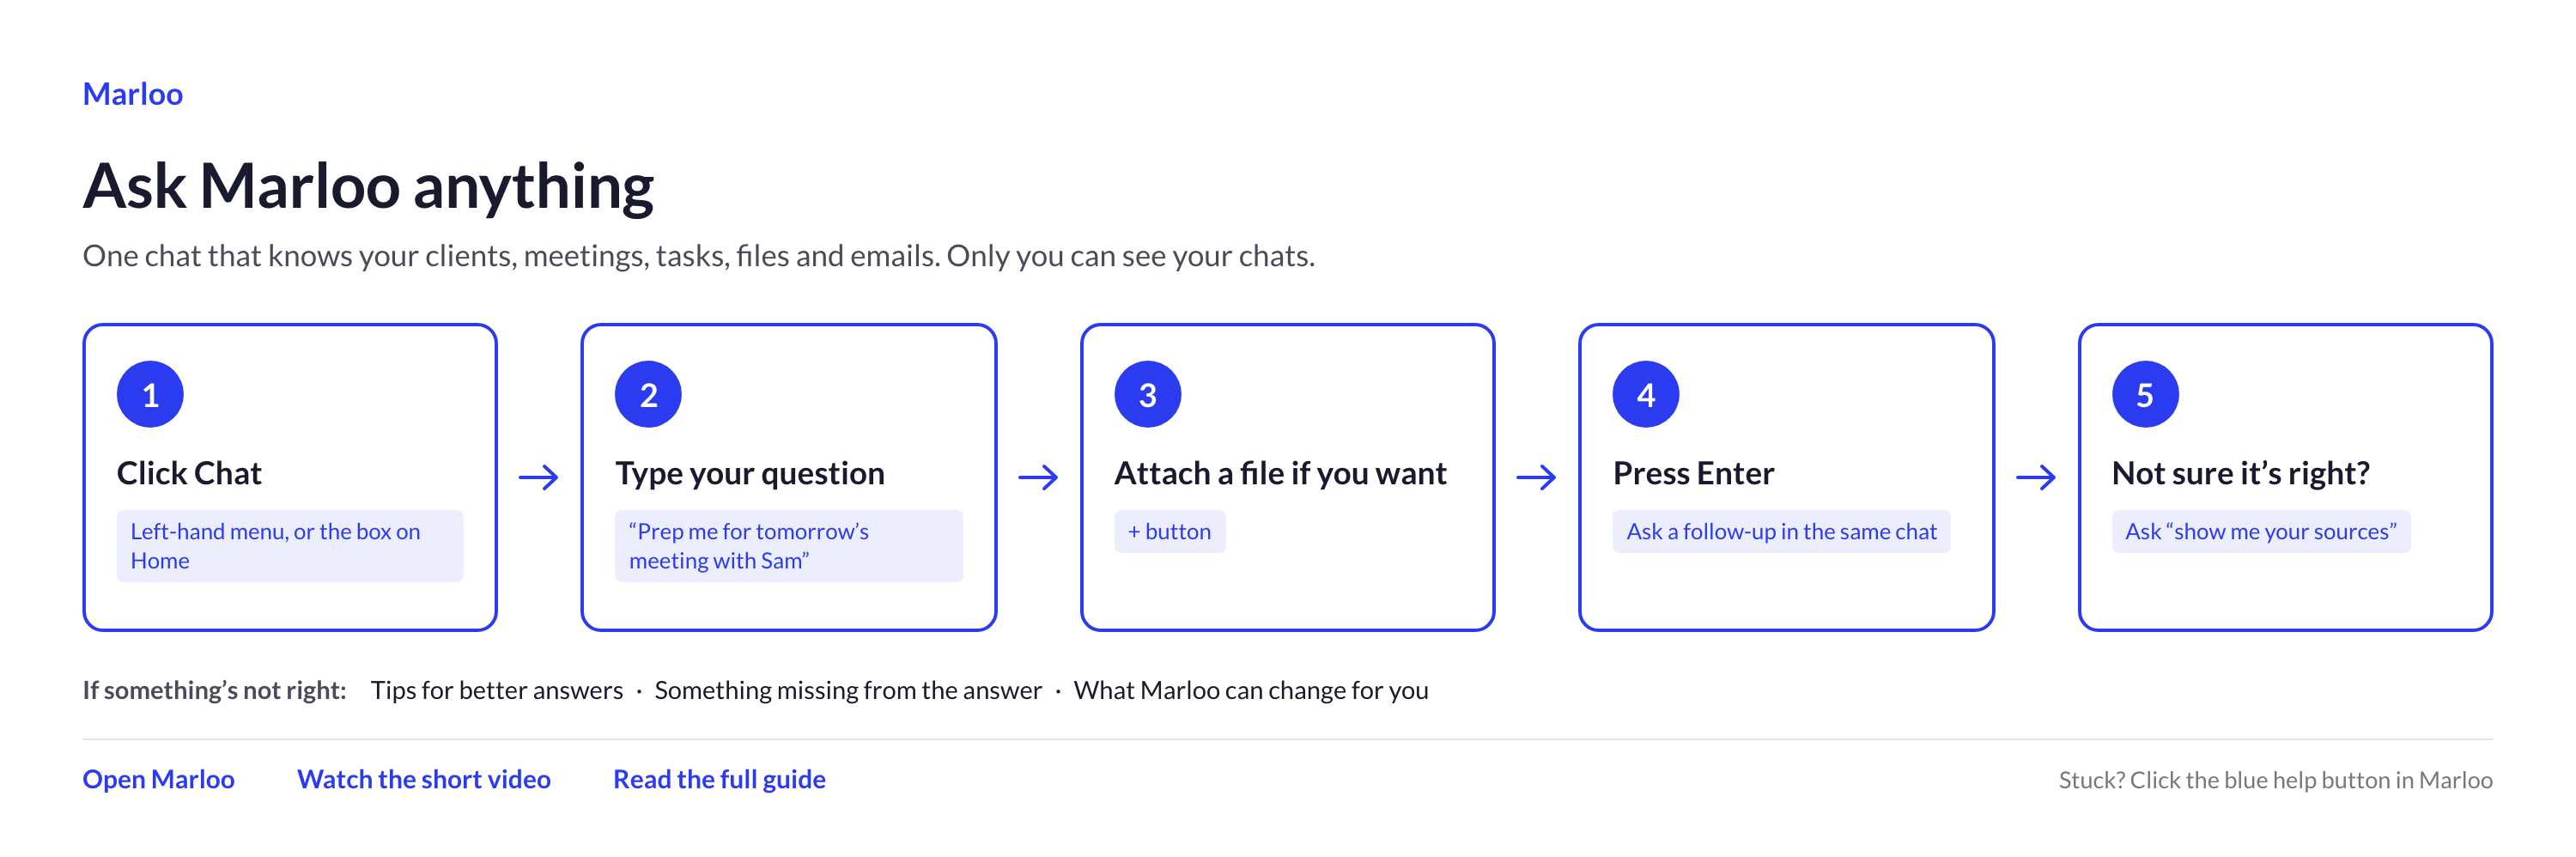
One chat that knows your clients, meetings, tasks, files and emails. Only you can see your chats.
- Click Chat in the left-hand menu, or use the box on Home.
- Type your question, for example "Prep me for tomorrow's meeting with Sam".
- Attach a file if you want with the + button.
- Press Enter. Ask a follow-up in the same chat.
- Not sure it's right? Ask "show me your sources".
If something's not right: tips for better answers; something missing from the answer; what Marloo can change for you.
Quick flowchart: run a Skill in 5 steps
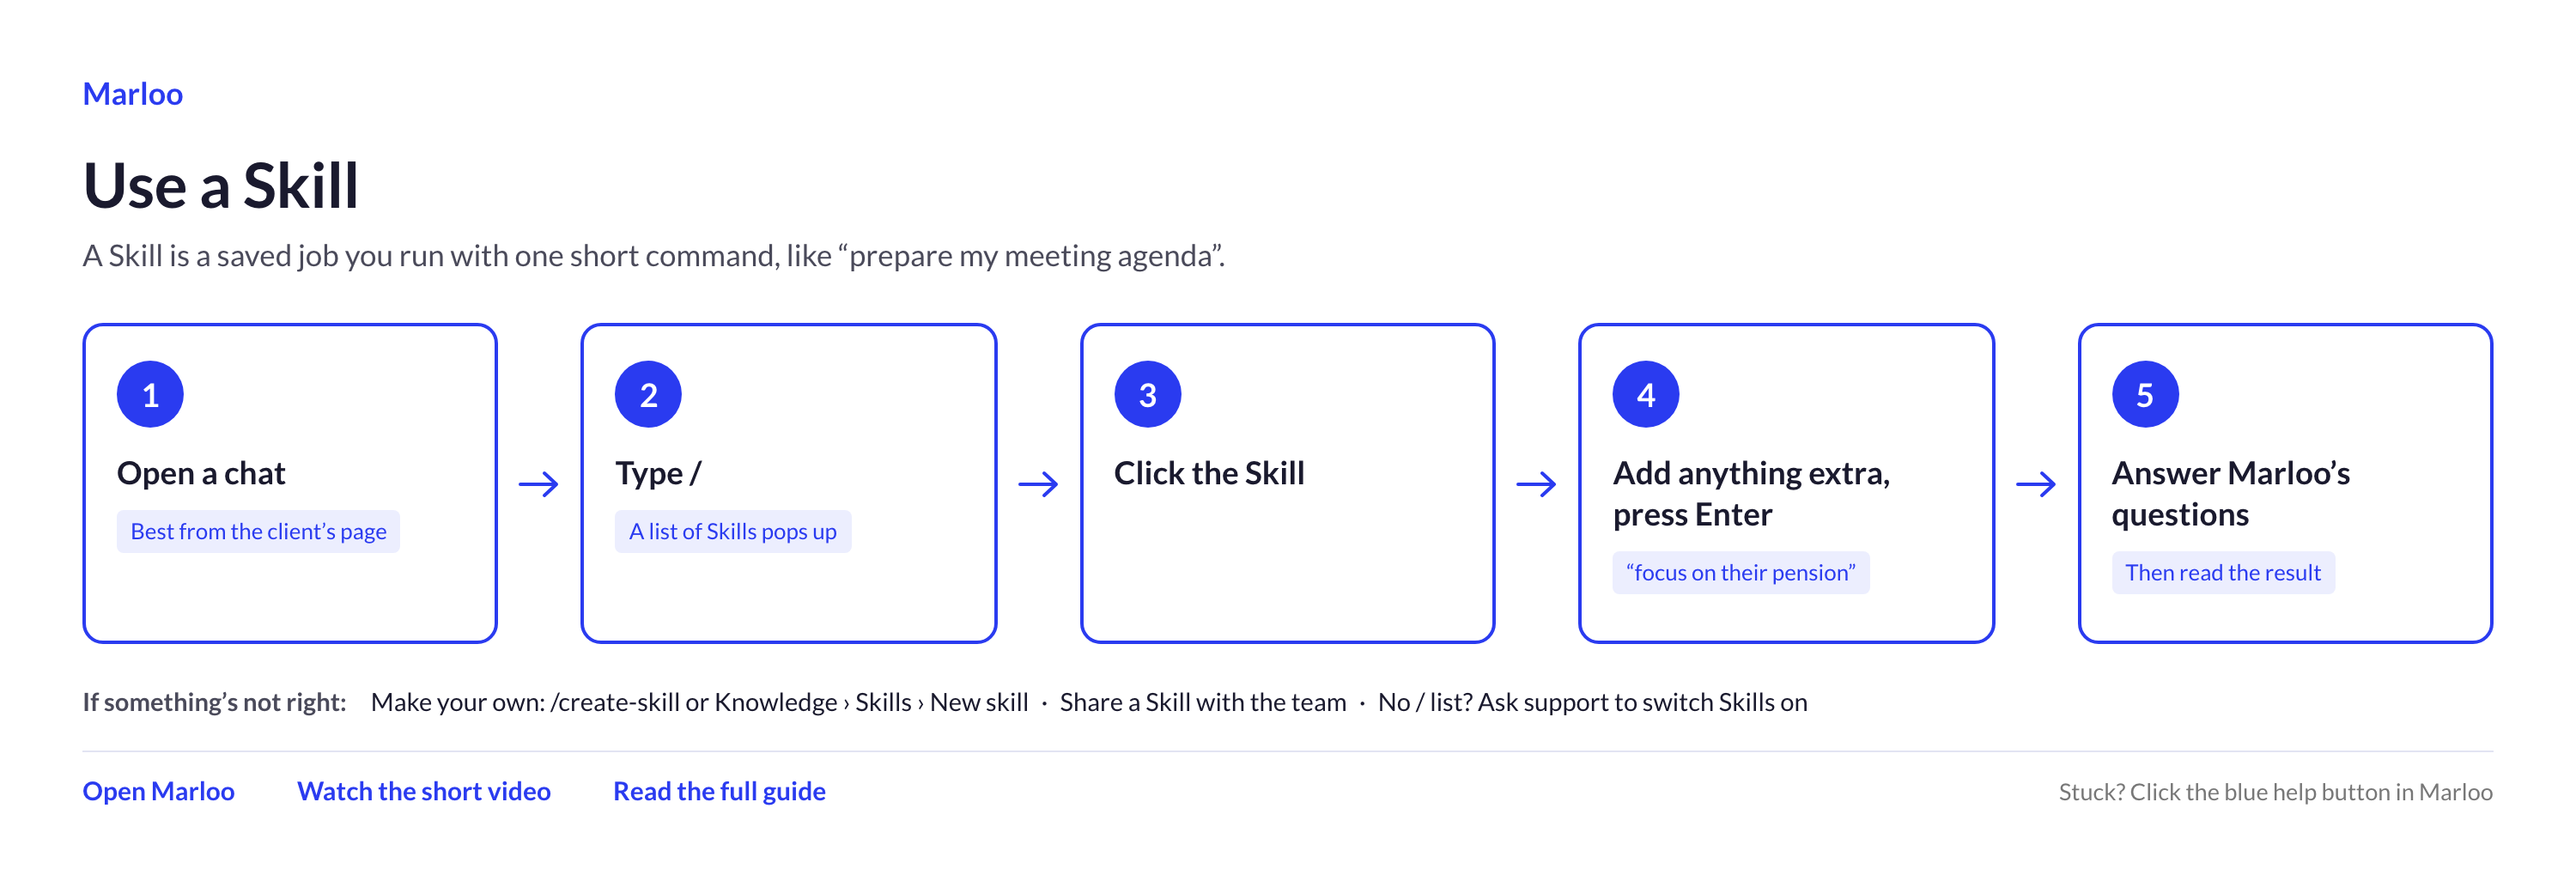
A Skill is a saved job you run with one short command, like "prepare my meeting agenda".
- Open a chat, best from the client's page.
- Type / and a list of Skills pops up.
- Click the Skill.
- Add anything extra and press Enter, for example "focus on their 401(k)".
- Answer Marloo's questions, then read the result.
If something's not right: make your own with /create-skill or Knowledge > Skills > New skill; share a Skill with the team.
Still stuck? Talk to a human.
Email the Marloo team with what you are seeing. If you are in the app, the blue chat button in the bottom-right corner is the fastest way to reach us.